How to turn on the search box on the lock screen on Windows 10
Starting with Windows 10 build 18932, a new experimental feature allows adding a search box on the lock screen so users can search the web using Bing directly on the lock screen. And this is how to turn it on.
Table of Contents
The lock screen is the screen you see when you lock your computer (or when it automatically locks after not using the computer for a while). The lock screen will also display at startup, when logged in and inactive for a minute. You need to skip the lock screen to see the login screen and login to Windows. Users can skip the lock screen by tapping the screen, typing on the keyboard or dragging it with the mouse.
Starting with Windows 10 build 18932, a new experimental feature allows adding a search box on the lock screen so users can search the web using Bing directly on the lock screen.
If this feature is enabled, the search box will only be on the lock screen when the user locks the computer ( Win + L ). The search box will not be available on the lock screen at startup.
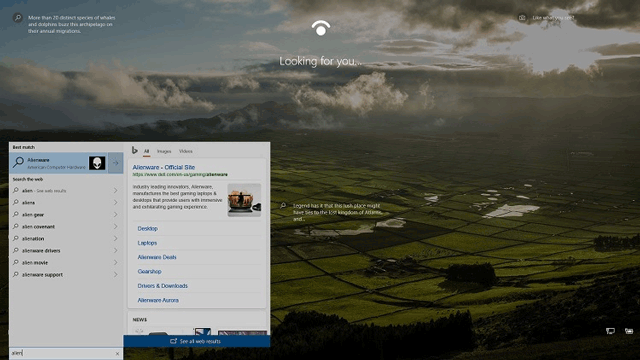
When the user types in the search box, it displays web search results from Bing. If the user clicks or touches the link in the search results, it will only open Microsoft Edge after logging in.
This article will show you how to enable or disable the lock screen search box to search the web with Bing for all Windows 10 users.
- How to download Windows 10 lock screen image from Spotlight to your device
- Create unique lock screen on Windows 10 Mobile by Win Screens
- How to disable background log blurring on Windows 10
Note: Although you need to log in as an administrator to enable or disable the search box on the lock screen, all users can use the search box if enabled.
Warning: You should create a restore point before enabling this feature in the event of a problem.
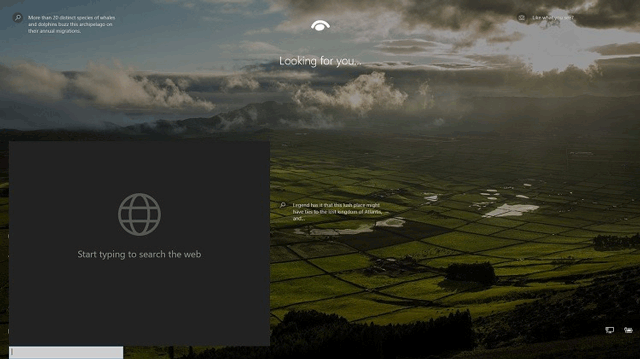
Here is the image of the search box on the lock screen.
How to enable or disable the search box on the lock screen
Step 1 . Close Task Manager if open.
Step 2 . Download the 32-bit (x86) or 64-bit (x64) version of Mach2 developed by Rafael Rivera for your system from the link below.
https://github.com/riverar/mach2/releases

Step 3. Save the file mach2_0.3.0.0_x86.zip or mach2_0.3.0.0_x64.zip to the desktop.
Step 4. Unblock the downloaded Zip file.
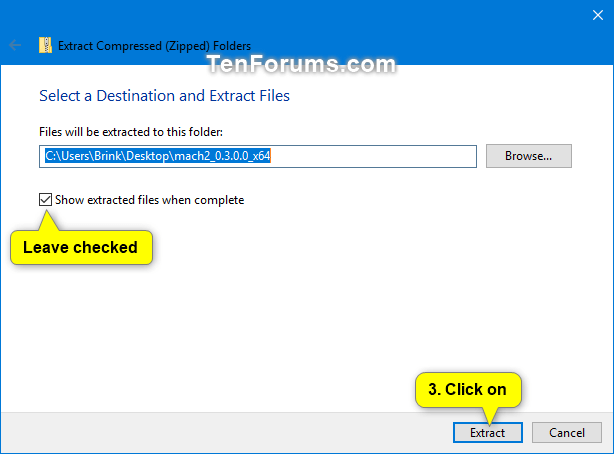
Step 5 . Right-click the file mach2_0.3.0.0_x86.zip or mach2_0.3.0.0_x64.zip , select Extract all .
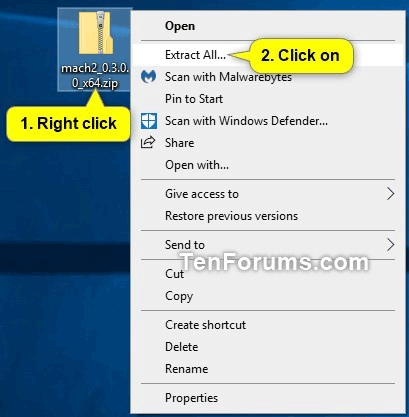
On the dialog box that appears, select Extract .
Step 6 . In the extracted mach2_0.3.0.0_x86 or mach2_0.3.0.0_x64 folder, click on the Home tab, select the mach2.exe file and click Copy path in the Ribbon.

Step 7.
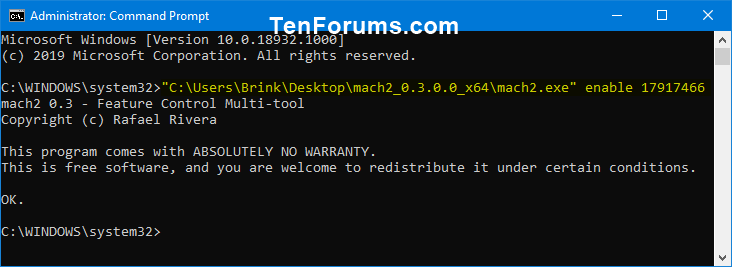
To turn on the search box on the lock screen, open Command Prompt as admin. Press Ctrl + V to paste the full path of the mach2.exe file from Step 6 to the Command Prompt. Then, add a space after the full path, type enable 17917466 and press Enter .
For example:
"C:UsersBrinkDesktopmach2_0.3.0.0_x64mach2.exe" enable 17917466
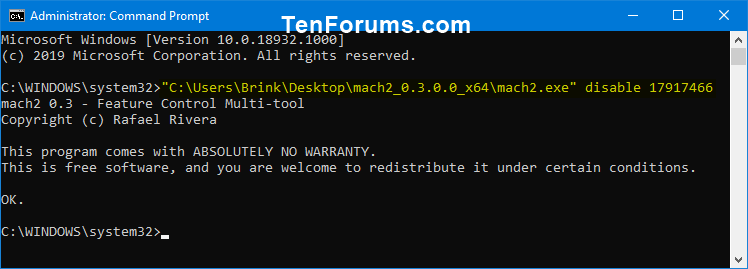
To turn off the search box on the lock screen, paste the full path of the mach2.exe file from Step 6 into Command Promt, then add a space after the path and type disable 17917466 and press Enter .
For example:
"C:UsersBrinkDesktopmach2_0.3.0.0_x64mach2.exe" disable 17917466
Step 8. Close Command Prompt.
Step 9 . Restart the computer to apply changes.
Step 10. If you wish, you can now delete mach2_0.3.0.0_x86.zip or mach2_0.3.0.0_x64.zip file and folder mach2_0.3.0.0_x86 or mach2_0.3.0.0_x64.
I wish you all success!
Was this article helpful?
Your feedback helps us improve.
Related Articles
 Instructions to turn off ads on the Screen Lock screen Windows 103 minutes read
 How to turn off the lock screen on Windows 10 Creators Update3 minutes read
 How to turn off the Lockscreen lock screen on Windows 103 minutes read
 Microsoft is testing a feature that allows you to search for information on the lock screen of Windows 102 minutes read
 How to disable Lock Screen lock screen on Windows 8, 104 minutes read
 How to turn off screen lock sounds for iPhone and iPad3 minutes read
Reader Comments 0
Sign in with email or Google to join the discussion.