How to Customize the Windows 10 Start Menu
Windows 10 offers the most customizable Start menu in the entire history of the Windows operating system. From changing the color to choosing side folders and configuring tiles, there's so much that can be done to make it look less...
Table of Contents
Method 1 of 3:
Adjusting the Size
- Make the Start menu taller. Move your pointer to the upper edge of the Start menu that borders the background. Drag it up to make it taller, and performing the opposite (dragging down) will shorten it.
- Widen the Start menu. Move your mouse to the outer side edge of the Start menu. Drag out to widen, and drag in to shrink.
-
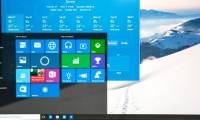
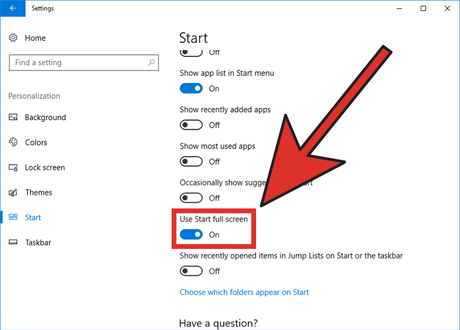 Enable the full screen Start menu. Similar to Windows 8's Start screen, Windows 10 provides the option to enable a modified full screen Start menu. To configure it, follow these steps:
- Go to Start > Settings
 > Personalization > Start and toggle on
 "Use Start full screen".
- Tablet mode enables this by default.
- Go to Start
Method 2 of 3:
Configuring App Tiles
- Pin tiles to the Start menu. Find an app from the "All apps" list and right-click on it. Select Pin to Start to pin a tile to the Start menu.
- You can also do this from the search feature, right-clicking a result and selecting the same listing from the context menu.
- Unpin tiles. Right-click on a tile and select Unpin from Start. The tile will be removed from the Start menu.
- Resize the app tiles. To maintain a sleek and custom feel to your Start menu, you can adjust the tile size on the app tiles. Just right-click on a tile, hover over Resize, and select an option.
- Different tiles will have different options, but they are generally small, medium, wide, and large. For example, desktop apps will usually have only two options, small and medium.
- Disable live tiles. While live tiles can be very helpful in finding relevant information quickly (e.g. today's weather), you may not be a fan of them. Turning them off is super simple. Just right-click a tile, hover over More, and click Turn Live Tile off.
- The process is identical for turning them back on. Just right-click, hover over More, and select Turn Live Tile on.
Method 3 of 3:
Configuring Side Folder Icons
This method will show you how to choose which icon shortcuts appear on the left side of the Start menu, such as the File Explorer and Settings icon. Keep in mind that the user account picture and power icon cannot be removed.
- Open the Settings app. Click the Startbutton and click the settings gear
 .
.
- Go to the Personalization category.
- Click Start from the left pane.
- Click "Choose which folders appear on Start". This will be at the bottom of the Start settings page.
- Configure which icons appear. These will be a bunch of different options to choose from, including File Explorer, Settings, Documents, Downloads, Music, Pictures, Videos, HomeGroup, Network, and Personal folder.
- Toggle on a switch under an item name to make the icon appear on Start. Oppositely, toggling off
 an option will remove its icon from Start.
- Basically: On = show, Off = hide
- Toggle on
Was this article helpful?
Your feedback helps us improve.
Related Articles
 Instructions to customize your Start Menu bar on Windows 103 minutes read
 6 tips to customize the Start Menu on Windows 113 minutes read
 Personalize the Start Menu of Windows 105 minutes read
 How to Customize the Start Menu to Better Navigate Windows 115 minutes read
 What is Classic Shell? How to use Classic Shell to customize Menu on Windows 10, 8, 73 minutes read
 Tips to customize the transparency of the Start Menu in Windows 102 minutes read
Reader Comments 0
Sign in with email or Google to join the discussion.