
How to Install and Configure Simple Directmedia Layer (SDL)
Method 1 of 3:
Download
-
 Downloading SDL from the official website. Follow this link to get directly to the download page.
- FIRST WARNING : You want to download the "DEVEL" (development) version of SDL, so scroll down the page to find it.
- Download a version that is compatible with your IDE. For example, you should download "SDL-devel-1.2.14-VC6.zip" for MS visual C++ express 2010.
- If you have a doubt about what version to get, ask in the discussion page.
Method 2 of 3:
Installation
-
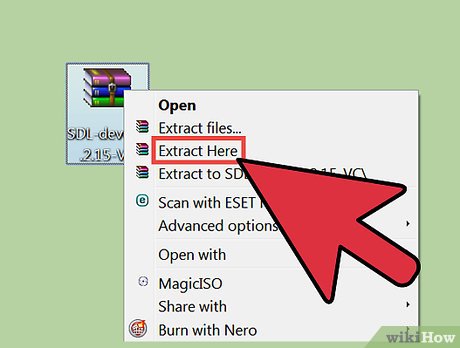 Unzip the .zip you just downloaded with "extract here."
 - You should now have a folder called "SDL-{version number}". For example, "SDL-1.2.14" (the latest release as of 3 Jan. 2012).
- SPECIAL STEP don't skip it or you won't be able to make it work.:
- Go in "SDL-{version}/include/SDL". Copy all the files.
- Go back one step (so "SDL-{version/include}". Paste files. It IS important.
- Go back to "My downloads" or wherever you downloaded SDL.
- Copy the whole "SDL-{version number}" folder you downloaded, somewhere on your computer, preferably next to the MINGW folder. Look at the picture below to see how it should look.
- You are now ready for the third and last step, configuration inside Code::Blocks.
Method 3 of 3:
Configuration in Code::Blocks
- Open Code::Blocks.
- Create a new project, scroll down and find "SDL project". Press "Go."
- Name your project as you wish and place it where you want, as long as you keep things tidy. Press "Next."
- Now is the critical step, Code::Blocks asks you where SDL devel libraries are. Let's tell it where it is.
- You should see something like "${#sdl}" written as location. It means it searches for SDL inside the MINGW compiler. But to keep things tidy, we just copied the "SDL-{version}" folder, next to mingw. (See picture above.)
- Click the three dots "...", it will bring up a path selection screen. Select the copied folder from step 4.
- In case you get the alternate screen, with "BASE", "include", "lib", etc..., just go to "BASE", select the path where you copied SDL, and click "Close", that's it! Nothing more is needed.
- Congratulations, you successfully installed SDL for Code::Blocks. You only have to configure and install once. So if you want to create another SDL project, you don't have to re-do all of this.
Update 05 March 2020
You should read it
- How to Download, Install, and Use Code::Blocks
- Operations with blocks in Excel
- Admire the robot model can transform itself as Transformer
- How to use StopAd blocking ads on Windows
- Select blocks of text and manipulate blocks in Word
- Group in Word, group of image blocks in Word
- Google Chrome will block unsafe downloads on HTTPS websites
- It is possible to turn iPhone lock into an international version with only one piece of code, and this is a way to identify to avoid being tricked when buying an old iPhone
- What is Low-Code? And how does it work?
- Chrome 71 automatically blocks any annoying ads
- How to set a Zalo PC security key
- The interesting mystery behind how to put code names and numbers of famous Linux distributions, you know?