Group in Word, group of image blocks in Word

To facilitate the movement and positioning of images in large image blocks, you should use the Group feature. The following article shows in detail how to Group in words and image blocks in Word 2007 2010 2013 2016.

Step 1: Open the file containing the image you need to group into a group:

Group in Word, group of image blocks in Word Picture 1

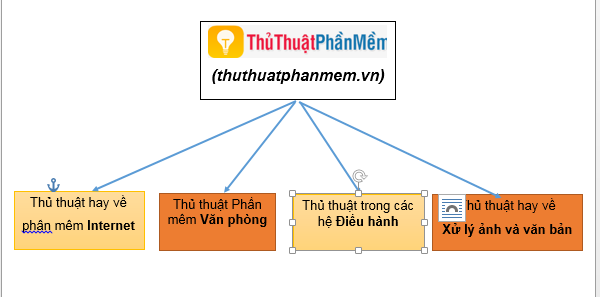
Step 2: Perform the rearrangement of the images as desired -> Hold down Ctrl and click the image objects you want to Group. Note when holding down the Ctrl key to select the cursor object to move the plus sign.

Group in Word, group of image blocks in Word Picture 2

Step 3: After you have selected the objects to be grouped -> right click (go to the objects container) select Group -> Group .

Group in Word, group of image blocks in Word Picture 3

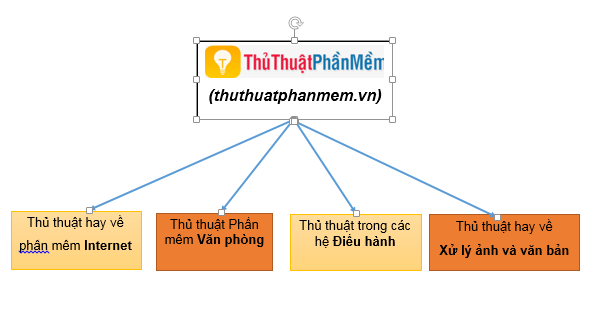
After selecting the Group, you can move the whole image block easily and especially when transferring to another computer, the images in the group are not moved. When you click on the block of images displayed:

Group in Word, group of image blocks in Word Picture 4

In case you want to edit the objects in the group -> right click on the image block -> Group -> Ungroup and proceed to edit each object as desired:

Group in Word, group of image blocks in Word Picture 5

Above is how grouped image blocks in Word hope to help you.

Good luck!

4 ★ | 1 Vote

May be interested

  • How to create a mirror image on both sides in WordHow to create a mirror image on both sides in Word
    in word, there is an option to flip and mirror the image in word for you to change the image with the available options.
  • 10 advanced techniques using MS Word10 advanced techniques using MS Word
    simple word options to the most advanced options of microsoft word 2010 help you compose and present documents faster.
  • Operations with blocks in ExcelOperations with blocks in Excel
    the following article shows you how to manipulate blocks in excel. frequently used operations in spreadsheets when working with blocks: 1. select blocks of contiguous cells. place the mouse cursor in the first cell position of the block - hold the left mouse button dragging
  • How to fix the error does not print images in WordHow to fix the error does not print images in Word
    failure to print images, or not displaying images on word will make it difficult for users to print documents.
  • How to group images in Google DocsHow to group images in Google Docs
    in a document that contains both text and images, it can sometimes be a challenge to ensure a good, logical layout. to make this task a little easier, you can use the image grouping/merge options in google docs.
  • How to group shapes in WordHow to group shapes in Word
    when working with shapes or textboxes on word, we can group shapes into one group for easy work.
  • Complete Word 2016 tutorial (Part 20): Align, align, and group objectsComplete Word 2016 tutorial (Part 20): Align, align, and group objects
    when using word, sometimes you need to use multiple objects such as images, shapes, text box, graphics. you can organize these objects by aligning, grouping, organizing and rotating them in different ways. this will make your document look more creative, beautiful and special. please follow the article below for details!
  • How to reduce image size in Word 2007, 2010, 2013, 2016How to reduce image size in Word 2007, 2010, 2013, 2016
    sometimes the image in the text is too big for the entire content, and you need to reduce the size of the image to match the layout of the full text. size is relatively simple and easy.
  • NOISE & PIXELATE filter groupNOISE & PIXELATE filter group
    the noise filter group is used to prepare the printed image and create a special effect. they belong to the most valuable and most common filter group in photoshop's own set of filters. these filters can add and remove noise from the defined (noise) image
  • Save images in Word files into separate filesSave images in Word files into separate files
    usually we open that word file and select each image one by one, copy and paste the image into an image editing application and then save the image as a separate file.