How to diagnose computer errors through beeps - Computer error reporting through beeps
Beep Code Viewer is a software that helps diagnose computer errors through beep sounds, from which users can determine what error the computer is having..
Every time you turn on the computer, a beep will appear, then the operating system will start. Usually the beep will only appear once and start, so that the user knows the current status of the computer. If so, when the computer appears unusual beeps, such as long beeps or beeps appear many times, the user needs to check the hardware again.
Each motherboard manufacturer will use a different type of BIOS chip, from which each BIOS chip will have a different way of emitting sound. If you have difficulty detecting beep errors on your computer, you can use Beep Code Viewer software to diagnose errors through beeps. This software will synthesize all the beep types of current BIOS chip manufacturers and fully explain to you how to fix the error.
Beep code and POST of computer
POST (power-on self-test) checks the computer's internal hardware for compatibility and connectivity before starting the rest of the boot process. If the computer passes the POST, it may beep once (some computers may beep twice) and then continue booting. However, if the computer fails the POST, it will not beep or generate a beep code to let the user know what the problem is.
If your computer has an unusual POST process or beep code not mentioned below, follow the POST troubleshooting steps to determine the faulty hardware component.
AMI BIOS Beep Code
Below are the possible AMI BIOS beep codes. However, since this BIOS has many different manufacturers, the beep codes may vary slightly.
| Beep Code | Describe |
|---|---|
| 1 short hour | DRAM refresh error. |
| 2 short hours |
Parity error. |
| 3 short hours | 64K RAM base error. |
| 4 short hours | System timer error. |
| 5 short hours | Process error. |
| 6 short hours | Keyboard driver Gate A20 error. |
| 7 short hours | Virtual mode exception error. |
| 8 short hours | Displays failed memory read/write test. |
| 9 short hours | ROM BIOS check error. |
| 10 short hours | CMOS shutdown read/write error. |
| 11 short hours | Cache error. |
| 1 long sound, 3 short sounds | Normal/Extended Memory Error. |
| 1 long sound, 8 short sounds | Show/retrieve failed test. |
| Signal with 2 different tones | CPU fan speed low, voltage problem. |
Beep code AWARD BIOS
Below are the possible BIOS AWARD beep codes. However, since this BIOS has many different manufacturers, the Beep codes may vary slightly.
| Beep Code | Describe |
|---|---|
| 1 long sound, 2 short sounds | Indicates that a video error has occurred and the BIOS is unable to initialize the video display to display any additional information. |
| 1 long sound, 3 short sounds | No video card detected (reseat video card) or video card is faulty. |
| The beeping sound keeps repeating over and over again. | RAM problem. |
| Repeated high pitched beep while PC is running. | CPU is overheating. |
| Repeat beeps alternating between loud and quiet | Problem with the processor (CPU). It may be damaged. |
If any other fixable hardware problems are found, the BIOS will display a message.
Beep code Dell
| Beep Code | Describe |
|---|---|
| 1 beep | BIOS ROM is damaged or defective. |
| 2 beeps | RAM not recognized |
| 3 beeps | Motherboard error |
| 4 beeps | RAM error |
| 5 beeps | CMOS battery error. |
| 6 beeps | Video card error. |
| 7 beeps | Poor processor (CPU) |
Beep code IBM BIOS
Below are the possible IBM BIOS beep codes. However, since this BIOS has many different manufacturers, the Beep codes may vary slightly.
| Beep Code | Describe |
|---|---|
| No beep | No power, loose power cord or insufficient power. |
| 1 short beep | POST normal, computer ok. |
| 2 short beeps | POST error, review screen for error code. |
| Continuous beeping | No power, loose power cord or insufficient power. |
| Repeated short beeps | No power, loose power cord or insufficient power. |
| 1 long beep and 1 short beep | There is a problem with the motherboard. |
| 1 long beep and 2 short beeps | Video related problem (Mono/CGA display circuit problem). |
| 1 long beep and 3 short beeps | Video display circuit (EGA). |
| 3 long beeps | Keyboard or keyboard card error. |
| 1 beep, display does not display or displays incorrectly | Video display circuit. |
Macintosh startup sound
| Minus | Error |
|---|---|
| Error tone (2 different tones) | Problem with logic board or SCSI bus. |
| Boot chime, drive spins, no video | Problem with video controller. |
| Power on, no beep | Logic board problem. |
| High, 4 higher tones | Problem with SIMM. |
Phoenix BIOS code
Below are the beep codes for Phoenix BIOS Q3.07 or 4.x.
| Beep Code | Description or part to be checked |
|---|---|
| 1-1-1-1 | Beep code not confirmed. Reseat the RAM chip or replace the RAM chip if possible. |
| 1-1-1-3 | Verify real mode. |
| 1-1-2-1 | Get CPU type. |
| 1-1-2-3 | Initialize system hardware. |
| 1-1-3-1 | Initialize chipset registers with initial POST values. |
| 1-1-3-2 | Set POST flag in place. |
| 1-1-3-3 | Initialize CPU registers. |
| 1-1-4-1 | Initialize cache to initial POST value. |
| 1-1-4-3 | Initialize I/O values. |
| 1-2-1-1 | Initialize power management process. |
| 1-2-1-2 | Load the replacement register with the original POST value. |
| 1-2-1-3 | Go to UserPatch0. |
| 1-2-2-1 | Initialize keyboard driver. |
| 1-2-2-3 | Check BIOS ROM. |
| 1-2-3-1 | Initialize the 8254 timer. |
| 1-2-3-3 | Initialize the 8237 DMA controller. |
| 1-2-4-1 | Programmable interrupt driver reset. |
| 1-3-1-1 | Check DRAM refresh capability. |
| 1-3-1-3 | Check the 8742 keyboard driver. |
| 1-3-2-1 | Set ES segment to register 4GB. |
| 1-3-3-1 | DRAM Automation. |
| 1-3-3-3 | Clear 512K RAM. |
| 1-3-4-1 | Check 512 base address lines. |
| 1-3-4-3 | Check 512K basic memory. |
| 1-4-1-3 | Check CPU bus clock frequency. |
| 1-4-2-4 | Re-initialize the chipset. |
| 1-4-3-1 | Protect system BIOS ROM. |
| 1-4-3-2 | Re-initialize cache. |
| 1-4-3-3 | Cache automation. |
| 1-4-4-1 | Advanced chipset register configuration. |
| 1-4-4-2 | Load the replacement registers with CMOS values. |
| 2-1-1-1 | Set initial CPU speed. |
| 2-1-1-3 | Initialize the interrupt vector. |
| 2-1-2-1 | Initiate BIOS interrupt processes. |
| 2-1-2-3 | Check ROM copyright notice. |
| 2-1-2-4 | Initialize the manager for PCI option ROMs. |
| 2-1-3-1 | Check video configuration with CMOS. |
| 2-1-3-2 | Khởi tạo bus PCI và các thiết bị. |
| 2-1-3-3 | Khởi tạo tất cả các bộ điều hợp (adapter) video trong hệ thống. |
| 2-1-4-1 | Bảo vệ video BIOS ROM. |
| 2-1-4-3 | Hiển thị thông báo bản quyền. |
| 2-2-1-1 | Hiển thị loại và tốc độ CPU. |
| 2-2-1-3 | Kiểm tra bàn phím. |
| 2-2-2-1 | Thiết lập thao tác bấm phím nếu đã được kích hoạt. |
| 2-2-2-3 | Kích hoạt bàn phím. |
| 2-2-3-1 | Kiểm tra các gián đoạn bất ngờ. |
| 2-2-3-3 | Hiển thị lời nhắc Press F2 to enter SETUP. |
| 2-2-4-1 | Kiểm tra RAM từ 512 đến 640 k. |
| 2-3-1-1 | Kiểm tra bộ nhớ mở rộng. |
| 2-3-1-3 | Kiểm tra các dòng địa chỉ bộ nhớ mở rộng. |
| 2-3-2-1 | Chuyển đến UserPatch1. |
| 2-3-2-3 | Định cấu hình các register bộ nhớ cache nâng cao. |
| 2-3-3-1 | Kích hoạt bộ nhớ cache bên ngoài và CPU. |
| 2-3-3-3 | Hiển thị kích thước bộ nhớ cache ngoài. |
| 2-3-4-1 | Hiển thị thông báo bảo vệ. |
| 2-3-4-3 | Hiển thị các phân đoạn không dùng một lần. |
| 2-4-1-1 | Hiển thị thông báo lỗi. |
| 2-4-1-3 | Kiểm tra lỗi cấu hình. |
| 2-4-2-1 | Kiểm tra đồng hồ thời gian thực. |
| 2-4-2-3 | Kiểm tra lỗi bàn phím. |
| 2-4-4-1 | Thiết lập vectơ ngắt phần cứng. |
| 2-4-4-3 | Kiểm tra bộ vi xử lý còn lại (nếu có). |
| 3-1-1-1 | Tắt cổng I/O trên bo mạch. |
| 3-1-1-3 | Phát hiện và cài đặt các cổng RS232 ngoài. |
| 3-1-2-1 | Phát hiện và cài đặt các cổng song song bên ngoài. |
| 3-1-2-3 | Khởi tạo lại các cổng I/O tích hợp. |
| 3-1-3-1 | Khởi tạo vùng dữ liệu BIOS. |
| 3-1-3-3 | Khởi tạo vùng dữ liệu BIOS mở rộng. |
| 3-1-4-1 | Khởi tạo bộ điều khiển đĩa mềm. |
| 3-2-1-1 | Khởi tạo bộ điều khiển đĩa cứng. |
| 3-2-1-2 | Khởi tạo bộ điều khiển đĩa cứng bus cục bộ. |
| 3-2-1-3 | Chuyển đến UserPatch2. |
| 3-2-2-1 | Vô hiệu hóa dòng địa chỉ A20. |
| 3-2-2-3 | Xóa register phân đoạn ES lớn. |
| 3-2-3-1 | Tìm kiếm các ROM tùy chọn. |
| 3-2-3-3 | Bảo vệ các ROM tùy chọn. |
| 3-2-4-1 | Thiết lập tính năng quản lý năng lượng. |
| 3-2-4-3 | Thiết lập tính năng ngắt phần cứng. |
| 3-3-1-1 | Đặt thời gian trong ngày. |
| 3-3-1-3 | Kiểm tra khóa phím. |
| 3-3-3-1 | Xóa dấu nhắc F2. |
| 3-3-3-3 | Quét F2 key stroke. |
| 3-3-4-1 | Vào thiết lập CMOS. |
| 3-3-4-3 | Xóa POST flag. |
| 3-4-1-1 | Kiểm tra lỗi. |
| 3-4-1-3 | Quá trình POST đã xong, chuẩn bị khởi động hệ điều hành. |
| 3-4-2-1 | Một tiếng bíp. |
| 3-4-2-3 | Kiểm tra mật khẩu (tùy chọn). |
| 3-4-3-1 | Xóa bảng mô tả toàn cục. |
| 3-4-4-1 | Xóa trình kiểm tra chẵn lẻ. |
| 3-4-4-3 | Xóa màn hình (tùy chọn). |
| 3-4-4-4 | Kiểm tra lời nhắc về virus và sao lưu. |
| 4-1-1-1 | Thử boot với INT 19. |
| 4-2-1-1 | Lỗi gián đoạn trình xử lý. |
| 4-2-1-3 | Lỗi gián đoạn chưa xác định. |
| 4-2-2-1 | Lỗi gián đoạn đang chờ xử lý. |
| 4-2-2-3 | Khởi tạo lỗi ROM tùy chọn. |
| 4-2-3-1 | Lỗi tắt máy. |
| 4-2-3-3 | Di chuyển khối mở rộng. |
| 4-2-4-1 | Lỗi tắt máy 10. |
| 4-3-1-3 | Khởi tạo chipset. |
| 4-3-1-4 | Khởi tạo bộ đếm refresh. |
| 4-3-2-1 | Kiểm tra flash bắt buộc. |
| 4-3-2-2 | Kiểm tra trạng thái HW của ROM. |
| 4-3-2-3 | BIOS ROM ổn. |
| 4-3-2-4 | Thực hiện kiểm tra RAM hoàn chỉnh. |
| 4-3-3-1 | Khởi tạo OEM. |
| 4-3-3-2 | Khởi tạo bộ điều khiển ngắt. |
| 4-3-3-3 | Đọc trong mã khởi động. |
| 4-3-3-4 | Khởi tạo tất cả vectơ. |
| 4-3-4-1 | Boot chương trình flash. |
| 4-3-4-2 | Khởi tạo thiết bị boot. |
| 4-3-4-3 | Boot code được đọc là OK. |
| Tiếng báo hiệu với 2 tông khác nhau | Tốc độ quạt CPU thấp, có vấn đề với mức điện áp. |
Cách dùng Beep Code Viewer đoán lỗi PC qua tiếng bíp
Bước 1:
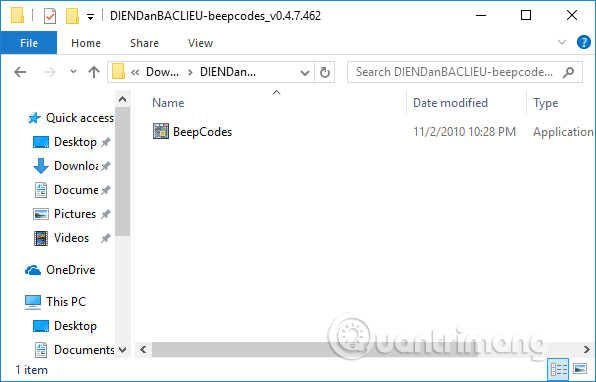
Trước hết bạn truy cập vào link dưới đây để tải phần mềm về máy tính, rồi tiến hành giải nén tập tin zip bằng công cụ trên máy tính.
- fshare.vn/file/GHDFUPXGAP/
Bước 2:
Trong thư mục giải nén, bạn chỉ cần click vào file Beep Code Viewer để chạy phần mềm mà không cần cài đặt nhiều bước.
Bước 3:
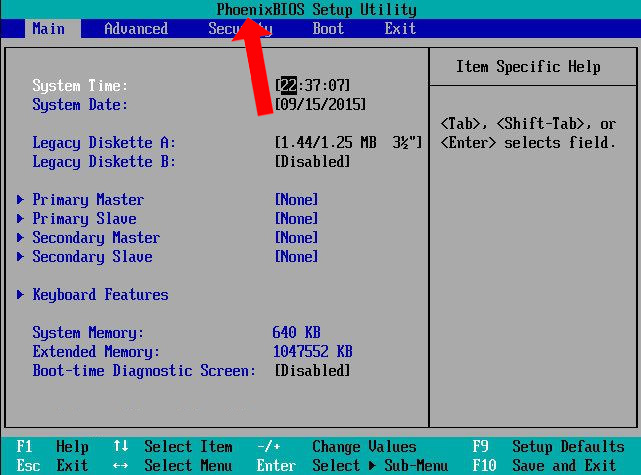
Xuất hiện giao diện của phần mềm, rất đơn giản để người dùng theo dõi. Để kiểm tra lỗi trước hết bạn cần biết hãng BIOS mà Mainborad của máy tính đang dùng. Nhấn vào mục BIOS Information trong giao diện.

Hoặc người dùng có thể sử dụng các phím truy cập BIOS trong bài viết Hướng dẫn vào BIOS trên các dòng máy tính khác nhau.
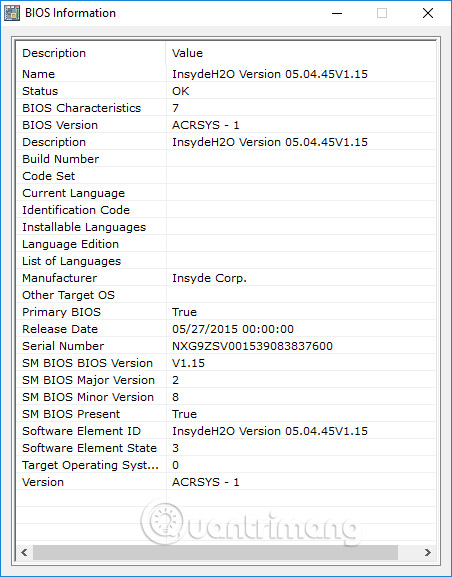
Xuất hiện toàn bộ thông tin của BIOS.
Sau khi đã xác định được hãng BIOS rồi xác định được kiểu tiếng bíp xuất hiện trên máy, bạn chỉ cần nhấn vào kiểu tiếng bíp và ngay bên dưới sẽ có tên lỗi cũng như cách sửa lỗi.
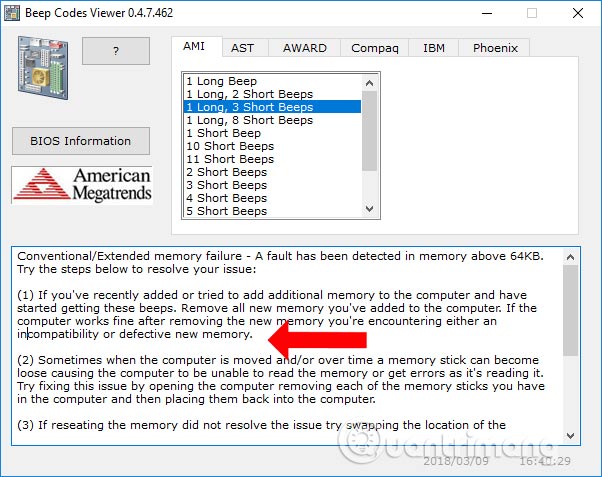
Với công cụ Beep Code Viewer, chúng ta có thể xác định được nguyên nhân cũng như lỗi của những tiếng bíp bất thường trên máy. Từ đó người dùng có thể dựa vào mức độ nặng nhẹ lỗi của máy để có hướng giải quyết vấn đề.
Chúc các bạn thực hiện thành công!