Summary of common errors on Bluestacks and how to fix each error
Bluestacks is one of the most complete Android application emulation software on Windows. With Bluestacks, you don't need to install a new operating system on your computer. Instead, Bluestacks runs the Android application on a regular Windows window. So you can run Android apps like running other Windows applications.
If you are a Bluestacks user, you will see that when using Bluestacks, there are often some errors such as graphics card error, Server connection error, BlueStacks error does not work on Windows 10 .
So how to fix these errors, please refer to the following article of Network Administrator.
1. Fix BlueStacks error does not work on Windows 10
Step 1: Ensure correct system requirements
Before performing the error correction process, make sure you have fully prepared the system requirements. Your computer must be equipped:
- Minimum RAM of 2 GB.
- Hard disk partition is not lower than 4 Giga bytes.
- Graphics card has been updated (update).
- Run the system under Admin.
Step 2: Update the graphics card
Graphics cards play an important role in the process of running emulator software (BlueStack). Therefore you should update the graphics card on the system.
Right-click the NVIDIA icon located in the system tray, then select the Check for updates option on the Menu.

Wait for the graphics card update process to finish, restart the system.
Step 3: Start in Compatibility mode
If BlueStack on Windows 10 still doesn't work, you can try to apply a solution that runs in Compatibility mode.
Right-click the BlueStack application shortcut, select Properties .

On the Properties window, switch to the Compatibility tab , then click Run compatibility troubleshooter .

Select Next Try recommended settings.
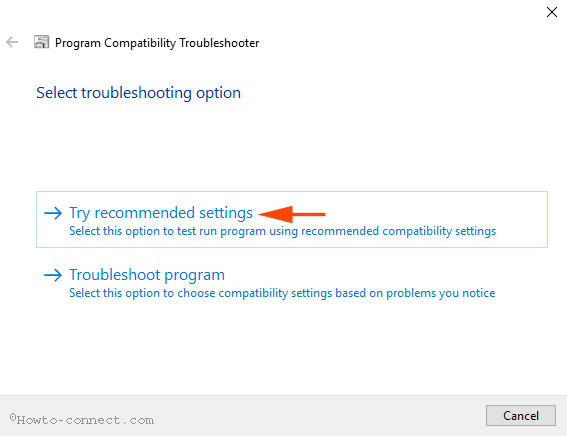
Then click Test the program . and check if BlueStack is working.
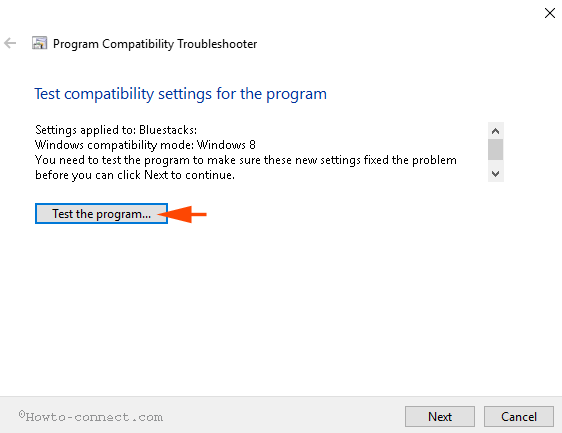
If the error persists, then click Next and select Try Using different settings to run the emulator.
Step 4: Make sure you have set permissions to run BlueStacks
In some cases if "missing" security settings will prevent BlueStack from running on Windows 10. You need to check if the settings are correct.
Right-click the BlueStack emulator software shortcut, select Properties.
On the Properties window, switch to the Security tab and click Edit.

Select your username (user name) within the Group or user names box and then select Full contro l in the Allow column. Finally click Apply and then click OK.

Close the dialog window and reopen the application to check for errors.
Step 5: Uninstall and reinstall BlueStacks
If you have applied the above steps, but BlueStack still does not work on Windows 10, then you can uninstall the application and then proceed to reinstall to fix the error.
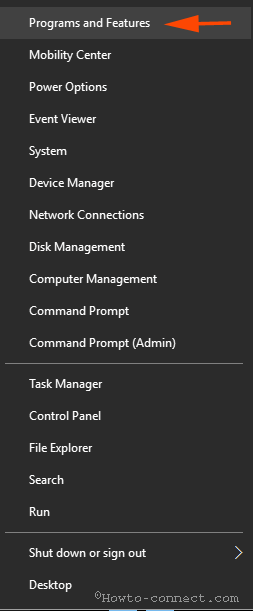
To uninstall the application, press the Widows + X key combination to open the Power User Menu, here click Programs and Features.
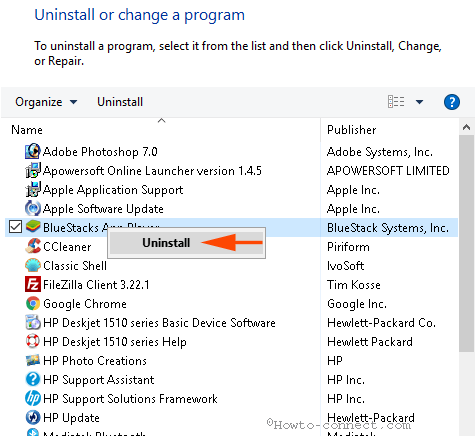
The BlueStacks App Player window will now appear, where you right-click BlueStacks App Player then select Uninstall.
The Uninstaller dialog box is displayed on the screen and a message asking if you want to uninstall BlueStacks App Player ( Are you sure you want to uninstall BlueStacks App Player ), select Yes.
Next on the screen displays another dialog box with a message asking if you want to keep all application data ( Do you want to keep all your apps and data? ), You choose No.
Now BlueStack has been removed from your computer.
To completely remove BlueStack on Windows 10, you need to do a few more things below:
1. Navigate to the C => Program Data drive and delete the BlueStack Setup.
2. Do the same, access C: Program Files (x86) BlueStacks , C: Program FilesBlueStacks , C: ProgramDataBlueStacks and delete BlueStacks Setup items if available.
3. Enter BST in the Search box on File Explorer and press Enter.
4. Open the Run dialog box and enter % temp% then press Enter, select all the items on the window that appear on the screen and delete it.
5. Run CCleaner to clean the BlueStacks Registry.
If your computer does not have CCleaner installed, you can Program Data and delete BlueStack Setup. 2. Do the same, access C: Program Files (x86) BlueStacks, C: Program FilesBlueStacks, C: ProgramDataBlueStacks and delete BlueStacks Setup items if available. 3. Enter BST in the Search box on File Explorer and press Enter. 4. Open the Run dialog box and enter% temp% then press Enter, select all the items on the window that appear on the screen and delete it. 5. Run CCleaner to clean the BlueStacks Registry. Finally visit the BlueStack homepage to download the latest application version. "Href =" https://download.com.vn/ccleaner/download "rel =" nofollow "target =" _ blank "> download CCleaner to your computer and Install here.
Finally visit the BlueStack homepage to download the latest application version.
2. System upgrade error message (System Upgraded)
In the process of using the BlueStacks emulator software, quite a lot of users reflect that on the screen an error message appears: "It seems your system has been upgraded. Please click OK to configure and run BlueStacks App Player" .

To fix this error, follow the steps below:
1. Navigate to the folder "C: Program Files (x86) BlueStacks" and find "HD-QuitMultiInstance.exe" .
Note:
This applies if your operating system is installed on the C drive.
2. Next, double-click the "HD-QuitMultiInstance.exe" file to run the file.
3. Open BlueStacks App Player again and check if the error is still there.
If the error still occurs, download this exe file to your computer and install it.
3. Graphic Card Error (Graphics Card)
Bluestacks does not recognize your Graphics Card. In this case it is very likely that you must update the Graphics Driver. Your task is to update and reinstall the Graphics Driver.
Reason:
Since the Bluestacks app for Android on computers requires the quality of graphics card to be good and the capacity of hard drive (Physical Memory). There are two types of graphics cards
- Microsoft's exclusive Direct3D: used to run applications on Windows windows.
- OpenGL: used to run Android programs.
How to fix:
Clean up uninstalled applications and programs using software like Revo Uninstaller .
- Download Revo Uninstaller to your computer here.
Protect your system when charging and set up Power options with high performance to make sure your graphics card works.
Update the graphics card by right-clicking Computer and selecting Manage => Device management => Display Adapter => double-clicking on the GPU version (Graphics card) => Drivers Update Drivers .
Refer to how to update, upgrade drivers for graphics cards, VGA for your computer, laptop
4. Error Downloading Runtime Data

Bluestack Stuck often fails Downloading Runtime Data . For this error you do not need to do anything with the hardware system.
Reason:
Because the server Bluestacks has problems.
How to fix:
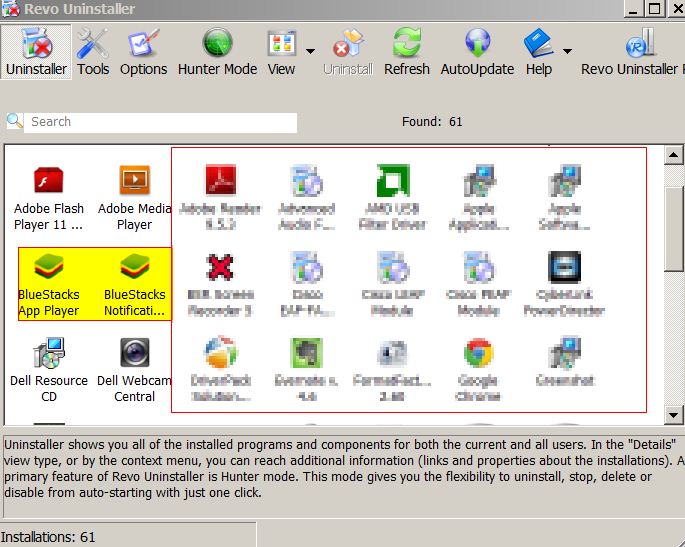
Uninstall the current version and download a newer version of the installation.
You can download Revo Uninstaller to your computer to uninstall Bluestack.
- Download Revo Uninstaller to your computer here
Visit Bluestacks.com to download the latest Bluestack version to your device.
5. Error connecting to the Server (server)
When downloading and installing certain applications on the Store you have a connection error.
Reason:
Because the Bluestacks Beta version does not work properly or may be partly due to a network connection error.
How to fix:
You can reconnect to the Internet and proceed to download the Store application to install. This is only a temporary issue so you can easily fix it.
6. Cannot access hard drive from Bluestacks
On some newer versions of Bluestacks you cannot directly access the hard drive to open files from the application.
How to fix:
You can drag and drop files you want to send to Bluestacks.
If the above method fails or fails, you can install the file management application like Astro File Manager and browse the files through it.
Download Astro File Manager to your computer here.
7. Capacity of hard drive (Physical Memory) of at least 2GB
Many users believe that the free space on their device hard drive is 100 GB. However this is a misconception.
Hard disk space may be RAM. So if the old computers have low RAM capacity, Bluestacks will not work.
How to fix:
Upgrade or buy new RAM.
With Bluestacks versions at first only use 1GB RAM. But now Bluestacks has been upgraded, so you must use at least 2 GB of RAM to install Bluestacks.
In case if you cannot upgrade RAM, you can search for older Bluestacsk versions (using 1 GB RAM) online to download and install.
8. Error Error Retrieving Information From Server from RPC server
If in the process you install any application or access an application on the Store that receives RPC error, Error retrieving information or Error rpc s-7 aec-7 . You can follow the instructions below to fix automatic errors.
Step 1:

Click on the Bluestack icon in System Tray / Notification Area (system tray), then select the Report Problem option.
Step 2:
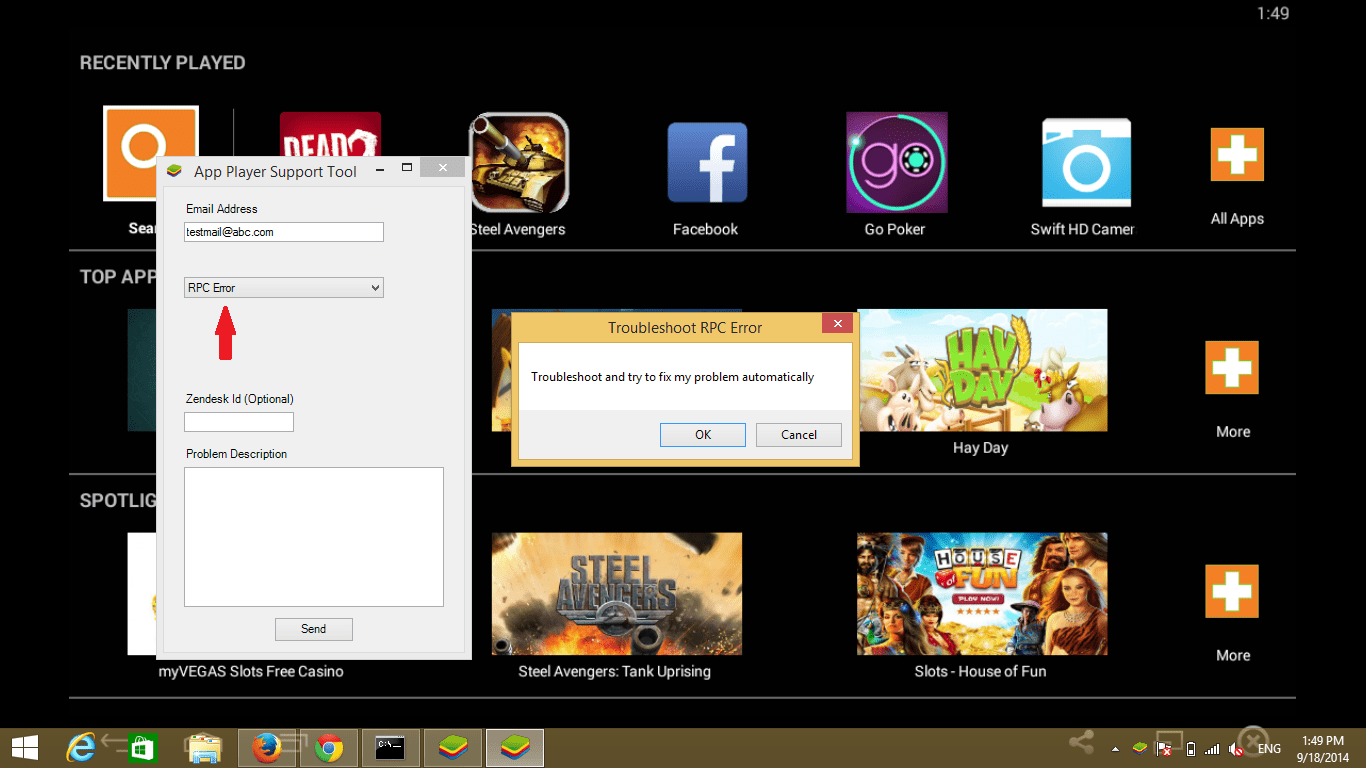
A drop-down menu appears on the screen. In this drop-down menu you select the item RPC error or Error retrieving information.
Step 3:
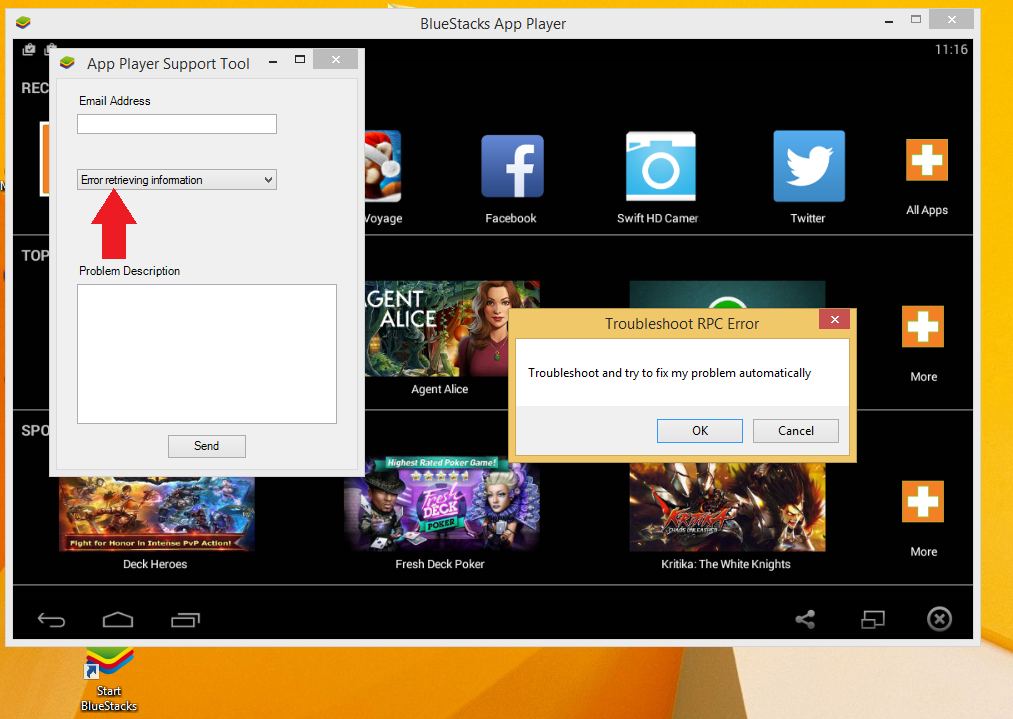
The Troubleshoot window will now appear, and click OK to continue.
Step 4:
When you access any application on the App Store that fails, the system will automatically fix the error for you.
If you are using an older version of Bluestack (previous versions version 0.9.3.4070), you must download and install the file.
9. Net error. Framework
When installing Bluestacks and you receive a Net error message. Framework as shown below. This error is also quite common when we install software.
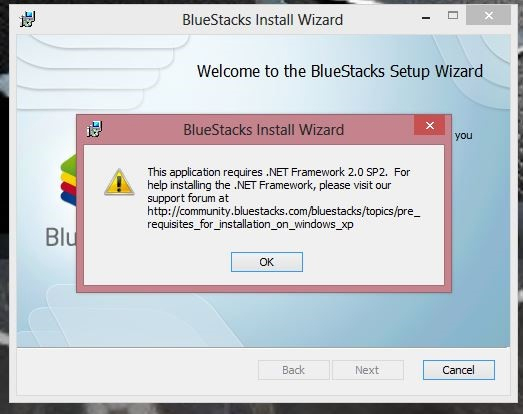
Reason:
It is possible that your version of Net.FramEwork is outdated or corrupted and needs to be upgraded to the latest version.
How to fix:
Very simply, you only need to download the latest Net.Framework version to your computer. Then reinstall Bluestacks.
- Download the latest Net.Framework
10. Black screen error when using Bluestacks
A black screen error occurred and made you only hear sounds like playing games, without any images at all.
Reason:
Related to graphics card in computer.
How to fix:
1. Edit Nvidia Control Panel 3D settings

Step 1:
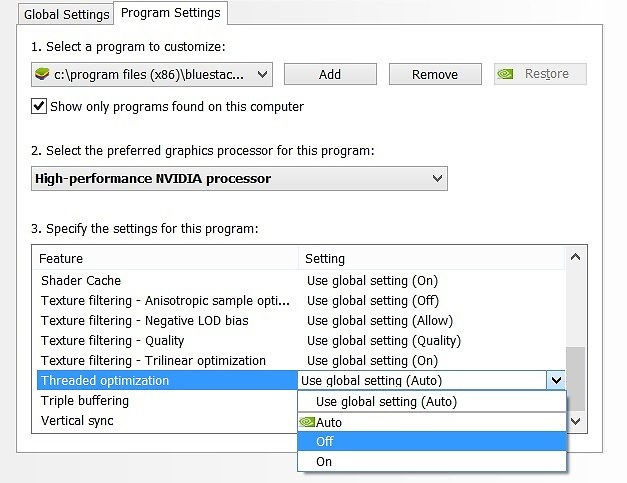
Follow the link below: Manage 3D Settings> Program Settings> Click Add> then add Bluestacks Frontend as shown below.

Step 2:
We will scroll down and select Threaded Optimization . Then select Off .
2. Update Graphic Driver

We can update Graphic drivers according to the link below. Note, you should use Internet Explorer for GPU dectection, which may require Java.
- http://www.intel.com/p/en_US/support/detect
- http://support.amd.com/en-us/download/auto-detect-tool
- http://www.geforce.com/drivers
- http://www.nvidia.com/Download/Scan.aspx
3. Adjust on the computer
1. Use Registry Editor
Step 1:
Press Win + R key combination to open the Run window. Then type the keyword regedit and click OK to access.
Step 2:
You find the directory with the following path:
HKEY_LOCAL_MACHINESOFTWAREBlueStacksGuestsAndroidConfig
Step 3:
Next, select New> DWORD Value .
Step 4:
Change the name to SkipGraphicsDriverCheck . Then, right-click on the newly created DWORD and choose Modify . Here, you will enter a value of 1 , click OK to save.
Finally, click Restart Bluestacks in the icon on the right corner of the screen.

2. Reinstall Bluestacks
Step 1:
First of all, we will install Offline Bluestacks under the link below:
- Download Bluestacks file offline
Then download the Orca program (Microsoft database table editor for editing Windows Installer package (.msi) files) for editing.
- Download Orca software
Step 2:
After installing Orca, we go to the Bluestacks Offline installation file and right-click and choose Edit with Orca .

Step 3:
Next, follow the path:
LaunchCondition> Installed OR PhysicalMemory> = 1024> Delete> OK
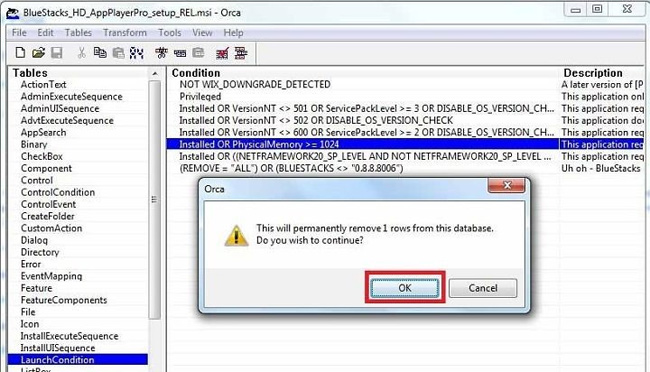
Ignore the RAM check when installing, for the 1GB RAM machine you want to install Bluestacks.
Step 4:
Next we click on the path:
InstallExecuteSequence> CheckMsiSignature> Delete> OK
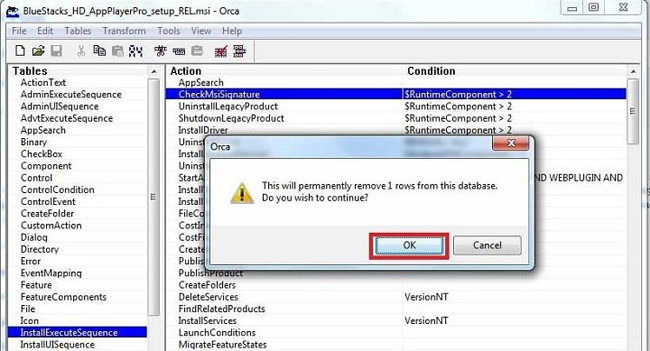
Then follow:
Property> Double-click GLMODE> Change TRUE to FALSE> Press Enter

Click the Save button to save the settings. Finally, reinstall Bluestacks with the file you just edited.

3. Install Bluestacks file Offline
Step 1:
Follow the link above to download the offline file to your computer. Select the appropriate file. Full version of Android 2.3.4 Gingerbread to Android 4.4 KitKat.
Note, you should choose 0.8.0 version
Step 2:
We proceed to reinstall Bluestacks with the error as shown below.
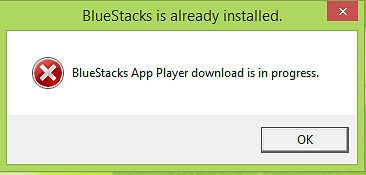
This error can be fixed by finding and deleting the following folders:
- C: ProgramDataBlueStacks
- C: Program Files (x86) BlueStacks or C: Program FilesBlueStacks
- C: Users . AppDataLocalBlueStacks, "." are usernames in your computer.Start> Run> Regedit . Find the key: HKEY_LOCAL_MACHINE> SOFTWARE . Find and delete BlueStacks folders.
11. Bluestacks app player error download is in progress

How to fix:
Step 1 :
We access the following links and find the Bluestacks folder to delete them:
- C: ProgramDataBlueStacks
- C: Program Files (x86) BlueStacks or C: Program FilesBlueStacks
- C: UsersTen_Cua_BanAppDataLocalBlueStacks
Step 2:
Press the Win + R key combination and type the keyword Regedit , press OK to access.
Step 3:
Follow the following link:
HKEY_LOCAL_MACHINE> SOFTWARE> Bluestacks, press Delete to delete
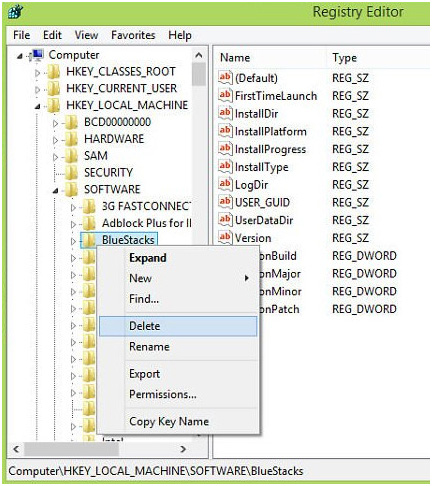
Finally restart the computer and reinstall Bluestacks.
12. Bluestacks Error Failed To Connect To Server
- The cause of the error:
The cause of the error may be due to:
- Internet connection problem.
- If the Internet connection has a low bandwidth, you should disable all processes running in the background by these processes that are responsible for consuming Internet data.
- It is better to install and use the latest Bluestack version.
- Solutions:
1. Disable the antivirus program temporarily
Sometimes antivirus programs can create a firewall, blocking Internet connection with Bluestacks and causing an error. Therefore, to fix the error, you should temporarily disable the antivirus program on your computer.
To do this thing:
- First disable the antivirus programs you are using.
- Next open BlueStacks.
- Sync your Google account with Bluestacks.
- Activate antivirus programs on your computer.
2. Allow full control for users
- Open up the C: // drive and access the Program Files folder (x86) (only for Windows 7 or higher).
- Here you search the directory named BlueStacks.
- Right-click the folder and select Properties .
- On the Properties window, click the Security tab.
- Here you will see the Edit button. Click Edit to change the permissions.
- Next select the system user (system user) and assign full control to all users.

Finally check if the error still occurs.
3. Edit DNS settings
In some cases, DNS conflicts also cause a Bluestacks Failed To Connect To Server error. So to fix the error you can edit DNS settings.
- Open the Network Connections window by entering ncpa.cpl in the Run command window.
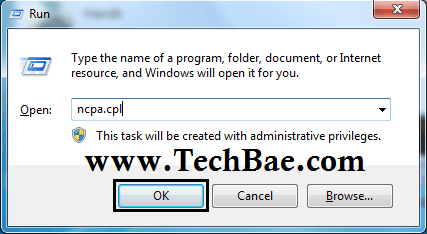
- Here you right-click on the network connection and select Properties.
- Next click on Internet Protocol Version 4 option (TCP / IPv4).
- Select the Use the following DNS server addresses option , then enter the Preferred DNS Server frame of 8.8.8.8 and enter the Alternate DNS Server frame of 8.8.4.4.
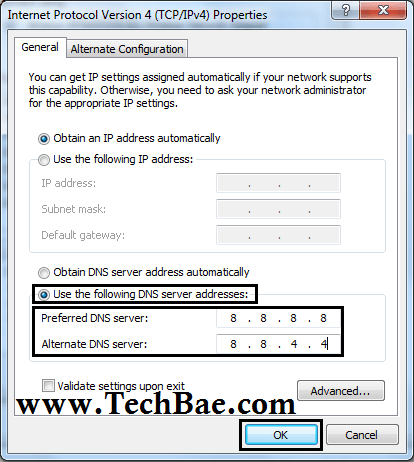
- Click OK to save the changes and close the Internet Protocol Version 4 window (TCP / IPv4) Properties.
Check if the error is still there.
4. Reinstall Bluestacks via File APK
If you have applied the above solutions, you still cannot fix the Bluestacks Failed To Connect To Server error, instead of installing the application from the Play Store you use the File APK to install the application. Download the APK file from the Internet, then use the APK file to install the application using the Bluestacks application.
Refer to some of the following articles:
-
Play Android games on Windows with BlueStacks
-
4 ways to run Android apps on your computer
-
BlueStacks adds 750,000 Android applications to the MAC
I wish you all success!