How to create tables in Office 2003
MS Word: Following the Office Informatics articles, QuanTriMang.com today will show you how to create and process data in tables..
MS Word: Following the Office Informatics articles, QuanTriMang.com today will show you how to create and process data in tables.
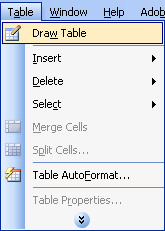
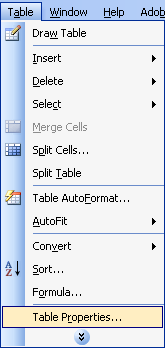
1. Introduce the Table menu (Table menu)
- Draw table: Draw a board
- Insert: Insert table
- Delete: Delete
- Select: Select (black out)
- Merge Cells: Enter the cell
- Split Cells: Split cells
- Split Table: Split tables
- AutoFormat table .: Table style format available
- AutoFit: Automatically stretches tables
- Repeat Heading: Set the first line in the table as the table title for the following pages.
- Convert: Convert
- Sort .: Sort
- Formula .: Calculation formula in the table
- Hide Gridlines: Hide / show table borders
- Table Properties: See table properties.

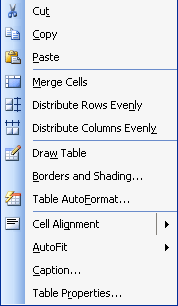
2. Introduce the menu when blackening and right-clicking on the table:
- Cut: Cut
- Copy: Copy
- Paste: Paste
- Merge Cells: Enter the cell
- Distribute Rows Evenly: Distribute evenly in line
- Distribute Columns Evenly: Distribute equally by column
- Draw Table: Draw a table
- Border and Shading .: Create borders and table colors
- AutoFormat table .: Table style format available
- Cell Alignment: Aligns text in the table
- AutoFit: Auto-stretch
- Caption .: Set the table title
- Table Properties: See table properties.
3. Create a table
Method 1:
Select the icon
 Standart bar and drag the mouse to select the column number and line number:
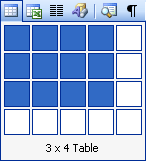
On the drawing is a table consisting of 3 lines x 4 columns.
u After clicking and releasing the mouse, you will get a new table. However, in the same way, you can only create up to 4 lines x 5 columns
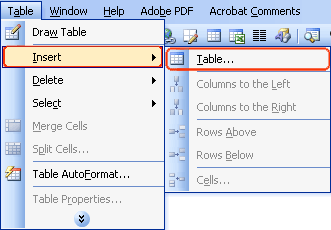
Method 2:
Go to Table> Insert> Table .
The Insert Table dialog box appears:
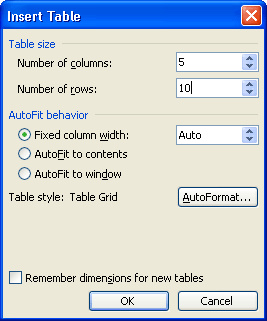
- Table size: Table size:
- Number of Columns: Enter the column number
- Number of rows: Enter the line number
- AutoFit behavior: Auto-scaling
- Fixed column width: Set fixed column size
- AutoFit to contents: Automatically shrink content
- AutoFit to window: Automatically shrinks according to the window screen.
- AutoFormat: Select the type of table format available.
- Remember dimensions for new tables: Remember the sizes for new tables.
Select the OK button.
4. Add columns & lines
Method 1: Use a pen
Go to Table> Draw Table (Or click on the icon
 on Standard bar)
Move the brush to the table and drag the line in the table directly into the position where you want to insert the column (line).
Method 2:
Place the cursor in the table. Go to Table> Insert
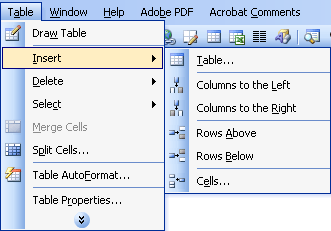
- Columns to the left: Add the left column
- Columns to the right: Add the right column
- Rows Above: Add the above line
- Rows Below: Add the bottom line
- Cells .> Insert entire column: Insert columns for the whole table
- Cells .> Insert entire row: Insert lines for the whole table.
5. Delete cells, rows, columns, tables
Go to Table> Delete
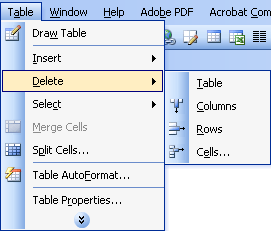
- Tabe: Delete the table
- Columns: Delete column
- Rows: Delete line
- Cells .: Delete the cell of choice
- Shift cells left: Delete the cell to the left
- Shift cells up: Delete the box below
- Delete entire row: Delete the entire row
- Delete entire column: Delete the entire column.
6. Select (black out) in the table
You can use a combination of Shift and arrow keys, Page Up, Page Down, Home, End to highlight in the table. It can also be used in a way:
1. Go to Table> Select
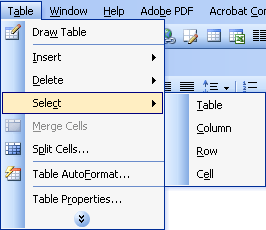
- Table: Black out the table (Or use the shortcut key Alt + number 5 with Num Lock lamp off)
- Column: Column
- Row: Line
- Cell: Oh
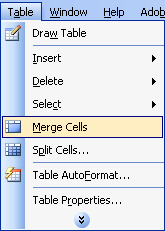
7. Enter the cell
Black out the cells you want to enter horizontally or vertically.
Go to Table> Merge Cells
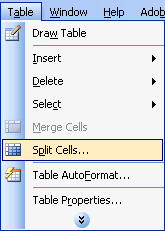
8. Split the cell
Go to Table> Split Cells .
The Split Cells dialog box appears
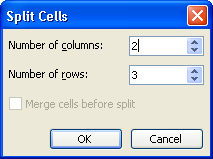
- Number of columns: Enter the number of columns to divide
- Number of rows: Enter the number of lines to divide
- Merge cells before split: Enter the cells before dividing.
Select the OK button to agree to divide the cell.
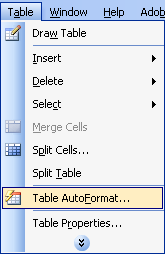
9. Table style format available
Go to Table> Table AutoFormat .
The Table AutoFormat dialog box appears
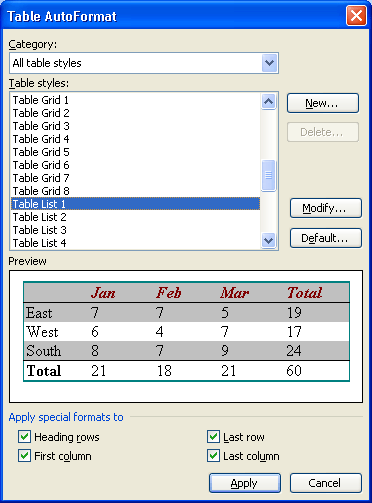
- Category: Select is All table styles
- Table styles: Select the available table formats of MS Word
- Apply special formats to: Apply special format to:
- Heading rows: Headline of the table
- First column: The first column of the table
- Last row: The last row of the table
- Last column: The last column of the table
New button . : Create your own new table format.
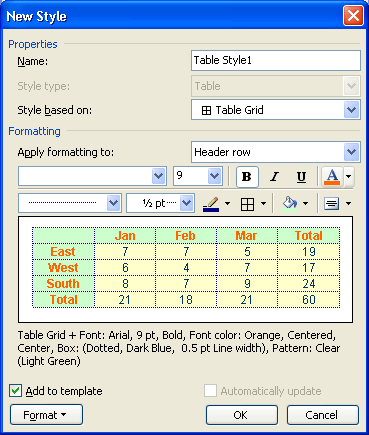
- Name: Format type name
- Style base on: Basic format type
- Apply formatting to: Apply the following formats for:
- Whole table: Full table
- Header row: Headline row
- Last row: The last line
- Left column: Left column
- Right column: Right column
- Odd row stripes: Borders for odd lines
- Even row stripes: Borders for even lines
- Odd column stripes: Borders for individual columns
- Even column stripes: Borders for even columns
- R Add to template: Add a new template
- Select the OK button to complete adding a new format.
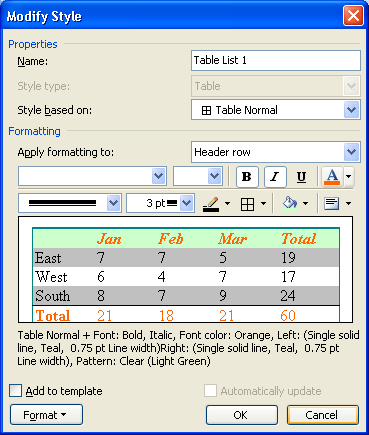
Modify button . Modify the selected style. The features use the same new addition to the table format
Delete button: Delete the table format type
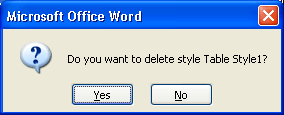
The screen appears: Do you want to delete the Table Style1 format? Let you make sure you want to delete.
Default . button: Set the default format for the following tables:
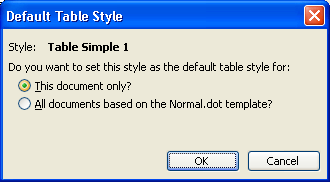
- This document only: Only applicable to the current file
- All documents based on the Normal.dot template? For all other files with Normal.dot format
Select Apply> Close button.
10. Set automatic table scaling mode
Go to Table> AutoFit

- AutoFit to Contents: Automatically shrinks by content.
- AutoFit to Window: Automatically scale according to the Window screen.
- Fixed Column Width: Fixed the width of the column. In this case, you just use the mouse to drag the vertical line along your alignment.
- Distribute Rows Evenly: Divide the height of the equal lines.
- Distribute Columns Evenly: Divide the width of the columns equally.
11. Convert data from tables into text (Remove tables but still keep enough content in the table)
Go to Table> Convert> Table to Text .

The Convert Table To Text dialog box appears:
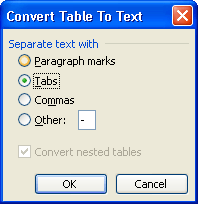
Separate text with: Select the type of separation between paragraphs of text:
- Paragraph marks: In paragraph form
- Tabs: By distance is 1tab = 1.27cm
- Commas: Comma
- Other: Other characters
Select the OK button to complete.
12. Convert data from text form to table
Select (black out) the paragraphs you want to include in the table:
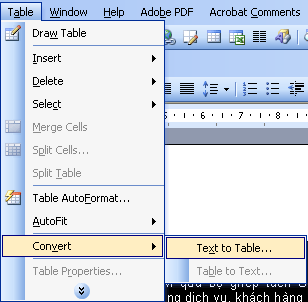
Go to Table> Convert> Text to Table .
The Convert Text To Table dialog box appears:
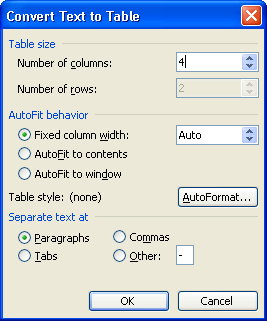
- Number of columns: Enter the column number
- Number of rows: This line number entry is not entered, but because MS Word adjusts to the number of columns you enter above.
- AutoFit behavior: Auto-scaling
- Fixed column width: Set fixed column size
- AutoFit to contents: Automatically shrink content
- AutoFit to window: Automatically shrinks according to the window screen.
- Separate text with: Select the type of separation between paragraphs of text:
- Paragraph marks: In paragraph form
- Tabs: By distance is 1tab = 1.27cm
- Commas: Comma
- Other: Other characters
Select the OK button to complete.
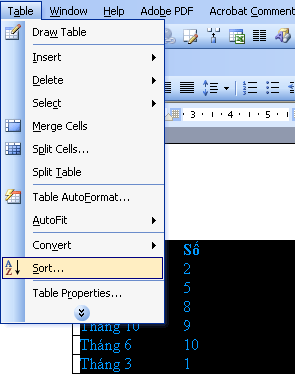
13. Sort data in tables
Black out the whole board. Here you should black out the entire table because after sorting by one or more columns, the values of the other columns are also sorted. If you only black out one column, the data is sorted only by that column, so your data in the whole table will be misleading.
Go to Table> Sort .
The Sort dialog box appears.
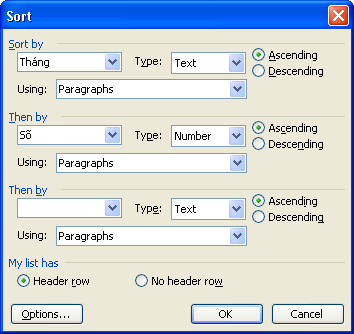
Sort by:
- Please select the first column name you want to sort (On the image is the Month column)
- Type: Type of format of column (field) sorted (Text, Number, Date .)
- Ascending: Sorting up gradually
- Descending: Sort descending
The parts Then by: Sort by the next column (the features are still the same as Sort by).
Có danh sách có:
- Header row: Headline row.
- No header row: Sorting is not except the subject line.
Select the OK button to complete the arrangement.
14. Some functions apply to MS Word tables
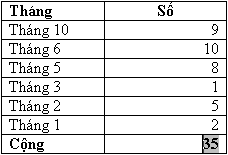
Let the cursor position in the cell you want to calculate (For example, calculate the sum of the column, leave it in the last row of the column).
Go to Table> Formula .
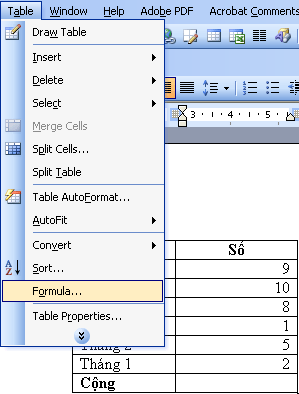
A Formula dialog box appears.
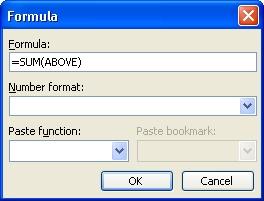
- Formula: Display function, calculation formula. Starting each function or formula must start at the sign '=' (SUM (ABOVE): The province of the above values). You must fill in the correct formula for each function.
- Number format: Digital format formats.
- Paste Function: Basic functions:
- ABS: Absolute treatment
- AND: Function and
- AVERAGE: Calculate average
- COUNT: Count
- IF: Conditional function
- INT: The function divides the integer part
- MAX: Largest function
- MIN: The smallest function
- MOD: The function divides the remainder
- NOT: Negative function
- OR: Function or
- ROUND: Function rounded
- SUM: Sums
Select the OK button to complete the calculation. If the formula is wrong, the result will show the command line! Syntax Error
Results The calculation function of the above worksheet is:
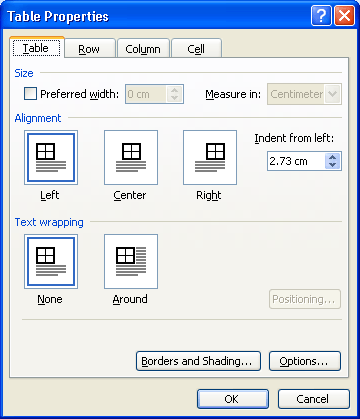
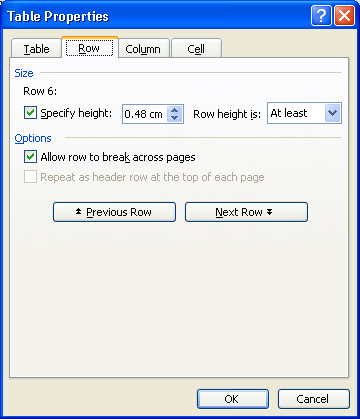
15. View table format properties
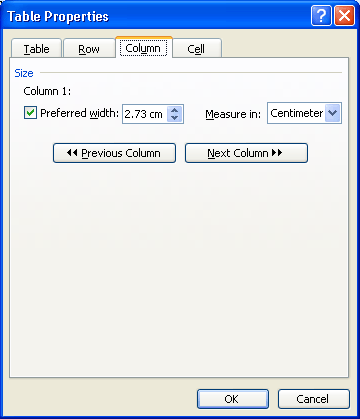
Go to Table> Properties:
The Table Properties dialog box appears: Table Card: Table information
Row card: Line information:
Column: Column information:
Cell Card: Cell information:
