MS Access 2003 - Lesson 15: Create an initial table
In this section, you are ready to create a table for the new database. In Chapter 2, you used the Table Wizard to create tables easily. This not only shows that creating a table manually is difficult; but it is a sure way to understand the table..
In this section, you are ready to create a table for the new database. In Chapter 2, you used the Table Wizard to create tables easily. This not only shows that creating a table manually is difficult; but it is a sure way to understand the table.
In the rest of this chapter, you'll learn how to develop a table without using the Table Wizard. In the process of doing this, you will use the information learned in chapter 3, 'Customize the components'. This table will contain a list of customers (If you are not a business, suppose to do so). You can also use the Table Wizard to build a table, but the results are almost unfulfilled for your needs such as creating tables manually.
To create a table, you need to go through the stages: designing and organizing tables. The following section describes in detail those phases.
Stage design
You rarely use computers during the design process. Instead, just a pencil and paper, you decide what information is in the database. Specifically, you decide which data to test and the characteristics (data type, formats, etc.). There are many books at stores that talk about the concept and practice of database design, but you don't need to read them to design a simple database. All it takes is to ask yourself (and answer) the following questions:
- What should I call the board?
- What data section do I need to contain?
- What data type is best suited for each piece of data?
- How much storage space is suitable for each piece of data?
- How to sort data sections?
- Do you need a unique key (primary key) for data?
There are many other questions you can ask yourself. In fact, you can gather detailed information before sitting in front of the computer. But if you can answer only a few of these questions, use the first table creation method.
Table design template
As mentioned in the previous section, the best way to design a table is with a pencil and paper. With that in mind, you can create a table design template to use as you work on the design. Figure 1 depicts an example
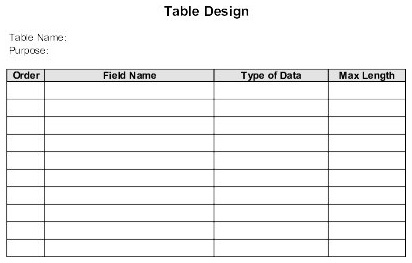
Figure 1: Table design template
First you should specify a name for the table. Because this table contains a list of business customers, use Business Customers as the table name. Write that name on top of the design.
Plan the Table Fields
On the paper sheet, write the names of the fields you like to use in the table. No need to pay attention to their order there. For school names, you can include company name, address (there are 2 address lines for long addresses and numbers), phone numbers, fax numbers, communication names, .
Table 1 shows a list of field names that you can use for the Business Customers table. If you haven't done so, you should enter each field name in the table design form. Usually you should enter the field name you wrote. However, because your database matches the example presented in this series, use only the field name listed in Table 1.
School Name Meaning Company Name Company Address Address 1 First Address Line Address 2 Second Address Line City Name City State District / District Zip Code Postal Code Main Phone Phone Number for PBX Company Number Fax Number Account Number Salesperson Customer ID Credit Limit account manager Number of accounts that can be purchased Account Opened Date of account set Last Order Last purchase date Active Specify if this is an active or inactive account Contact Transaction name of the company Contact Phone Contact phone number Comments The notes needed to recordTable 1: Field names for the Business Customers table
Select the data type
A field data type specifies the type of value that the field holds, such as the date, text, or currency value. The next step in defining the table is to decide the data type for the field. Table 2 lists data types in Access
Data type Meaning AutoNumberAutomatic numbers Access will automatically enter numbers in order each time a record is added. Currency
Currency type Number is accurate to 15 decimal places to the left of the decimal point and 4 digits to the right. Date / Time
The date type number corresponds to the date or time between 100 and 9999 years. Hyperlink An address that links to documents, URLs or locations in the Memo document
Memo style Text strings have a length of up to 64000 Number characters
Number type A numeric value. OLE Object Objects such as text or sound clips
Text style Consists of multiple characters, the maximum length of 255 characters. Yes / No
Logic type True or false.
Table 2: Data types supported by Access
Most fields in the table will use the data type as Text. But for some fields, you will have to choose the appropriate data type. For example, you should use the Yes / No data type for the Active field, the Date / Time type for the Date Opened and Last Order fields, and the Memo type for the Comments field. Table 3 lists the data types you should use for each field in the table. You should write the data types in the Type of Data column of the table design pattern.
Field Name Data Type Company Name Text Address 1 Text Address 2 Text City Text State Text Zip Code Main Phone Text Fax Number Text Account Number AutoNumber Salesperson Text Credit Limit Currency Opened Account Date / Time Last Order Date / Time Active Yes / No Contact Text Contact Phone Text Comments MemoTable 3: Data types for fields in the Business Customers table
Notice that Table 3 assigns AutoNumber type to the Account Number field. Because Access automatically calculates this data type with each new record it assigns itself to the customer code, you can skip the automatic access of Access to manually assign the customer account number.
Determine the length of the school
In Table 2, a text field can be up to 255 characters, a Memo field (memo type) with a maximum length of 64,000 characters. The next step in the table design is to determine the length for the fields. For some schools, you don't need to do this. For example, there is no need to specify the length for Credit Limit fields as well as Active because their data types are not dependent on length. However, you must specify the length for all other fields.
To determine the maximum length of the field appropriately, you need to know the data contained in the table. For example, you need to know that you will need to maintain your customer's 5-digit or 9-digit postal code. Similarly, you should know how much space is required for the Company Name and Address fields.
If you know your data, you can choose the best length for the school. Although Access always allows you to change the field length, even after starting to enter data into the table, you should see the data range to avoid damaging and duplicating the work later. Table 4 lists the maximum lengths of fields in the Business Customers table.
School Name Maximum Length Company Name 35 Address 1 40 Address 2 40 City 25 State 2 Zip Code 9 Main Phone 10 Fax Number 10 No Account Number Salesperson 35 Credit Limit does not need Account Opened Last Order does not need Active without Contact 35 Contact Phone 10 Comments does not needTable 4: Length of fields for the Business Customers table
Order schools
Lastly, you need to decide the order of the fields that appear in the table and specify the order on the table design template.
Note, at the beginning of the design process you should write the fields in the order they appear in your head. Because the order of fields (like selecting a field length) is a basic and necessary process for organizing your tables, it is normal to place fields in the order in which they appear. The order in the column of the table design should be set to 1 for the first field, 2 for the second field, .
However, our goal here is to use the order specified in Table 5. Enter this information in the Order column of the table design template.
Name of School Order Company Name 2 Address 1 3 Address 2 4 City 5 State 6 Zip Code 7 Main Phone 8 Fax Number 9 Account Number 1 Salesperson 16 Credit Limit 13 Account Opened 12 Last Order 14 Active 15 Contact 10 Contact Phone 11 Comments 17Table 5: Order fields for the Business Customers table
Before entering information in the table design form into Access, you should decide to use a primary key for the table. In Chapter 2 you learned how to use the primary key to sort the records and locate them faster. The typical primary key is a unique value (ie no duplicate records in the table).
In the Business Customers table, there are many fields you can use as a key. For example, you can use the Company Name field as the primary key. However, there may also be two company names with the same name, and you need another key that is unique. If you cannot find another key, you can use the Company Name field and allow only two identical names.
You should also use the Account Number field as a key. By definition, this number is unique. Note, Access automatically generates the code for you to use the AutoNumber field. Because the Accout Number is usually unique, and it will be a reasonable primary key. To remind yourself that the Account Number field will be the primary key, circle the number of fields (1) in the Order column of the table design template.
Presentation stage
After completing the table design, you are ready to use Access. With the table design template in hand, you can quickly and easily organize the database. All you need to do is enter the information in order from the table design template to the Design view window. To create the Business Customers table, perform the following steps:
1. If necessary, open Access and go to the Customer database. This is the database created at the beginning of this chapter.
2. From the Database window, select the Tables button. You will see no tables listed yet because they have not yet been created
3. Double-click Create Table in Design View . Access displays the Design view window as shown in Figure 2.
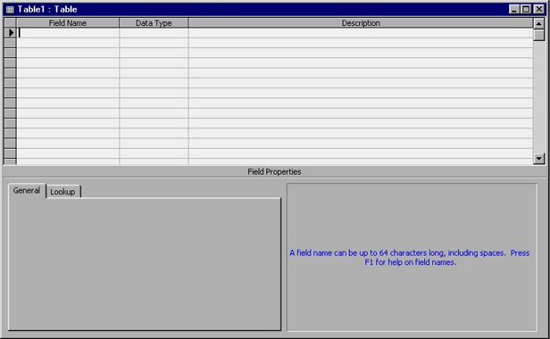
Figure 2: Design view window.
In Chapter 3, you learned how to use the Design view window to change the layout of the current table. Now you use it to create a new table. In this case, the Design view window is completely empty. Note that the cursor flashes in the first line in the Field Name column. Access is ready for you to arrange the table.
To start, enter the first field name in the table order: Account Number field, Enter Account Number , then press Enter . After Access accepts the field name, the cursor moves to the Data Type column. The Design view window now looks like Figure 3. Notice that Access assumes this field is a text field and that by default the properties for the Text data type appear below the Design view window.
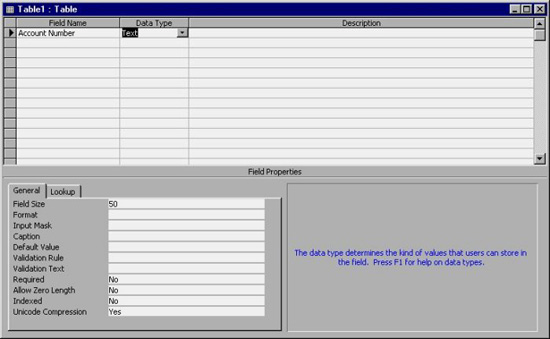
Figure 3: Design view window after entering the first field name.
In the table design pattern, you specify the data type of the Account Number field to be AutoNumber. To change the field data type, click your mouse on the arrow to the right of the Data Type box. In turn, Access displays a drop-down list of data types. Click to select AutoNumber.
Cell will immediately display AutoNumber data type for the Account Number field. The Design view window is similar to Figure 4. At the same time, along with changing the data type, Access has changed the properties of the field.

Figure 4: Design view window after changing data type
When you press ENTER, the cursor moves to the Description column. You can enter comments for that school. For the Account Number field, you can include a comment to remind you or another user that this field is the primary key.
When you press ENTER again, Access moves to the next line in the Field Name column. Enter the name of the second field (Company Name) and select the data type. Do this until you enter the information for the final field.
Before moving out of the line containing the Company Name field, look down at the properties section below the Design view window (Figure 5). Those properties default to the Text data type. Notice that Access sets the Field Size property to 50.
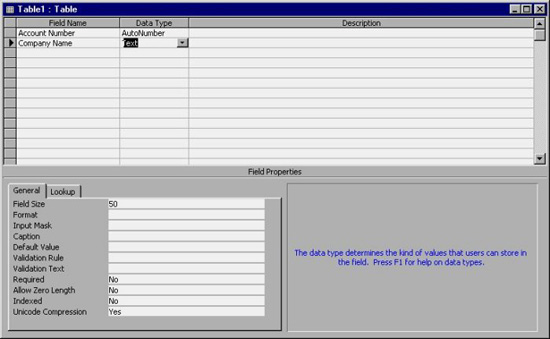
Figure 5: Design view window after specifying the data type for the second field.
When you define a table design pattern whose length is only 35, adjust the Filed Size property. Use the mouse to select the Field Size property and change it to 35. Then, use the mouse to return to the Field Name column, in the third line enter the next field name.
Continue and enter all 17 fields for the Business Customers table. When entering each field into the table, make sure you set the DataType property and change the Field Size to a reasonable one. When finished, the Design view window appears as shown in Figure 6.
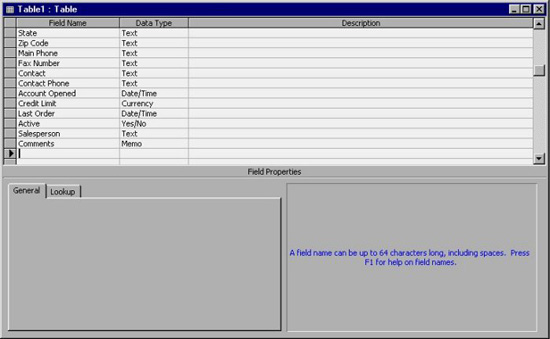
Figure 6: Design view window after entering the last field.
After completing all fields, you must specify the primary key. To do this, scroll the table design up until you see the Account Number field on the screen. Select the field and click your mouse on the Set Primary Key tool. Access displays a key in the gray area to the left of the Account Number line (Figure 7).

Figure 7: The Design view window after it is completed.
Now you have completed the whole table, and want to save it. To save the table, simply close the Design view window by clicking your mouse on the Close button above the right corner of the window. Before closing, Access asks if you want to save this table (Figure 8).
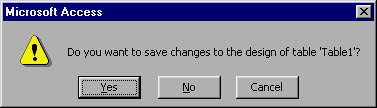
Figure 8: Access asks if you want to save the table
To save, click your mouse on the Yes button. Access will ask you to specify a name for the table, Figure 9.

Figure 9: Name the table to be saved.
Enter the name you wrote above the design template: Business Custormers. Click ENTER or click the OK button to save the table under that name.