Create data queries in Access 2016 from simple to complex
The real power of relational databases lies in its ability to retrieve and analyze data quickly and accurately by performing queries. The query allows to retrieve information from one or more tables based on the search conditions you defined. In this lesson, you will learn how to create queries on a simple table and query on multiple tables in Access 2016.
What is a query?
Query is a way to search and compile data from one or more tables. Query execution is like asking a detailed question about databases. When creating a query in Access, you are defining specific search conditions to find exactly the data you need.
Query is much more powerful than simple searches or filters that we often use to search data in a table. This is because the query can collect information from multiple tables. For example, when performing a search on the customer table to find the name of a customer or filter the order table to see orders in the past week, you only get the individual information, not to show customers and orders at the same time. But if you execute the query, you can find the names and phone numbers of all customers who have purchased goods in the past week. Well-designed queries can provide useful and accurate information that you can't find by checking or looking at the data in the table.
When executing a query, the result is returned as a table, but when designing you can use a different view, called Query Design, and it allows you to see how the queries work together. .

Query on a table
Familiarize yourself with the query building process by building the simplest query possible: a query on a table.
In this example, the query will be executed on the Customer table. Suppose our bakery has a special event and we want to invite customers to live nearby because they are most likely to come. This means seeing a list of all customers who live near the bakery and only invite those customers.
We want to find customers living in Raleigh city, so we will look for "Raleigh" in City column. Some customers live in suburbs quite close, and we want to invite them too. We will add their area code, 27513, as another criterion.
If you think this sounds like applying a filter, you're right. The query on a table is actually just an advanced filter applied to a table.
To create a query on a table you do the following:
Click on the Create tab> Queries > Query Design group :

Access will switch to Query Design view. In the Show Table , select the table you want to query, here is Customers.
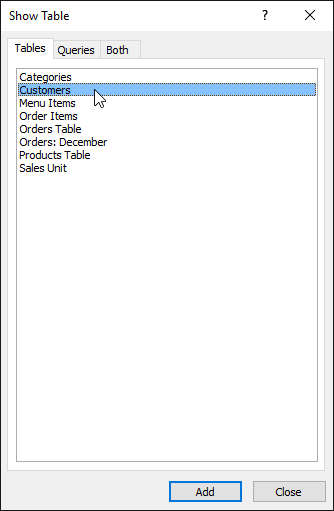
Select the table you want to create a query
Select Add > Close . The selected table will appear as a small window in the Object Relationship frame. In the table window, double click on the name of the field you want to appear in the query. They will be added to the design grid at the bottom of the screen. Here, we want to send invitations to customers who live in certain areas, so choose First Name, Last Name, Street Address, City, and Zip Code.
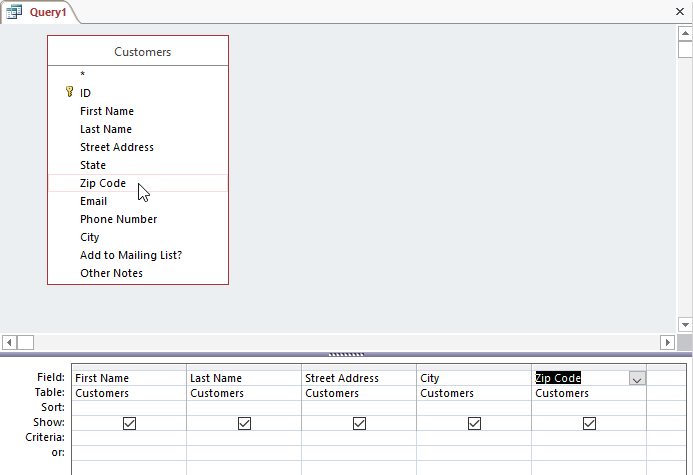
Select the field you want to appear in the query
Set search criteria by clicking on the box in the Criteria row: of each field you want to filter. Entering criteria in more than one field in this row will set your query to include results that meet all of the criteria. If you want to set multiple criteria but don't need the record to meet them all, enter the first criterion in the Criteria: row and additional criteria in the or: row and the row below it.
Because it is necessary to find a customer who lives in Raleigh or has an area code of 27513, it will enter 'Raleigh' in City and '27513' fields in the or: row of the ZIP Code field. Quotes will search for these fields to get accurate results.
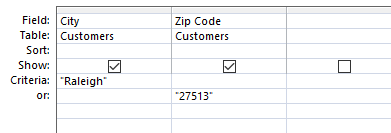
Set criteria for queries
After setting the search criteria, execute the query by clicking the Run command on the Design tab.

The query results will show up in the Datasheet frame, like a table. If you wish, you can save this result by clicking the Save command on the Quick Access Toolbar.
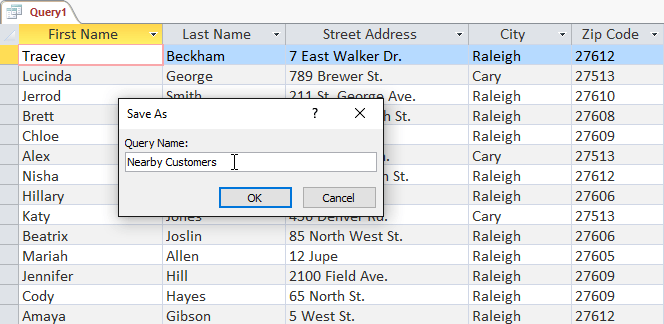
Query results are displayed in tabular form
Create Access queries on multiple tables
Queries on multiple tables will be more complex than queries on a table, which allows answering more complex questions.
The query can be confusing or difficult to create if you don't have a good idea of what you're trying to find and how to find it. Queries on a table can be simple to create, but with queries on multiple tables, you need to have time to pre-query the query.
Query planning:
When planning queries on multiple tables, you should do the following four steps:
- Determine exactly what you want to know. If you can ask the database of questions, what is that question? Building a query is more complex than asking a question, but knowing exactly the question you want is essential to building useful queries.
- Determine all types of information to be included in the query results. Which schools contain this information?
- Determine the location of the fields you want to have in the query. Which table contains them?
- Identify criteria for finding information to meet in each school. Think about the question you posed in the first step. Which schools need to find specific information? What information is looking for? How to find them?
This process may seem 'booky' and somewhat abstract at first, but if you go through it you will find that planning for queries on multiple tables will help build queries more easily.
Below is an example of a query plan:
Now will try to set up a query plan for the database of a bakery. Read the planning process step by step, thinking about how each part of this process can apply to the query you are creating.
Step 1: Determine the question you want to ask
The bakery database contains many customers, some of whom have never ordered but they are in the database because they have registered to receive notification emails. Most of them live in the city, some live outside the town or in another state. Now we want customers outside the town who have ordered to come back and order before, so we will send them a coupon. This list of customers must not have customers who live too far from the store, as they may not return only with coupons. Therefore, we want to find people who do not live in the city, but still in the neighborhood.
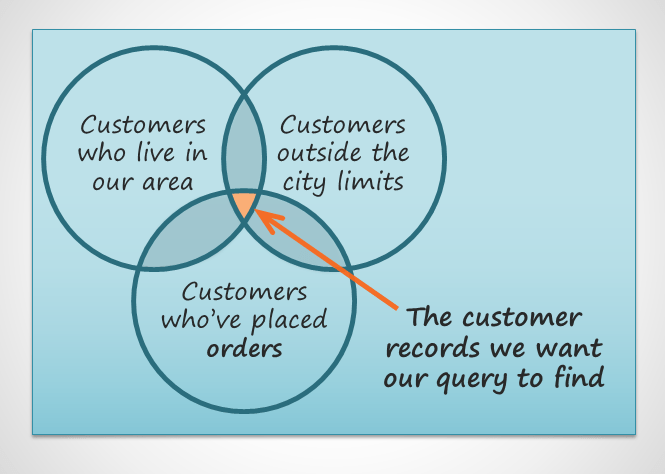
Data area you want to retrieve
In short, the question we want to ask is: Which customers are living in the area near the store, outside the city and have placed a cake before?
Step 2: Determine the information to retrieve
We need their customer name, contact information: Address, phone number, email. But how do you know if they have ordered before? Each record of an order will identify the customer who ordered. If including an order ID, it is possible to narrow down the list of customers to those who have previously ordered.
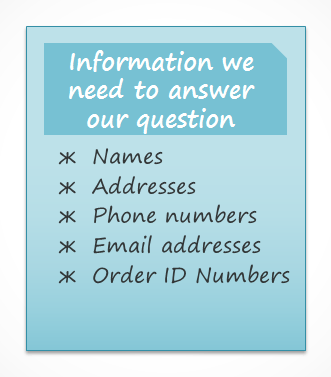
Determine what information to retrieve
Step 3: Determine the table containing the information to retrieve
To write a query, you need to be familiar with many different tables in your database. Here, we see that the customer information needed is in the fields of the Customers table. The order ID number is in a field of Orders table. We just need to take these two tables to have enough information we need.
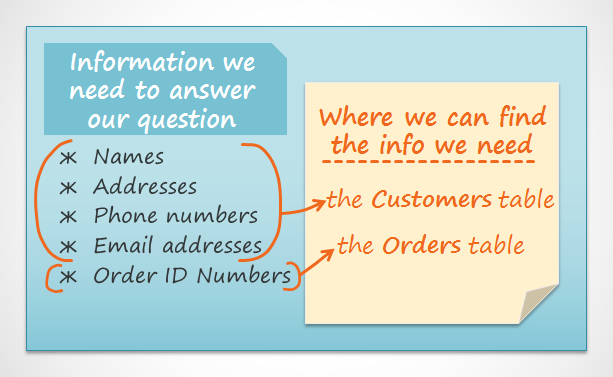
Identify tables with information to retrieve
Step 4: Determine the criteria that the query should look for
When you set criteria for a field in a query, you will basically apply a filter that allows the query to extract only information that matches the search criteria. Review the list of fields we include in this query. How and where we can set search criteria can create the best answers to questions.
Because I don't want to get clients from Raleigh town, so we need criteria to return all records except the record of City school is Raleigh. Since you do not want to get customers who live too far, just get customers who live in the same area, you will use the phone area code of the area of 919. Adding criteria only returns records with items in the phone number field starting with 919 , will ensure that only coupons are sent to customers close enough for them to return to the bakery and use it.
We do not set criteria for the order ID field or any other school because all orders of those who meet the above two criteria need to be considered.
Connect the tables in the query:
The last thing to consider when designing a query is how you link, or join tables that are working together. When adding two tables to Access's query, this is what you will see in the Object Relationship frame:
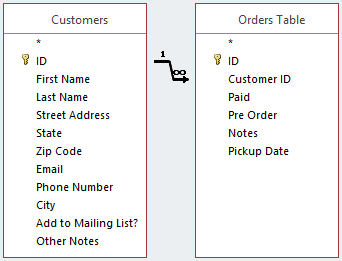
The tables appear in Object Relationship frame
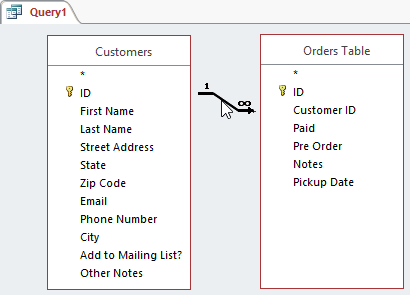
The line connecting the two tables is called the connecting line. Do you see the arrow on the ramp? This is because it indicates the query order to find data from two tables. In the figure, the left-to-right arrow means that the query will view the data in the left panel first, then find the data in the right table that relates to the records found in the left panel.
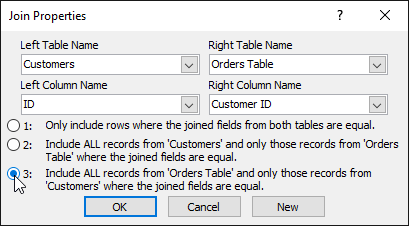
Tables are not always combined in this way. Sometimes Access will connect them from right to left. In both cases, you can change the link direction to make sure the query contains the correct information.Linking can affect the information that your query obtains.
To understand what this means, consider the query we are designing. We need to see the customer has ordered, so the Customers and Orders table has been added, these are the data in these two tables:
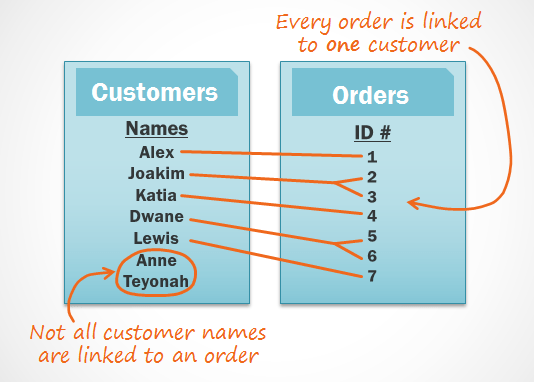
Consider the link between the two tables
What do you notice when you look at these lists? First of all, every order in the Orders table is linked to someone in the Customers table - the person who purchased the item. However, when you look at the Customers table, you will see that customers have placed multiple orders linked to multiple orders and those who have never placed an order do not link to any orders. Thus, even if the two tables are linked together, there are records in a table that do not have any relationship with any other table record.
So what happens when Access tries to run our query with the current link from left to right? It takes all records from the left page: the Customers table.
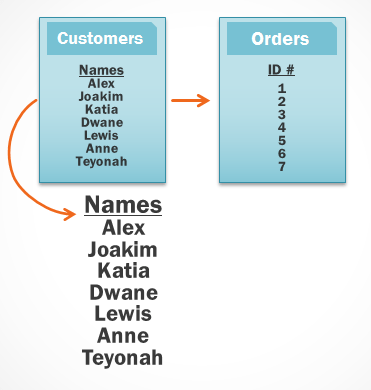
Access gets information from the left panel
The trouble will retrieve every record from the right table that relates to a record that Access has retrieved from the left table.
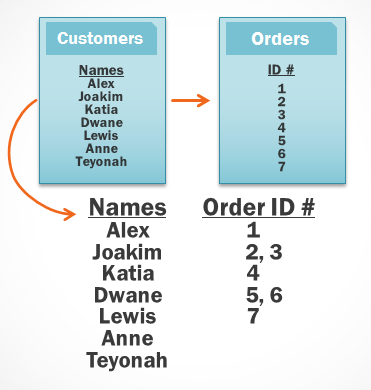
Access gets information from the right table
Because the link begins with the Customers table, the query retrieves the records of all customers, including those who have never ordered. This information is more than what we need, we just want to see the record of the customer who ordered it.
Fortunately, we can fix this problem by changing the direction of the link. If we link two right-to-left tables, Access will initially retrieve the order from the right table: Orders:
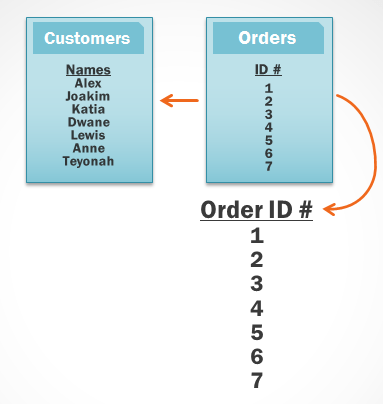
Change the link direction between the two tables
Then Access will find and extract the records in the left table (Customers) of the customer associated with the orders in the Orders table.
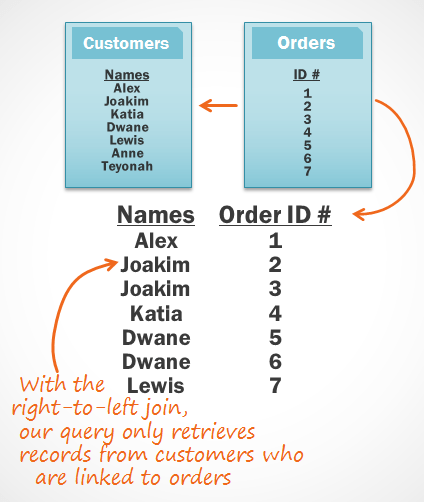
Access reverses the direction of getting data between the two tables
Now, we have exactly the information we need: All customers have ordered. As you can see, we have to link the two tables in the right direction to get the information we want. At this point, we have understood which link direction to use and ready to build queries.
Create multiple table queries
We have completed the query plan and are ready to design and run it. If you have also created your own plan, be sure to reference them often during this query design process.
To create queries on multiple Access tables, do the following:
Click the Create tab> Query Design .

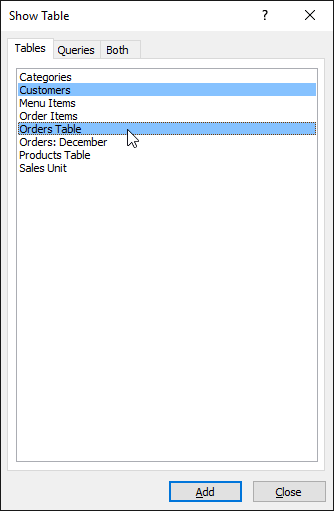
In the dialog that appears, select the desired table in the query and click Add . You can press and hold the Ctrl key to select more than one table. Here, we select the Customers table and Orders as in the plan.
The table will appear in the Object Relationship frame, connected by a link. Double click on the smaller line section in the link between the two tables to correct the alignment.
In the Join Properties dialog box, select the connection direction, here we choose 3 because we want to link from right to left.
In the table window, double-click the field you want to include in the query. They will be added to the design grid at the bottom of the screen. In our example, most fields of the Customers table: First Name, Last Name, Street Address, City, State, Zip Code, Phone Number and ID from the Orders table are included.
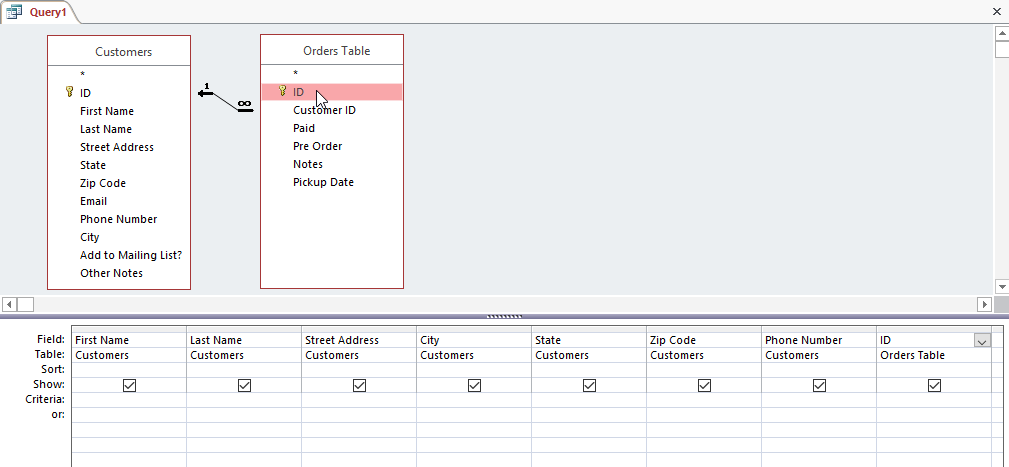
Set search criteria by entering the desired criteria in the criteria row of each field. Here, we need to set two criteria: Not in ("Raleigh") in the City and Like fields ("919 *") in the Phone Number field. This helps to find customers who do not live in Raleigh but live in an area with a phone number of 919.

After setting the search criteria, run the query by clicking Run on the Design tab.

The query result will be displayed in the Datasheet, like a table. If you want, you can save this result by clicking Save on the Quick Access Toolbar.
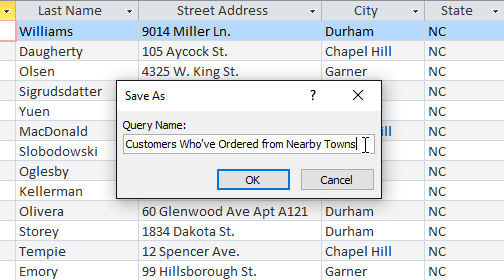
You now know how to create the simplest query on a table as well as create queries on multiple tables. In the next article, we will talk about other query design options that can make your query even more powerful.
Next article: Options to create data queries in Access 2016
Previous article: Working with data in Access 2016