MS Access 2003 - Lesson 12: Working with a table
You have learned how to create and design tables in Access. And now it's time to learn how to manipulate all tables.
You have learned how to create and design tables in Access. And now it's time to learn how to manipulate all tables. Do not confuse this concept with the known editing feature in chapter 2 'Access Learning in 1 hour'. Those features only refer to individual fields or records in a table.
In the next 3 sections, you will learn how to do the following:
-
Copy a table
-
Rename the table
-
Clear the table
Copy the table
Sometimes you want to copy the whole table. For example, you need to copy a table so you can use that copy as another table. Or you want to copy it to keep a temporary backup.
To copy a table, perform the following steps:
1. Select the Table button in the Database window. You will see a list of tables in the database.
2. Select the table name you want to copy. For example, select the Addresses table.
3. Select Copy from the Edit menu, or press CTRL + C
4. Select Paste from the Edit menu, or press CTRL + V key combination. In turn, Access displays the Paste Table As dialog box as shown in Figure 1.

Figure 1: Paste Table As dialog box
5. In Table Name , enter the name of the copy table you just created. For example, enter the name Temporary Addresses , but do not press the ENTER button
6. In the Paste Options section, select the type of copy you want. When you want to copy the whole table, select the second option, Structure and Data . (If you only want to copy the structure without data, select Structure Only )
7. Click your mouse on the OK button, Access will copy the table and update the new table into the Database window as shown in Figure 2.
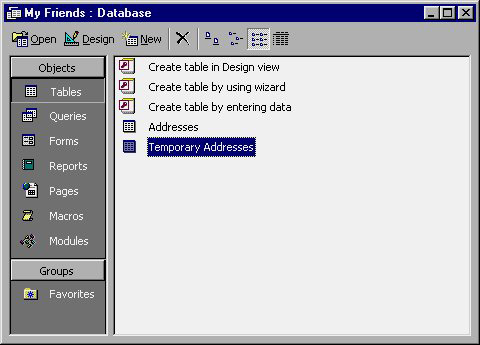
Figure 2: Database window has been updated
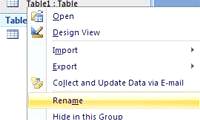
Rename the table
Access allows you to rename a file similar to the way Windows File Manager renames files. To rename the table, follow these steps:
1. Select the Table button from the Database window. You will see a list of tables in the database.
2. Select the name of the table you want to change. For example, select the Temporary Addresses table.
3. Select Rename from the Edit menu. Access blackens the table name and performs a name change, so the table can be renamed
4. Enter a new name for the table or edit the existing name. Do not use the name already in the table. For example, you can type the name New Addresses .
5. Press ENTER or click your mouse anywhere outside the work area. Access renames the table and adds a new name to the Database window (Figure 3).
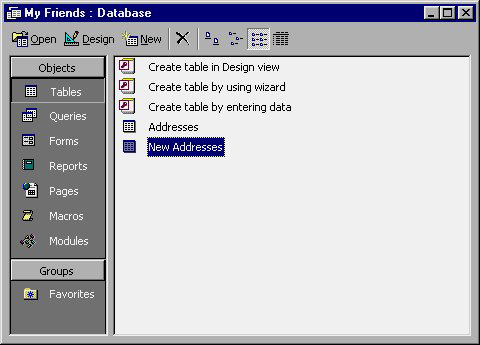
Figure 3: The Database window after renaming the table
Delete a table
Removing a table is as easy as copying or renaming. In fact, you can delete a table in many ways like deleting documents or subdirectories in many other Windows applications. To delete a table, follow these steps:
1. Select the Table button from the Database window. You can see a list of tables in the database.
2. Select the name of the table you want to delete. For example, select the New Addresses table.
3. Select Delete from the Edit menu or simply press the DEL key on the keyboard. Access will ask you to confirm the action.

Figure 4: Confirm deleting the table
Click your mouse on the Yes button to delete the table or click the No button to ignore this option.
Was this article helpful?
Your feedback helps us improve.
Related Articles
 MS Access 2003 - Lesson 15: Create an initial table17 minutes read
 MS Access 2003 - Lesson 7: Enter information for the table8 minutes read
 MS Access 2003 - Lesson 16: Check your presentation5 minutes read
 MS Access - Lesson 6: Managing tables1 minutes read
 MS Access 2003 - Lesson 6: Creating a table in Access12 minutes read
 MS Access - Lesson 5: Create a table5 minutes read
Reader Comments 0
Sign in with email or Google to join the discussion.