Table of Contents
This updated guide explains how to Create a Table and Insert a Table in Excel through clear steps, practical examples, and important checks that help prevent common errors.

The article shows you how to create and edit tables in Excel.
1. Create a Table
Method 1: Create a Table Using the Default Style.
Step 1: Select the data range that you may need to create the table, the cells may or may not contain data.
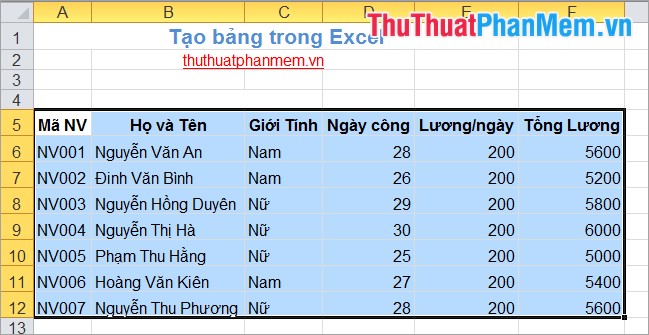
Step 2: Select the Insert tab on the Excel toolbar. In the Tables section, select Table (or the key combination Ctrl + T or Ctrl + L ).

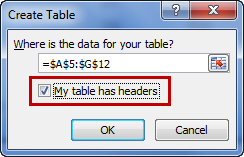
Step 3: The Create Table dialog box appears.
If the data range you selected in Step 1 includes the table header, then check the box before My table has headers .
If the data range you selected in Step 1 does not include the table header, you uncheck the box before My table has headers .
At the top of the table columns will appear with the default title names such as Column 1, Column 2. you can change the title name as you like.
Then you click OK to create the table.
Method 2: Create the Table According to the Style You Want.
Step 1: Select the range of cells you may need to make a table.
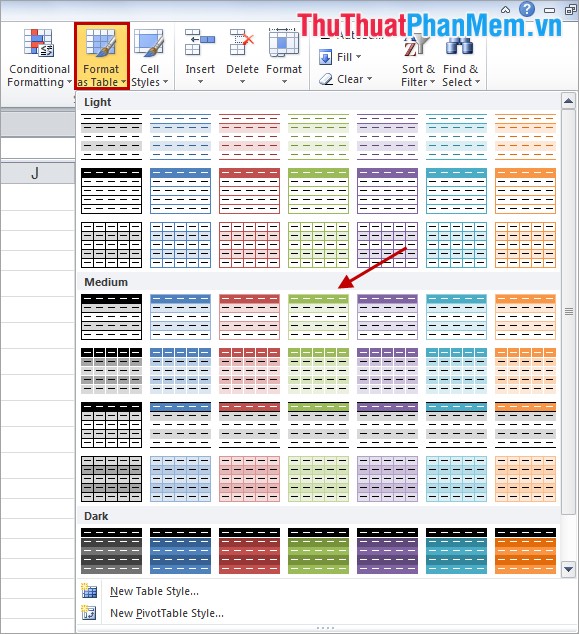
Step 2: Select the Home tab on the toolbar, in Styles -> Format as Table and select the table format you may need to create.
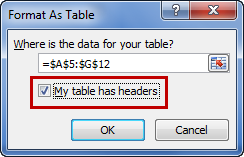
Step 3: The Format As Table dialog box appears. If the selected range contains the data you may need to use as the table header, check the box before My tables has headers then click OK to create the table.
2. Edit the Table.
When selecting any cell in a table, the Design tab of Table Tools appears . You can change the table style in the Table Styles section.

Some other customizations in Table Style Options :
- Header Row: Hide / show the title of the table.
- Total Row: Hide / show the total row at the bottom of the table.
- First Column: Display special format for the first column of the table.
- Last Column: Display special format for the last column of the table.

Add Row
To add rows to the table, select the last cell of the last row in the table and then press the Tab key on the keyboard. The row will be added below the table.

Or you select any cell of the last row in the table, right-click and select Insert -> Table Rows Below to add rows to the bottom of the table.
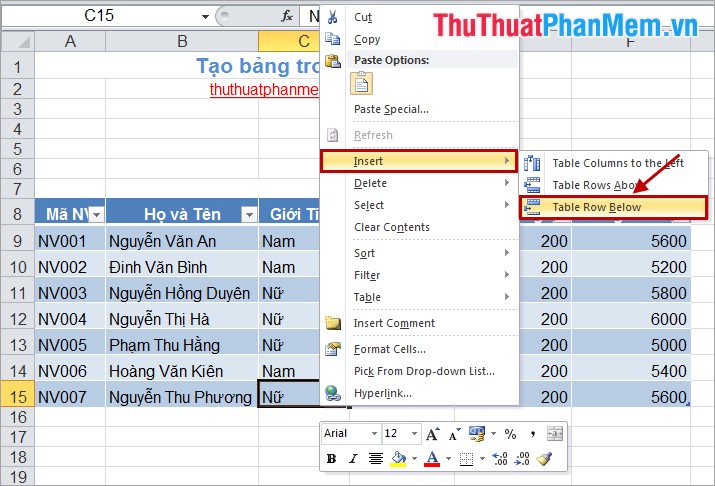
To add rows to any position of the table, you can add as rows in Excel.
More Collum
Add the column to the end of the table, select any cell in the table in the last column, right click and select Insert -> Table Column to the Right .

To add columns to any position in the table you can add as adding columns in Excel.
So with very simple operations, you quickly created yourself tables in Excel. You can filter data in the table, analyze data from the table easily. Good luck!
FAQ
What is the easiest way to Create a Table and Insert a Table in Excel?
Start with the requirements in this guide, then follow each step in order. Check the result after every major change so problems are easier to identify.
Can beginners follow these instructions?
Yes. The process is organized into practical steps, and you can repeat any step before moving forward.
What should I check if the method does not work?
Confirm your software or device version, permissions, settings, file format, and internet connection when the task depends on online services.
Related Articles
 How to Create a Table, Insert a Table in Excel 20168 minutes read
 How to Insert an Excel Table into Word3 minutes read
 How to Create an Excel Table, Insert a Table in Excel7 minutes read
 MS PowerPoint 2007 - Lesson 8: Insert Tables in PowerPoint7 minutes read
 Manipulating Tables in Excel2 minutes read
 How to Create a Table in Photoshop3 minutes read
Reader Comments 0
Sign in with email or Google to join the discussion.