How to create an ISO file on Linux
You may know that an ISO file can be burned to a CD / DVD or USB drive, but do you know that you backup or store your files and folders into an ISO file? will be better? With an ISO file, you can burn it to a CD / DVD as a backup or simply mount it as an external drive and access files from within.
If you want to back up the contents of a disc or if you have a bunch of files and folders that you want to back up and store, here's how you can apply to create ISO files in Linux.

1. Through Archive Manager
If using Ubuntu (or Gnome Desktop), you can easily create an ISO file using the Archive Manager application.
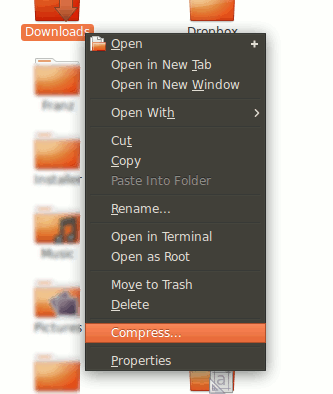
1. Open the Manager file. Select the files and folders you want to backup. Right-click on it and select Compress .

2. Select the ".iso" option and then click Create . This process will compress the selected files and folders to an ISO file.
2. Through the command line
dd is one of the useful commands that you can use to create an ISO file. All you need to do is identify the source and destination, and take steps to create an ISO file.
Use the basic statement below:
dd if = source of = destination
For example, if your CD-ROM drive is mounted at '/ dev / hdc,' and you want to back up the contents of the drive into a file 'my-cd-backup.iso', then you can use it. Use the following command:
dd if = / dev / hdc of = / home / username / my-cd-backup.iso
Source is not a CD-ROM drive. It can be a hard drive partition, or a portable hard drive or file path, although it does not work on a directory.
Alternatively you can use the mkisofs command to create an ISO file. The highlight of the mkisofs command is to give you lots of options to customize the ISO file created to your liking.
Use the basic statement below:
mkisofs -o destination-filename source
For example, use the command below to back up your Home folder:
mkisofs -o myHomeBackup.iso / home / username
You can request mkisofs to activate the Rockridge extension by setting the -R option:
mkisofs -R -o myHomeBackup.iso / home / username
Activate Joliet extension with flag -J:
mkisofs -R -o myHomeBackup.iso / home / username
In addition, you can set the Volume name (-V option) for the ISO file (in case if you burn the ISO file to a CD, the volume name will be used as the CD's name).
mkisofs -V "Home Folder Backup" -o myHomeBackup.iso / home / username
Also you can prevent another file from being added to the ISO file with the "-m" option. It supports both * characters, so you can use the following command:
mkisofs -m ". *" -o destination source
Refer to some of the following articles:
- 7 commands to manipulate the most basic files and folders everyone must know
- Ubuntu Bash tutorial on Windows 10
- Anyone should know these basic Linux commands
Good luck!
You should read it
- How to quickly create new blank text files on Windows, Mac and Linux
- How to create an EXE installation file
- Instructions for creating and using BAT file on Windows
- The Fsutil file in Windows
- How to create a new host file on Windows
- How to Create a File in Unix
- How to Make a New File in Windows
- How to Create a Computer File
- Instructions on how to transfer ESD file to ISO for Win XP, 7,8,10
- What is ISO file?
- How to create ISO file with WinRAR
- What is DMG file?
Maybe you are interested
How to Convert Document Files to Speech with Gemini Instructions for commenting with photos on TikTok Top 6 best VPN add-ons 2023 Who made this two meter tall 'devil's corkscrew' millions of years ago? Create a transparent interface for the skin of Windows Media Player How to make Christmas wreaths with beautiful and simple wall stickers with colored paper
