How to create a new host file on Windows
File host is an important system file in Windows, if you accidentally accidentally delete it, only create a new host file then copy paste the default information.
Table of Contents
File host is an important system file in Windows, if unfortunately in the "tinkering" process, if you accidentally delete it, it is almost impossible, there is no way to recover the default information as the original. . So what should I do in this case? Only how to create a new host file then copy the default information. Please apply the host file procedure we share below to retrieve the host file on your computer.
Instructions for creating new host files on the computer
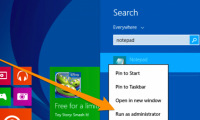
Step 1: Open the Run dialog box (or use Windows - R key combination), then enter notepad to open Notepad.

  # Copyright (c) 1993-1999 Microsoft Corp.
  #
  # Này là một tập tin HOSTS được dùng bởi Microsoft TCP / IP cho Windows.
  #
  Tập tin này chứa mappings của IP địa chỉ đến tên tên máy.  Each
  Số nhập nên được giữ lại ở một dòng này.  Cần địa chỉ IP
  # được đặt trong theo thứ tự đầu tiên trước theo tên host tương ứng.
  # Tên địa chỉ IP và tên máy nên được gỡ bỏ ở ít nhất một
  # space.
  #
  Không thêm được, ý chú ý (như như này) có thể được inserted on nhân
  # lines or theo tên máy này được gỡ bỏ bởi một '#' ký hiệu.
  #
  # For example:
  #
  # 102.54.94.97 rhino.acme.com # source server
  # 38.25.63.10 x.acme.com # x client host
  127.0.0.1 localhost

Step 4: Save the file with the name hosts.txt.
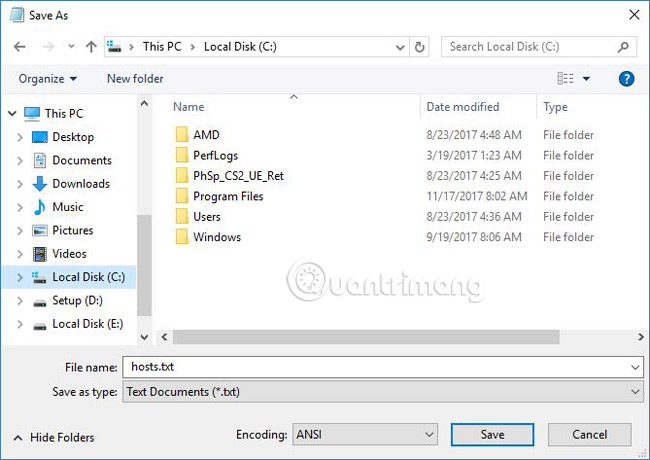
Step 5: Copy this hosts.txt file to the C: WindowsSystem32driversetc path
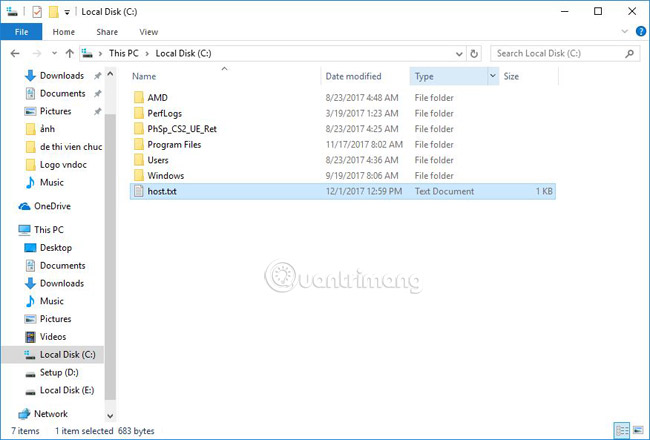
Step 6: Change the file name of hosts.txt to hosts (remove the .txt extension).
So, with just six simple steps above, you can restore the new host file as originally due to a day when it is not beautiful. Save the article for use when you need it or share this cool tip with friends when you encounter a similar situation.
Hope the article will be helpful to you, wish you success!
See more:
- How to increase VRAM in Windows 10
Was this article helpful?
Your feedback helps us improve.
Related Articles
 Simple and fast steps to edit Host File on Windows 103 minutes read
 How to open the Host file on Windows 10, edit the hosts file4 minutes read
 The simplest way to read and open Host file on Windows XP/7/8/103 minutes read
 What is a computer host file and how to edit a host file?3 minutes read
 Facebook host file, How to edit the host file on facebook 20175 minutes read
 How to fix the hosts file on Windows 103 minutes read
Reader Comments 0
Sign in with email or Google to join the discussion.