Table of Contents
This updated guide examines Video: How to Add Personal Movies to Itunes and organizes the essential facts, background, and practical takeaways in clear American English.
Part 1of 2:
Converting Your Video Files
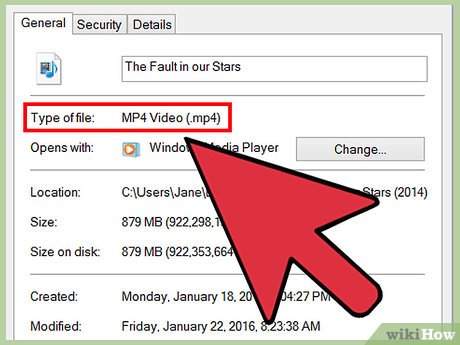 Check the format of the movie file you want to add. iTunes only supports the MP4 (M4V) and MOV formats. It does not support many popular formats, including AVI, MKV, and WMV. If your video files are not the proper format, you won't be able to add them to your iTunes library. Check your video's format before proceeding. If it is an incompatible format, follow this section to convert it to a compatible one. If the video is already in MP4, M4V, or MOV format, skip down to the next section.
- Windows - Right-click on the video file and select "Properties." Check the "Type of file" line in the General tab for the file format.
- Mac - Control-click the file and select "Get Info." Check the "Kind" line in the General section of the Show Info window.
 Download and install Adapter. This is a freeware video conversion program from Macroplant that can quickly convert your video files to an iTunes-compatible format. It is available for both Windows and Mac. As long as you download Adapter frommacroplant.com/adapter/, you shouldn't have to worry about adware.
- During installation, make sure to keep the "Download and install FFmpeg" box checked. This is required for the conversion process. FFmpeg is open-source and adware-free.
 Drag your video files into the Adapter window. You can drag all of the files that you want to convert, or just add single files at a time. You can also click the "Browse" button in the Adapter window and navigate to the files you want to convert.
 Click the Output menu at the bottom of the window. This will allow you to select what format you want to convert to.
 Select "Video" → "General" → "CustomMP4." This will set Adapter to convert your files to the MP4 format, which is compatible with iTunes.
- If you're adding these videos to iTunes so that you can sync them with your iOS device, select the preset for your iPhone, iPad, or iPod in the "Apple" section of the Output menu.
 Click the Gear button to see additional settings. This menu will allow you to adjust some of your settings before converting.
- You can change the destination for your converted files at the top of the menu.
- The "Quality" menu in the Resolution section will allow you to set the quality of the image after conversion. "Medium" is the default setting, which will result in a smaller file size with a minor drop in quality. If you want to keep the original quality of the video, select "Very High (Lossless)."
 Click "Convert" to begin converting the videos. This may take a while to complete, especially for longer videos and older computers.
 Find your converted files. By default, the converted videos will be in the same location as their originals. Find them so that you can add them easily to iTunes.
Part 2of 2:
Adding Movies to iTunes
 Launch iTunes. If your video files are the proper format, you can add them to your iTunes library. Make sure iTunes is up-to-date to ensure the best playback experience.
 Add a video file to your library. The process for this is a little different for Windows and Mac:[1]
- Windows - PressAltto display the menu bar. Click the File menu and select "Add File to Library" or "Add Folder to Library." Browse for the video file or folder containing multiple files that you want to add.
- Mac - Click the iTunes menu and select "Add to Library." Browse for the video file or folder that you want to add.
 Select the Movies section of iTunes. You can open this by clicking the filmstrip button at the top of the window. Don't be alarmed if your newly-added files don't appear; they're hidden in a sub-category.
 Select the "Home Videos" tab. You'll see this along the top row of iTunes.[2]
 Find your added videos. Videos that you've added yourself will appear in the Home Videos section. If the video is not appearing, then it was not in a compatible format. Double-check the format of the video file and convert it to a compatible one following the steps in the previous section.
 Move videos from "Home Videos" to "Movies" or"TV Shows." You can sort your new videos into the proper categories so that you can find them easier in the future:
- Right-click on the video in the Home Videos section and select "Get Info."
- Click the "Options" tab and use the "media kind" menu to change how the video is sorted.
FAQ
What is Video: How to Add Personal Movies to Itunes about?
It provides a structured overview of video, explains the main context, and highlights practical takeaways for readers.
Why does this topic matter?
Understanding the main concepts helps readers evaluate the issue, avoid common mistakes, and make better-informed decisions.
How should readers use this information?
Use the guidance as a practical starting point, confirm details that may have changed, and follow current product, safety, or security recommendations.
Related Articles
 How to Rent Movies on iTunes5 minutes read
 How to Delete Movies from Itunes3 minutes read
 How to Restore Itunes Account ID?: Itunes Account ID Recovery3 minutes read
 How to Add Movies to iPad: Complete Guide9 minutes read
 How to Use Itunes on Linux?: Install Itunes on Linux5 minutes read
 Instructions for Installing, Updating and Using Itunes on Windows 108 minutes read
Reader Comments 0
Sign in with email or Google to join the discussion.