How to Add a Footnote to Microsoft Word
Footnotes allow you to cite sources or explain a concept in detail without sidetracking the main text. Word makes managing footnotes easy, as new footnotes are numbered automatically, and the footnotes area expands and shrinks dynamically....
Method 1 of 3:
Word 2007/2010/2013/2016 (Windows)
-
 Click the "References" tab. This is located at the top of the window, typically between "Page Layout" and "Mailings". This tab lets you insert various reference tools, such as a table of contents, footnotes and endnotes, citations, captions and more.
 -
 Place your cursor where you want the footnote to appear. By default, footnotes will be designated by increasing superscript numbers. Place the cursor where you want the number to appear.
 -
 Click the "Insert Footnote" button. This is located in the "Footnotes" section of the "References" tab. The footnote number will be inserted, and a separator bar will be added to the bottom of the page. Your cursor will automatically be taken to the footnote at the bottom of the page so that you can fill it out.
- An endnote is like a footnote except the reference occurs at the end of the document. By default, endnotes are numbered with Roman numerals (i, ii, iii, etc.).
- Alternatively, you can press Ctrl + Alt + F to create a footnote, or Ctrl + Alt + D to create an endnote.
-
 Change when your footnotes numbering resets. By default, your footnotes will increase in number throughout your whole document. You can change this so that the numbers restart every page or at section breaks in the document.[1]
- Click the Menu button in the bottom-right corner of the "Footnotes" section. This will open the "Footnote and Endnote" window. In the "Format" section, use the "Numbering" drop-down menu to select when you want the footnote numbers to restart.
- You can insert section breaks into your document by clicking the "Page Layout" tab, clicking the "Breaks" button in the "Page Setup" section, and then selecting the type of break you'd like to insert. Besides changing the way footnotes are numbered, section breaks are great for making layout changing to specific portions of a document.
-
 Change your footnote formatting. If you'd rather have symbols instead of numbers, want the footnotes to appear below the text instead of at the bottom of the page, or want the numbering to start at a different number, you can change this from the "Footnote and Endnote" window. Click the Menu button in the bottom right-corner of the "Footnotes" section to open it.
- Click Symbol... to choose a symbol from the Symbol menu. You can choose any character from any font, though the "Symbols" font will open by default.
Method 2 of 3:
Word 2011 (Mac)
-
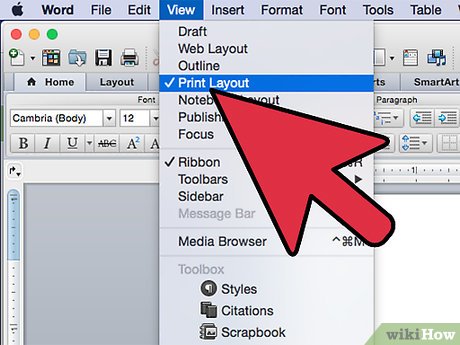 Switch to Print Layout view. Click View and select Print Layout.
 -
 Place your cursor where you want the footnote to appear. Your footnote will appear at the cursor, so place the cursor at the end of the text that you want to create a footnote reference for.
 -
 Insert the footnote. Click the "Document Elements" tab, and then click the "Footnote" button in the "Citations" section. A footnote will be inserted at your cursor and you will be taken to the footnote text section to enter the contents of the footnote. The footnote text will be at the bottom of the same page as the footnote, separated by a line.
- Alternatively, you can press Command + Option + F to create a footnote, or Command + Option + E to create an endnote.[2]
-
 Change your footnote formatting. If you'd rather have symbols instead of numbers, want the footnotes to appear below the text instead of at the bottom of the page, or want the numbering to start at a different number, you can change this from the "Footnote and Endnote" window. Click Insert and select Footnote.
- Click Symbol... to choose a symbol from the Symbol menu. You can choose any character from any font, though the "Symbols" font will open by default.

- By default, your footnotes will increase in number throughout your whole document. You can change this so that the numbers restart every page or at section breaks in the document. In the "Format" section, use the "Numbering" drop-down menu to select when you want the footnote numbers to restart.

- You can apply your formatting changes to just your selected text, the current section, or your entire document.

- Click Symbol... to choose a symbol from the Symbol menu. You can choose any character from any font, though the "Symbols" font will open by default.
Method 3 of 3:
Word 2003 (Windows) or Word 2004/2008 (Mac)
-
 Switch to Print Layout view. Click View and select Print Layout.
 -
 Place your cursor where you want the footnote to appear. Your footnote will appear at the cursor, so place the cursor at the end of the text that you want to create a footnote reference for.
 -
 Insert the footnote. Click Insert → Reference → Footnote... to open the "Footnote and Endnote" window. Select "Footnote", and then choose your numbering option. You can have Word number your footnotes automatically, or you can choose a custom symbol to insert.
- In Word 2004/2008, click Insert → Footnote....
- Alternatively, you can press Ctrl + Alt + F to create a footnote, or Ctrl + Alt + D to create an endnote in Windows. On a Mac, press Command + Option + F to create a footnote, or Command + Option + E to create an endnote.
-
 Enter your footnote text. Your footnote will be created and you will be taken to the footnote text section at the bottom of the page. You can enter the text you want for the footnote, and then click back in your document when you are finished.