How to Add a Photo to a Document Using Microsoft Publisher
Adding graphic images to your Microsoft Publisher publications can enhance their visual appeal and support the text with charts, graphs, and example photographs. You can add photos to Publisher documents in one of several ways: from the...
Table of Contents
Method 1 of 4:
Adding a Photo From the Clip Art Task Pane (Publisher 2003, 2007, and 2010)
-
 Find the photo you want to insert in the publication. Microsoft Publisher comes with a clip art collection that includes stock photographs as well as drawn graphic images.
- In Publisher 2003 and 2007, select "Picture" from the Insert menu and then select "Clip Art" from the Picture submenu. Type a word or phrase in the "Search for" box that describes what kind of photo you want. (For example, to insert a photograph of computer equipment, type "computer.") To limit the search to only photographs, be sure only the box in front of "Photographs" in the "Results should be" list is checked.
- In Publisher 2007, you can also select "Organize Clips" from the Clip Art task pane to display the Clip Organizer dialog. From here, you can browse for the folder that displays the photo you want to insert.
- In Publisher 2010, click the "Clip Art" button in the Illustrations group on the Insert menu ribbon. Type a word or phrase in the "Search for" box that describes what kind of photo you want. To limit the search to only photographs, be sure only the box in front of "Photographs" in the "Results should be" list is checked.
-
 Insert the photo. Click the photo of your choice from the Results list. Some versions of Publisher offer additional options, as noted below.
- In Publisher 2007, you can click the arrow next to the photo you wish to insert and then click "Copy." Right-click the place in your publication where you want to place the photo and click "Paste."
- In Publisher 2010, you can also click the arrow to the right of the photo and then select "Insert" from the popup menu that appears to place the photo in your publication.
Method 2 of 4:
Adding a Photo From the Content Library (Publisher 2007)
-
 Select "Item" from Content Library on the Insert menu. Microsoft Publisher 2007's Content Library is a repository for pictures, logos, and other items you can use in marketing campaigns. Anything you add here can be inserted in other publications.
 -
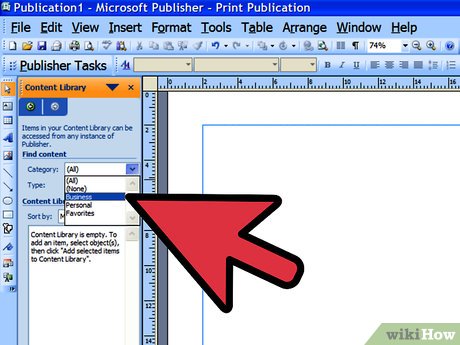 Select the category from the Category list in the Content Library task pane you wish to get a photo from.
 -
 Select the content you want from the Type list. If you have trouble finding the photo you're looking for, select "(All)" to display everything in the Content Library.
 -
 Narrow your choices, if need be, by selecting the appropriate sorting option from the "Sort by" list.
 -
 Insert the picture. Point to the picture in the list of results, click the arrow in front of it, and then click "Insert."
Method 3 of 4:
Adding a Photo From a File (Publisher 2003, 2007, and 2010)
-
 Set up a place for the photo to appear in your publication. In Publisher 2003 and 2007, this is called a picture frame, while in Publisher 2010, it's called a picture placeholder.
- In Publisher 2003, select "Picture Frame" from the Objects toolbar.
- In Publisher 2007, select "Picture" from the Insert menu and then select "Empty Picture Frame" from the Picture submenu.
- In Publisher 2010, select "Picture Placeholder" from the Illustrations group in the Insert menu ribbon. You can select a frame style for your picture from the Picture Styles group in the Picture Tools Format ribbon.
-
 Adjust the frame or placeholder as necessary. When the picture frame or placeholder appears in your publication, it is surrounded by a set of sizing handle dots. When you place your cursor over any one of these dots, it changes to a 2-headed arrow. By holding your left mouse button down and moving your cursor toward the center of the frame, you make it smaller. If you instead move your cursor away from the center of the frame, you make it larger.
 -
 Select and insert a photo in the frame/placeholder. You do this in Microsoft Publisher's Insert Picture dialog, which lists the folders on your computer. You navigate to the folder that contains the photo you want to insert in your publication. How you access the Insert Picture dialog depends on your version of Publisher.
- In Publisher 2003, select "Picture" from File.
- In Publisher 2007, either select "From File�" from the Picture submenu of the Insert menu or click the "Insert Picture" button on the Picture toolbar.
- In Publisher 2010, select "Picture" from the Objects group in the Home menu ribbon, from the Illustrations group in the Insert menu ribbon, or from the Insert group on the Picture Tools Format ribbon.
-
 Decide whether you want to embed or link the photos to your publication. Embedded pictures become part of the destination publication file; if you change the original picture in another program, you won't see the changes in the embedded copy. You can also move the original picture to a different location on your computer, and the picture will still appear in the publication. Linked pictures are connected to, but not physically part of, the destination publication file; any changes you make to the original picture in another program will appear in the publication file as soon as you open it. If you move the linked picture to a different location on your computer, it will not appear in the publication file until you re-establish the link. Linked photos do not increase the file size of the publication file, while embedded photos do.
- To embed the photo in your publication, choose "Insert" from the Insert dropdown button on the Insert Picture dialog.
- To link the photo to your publication, choose "Link to File" from the Insert dropdown button on the Insert Picture dialog.
- You can omit the first 2 steps and simply open the Insert Picture dialog and choose a photo to insert; however, the photo will appear in its full size in the center of your publication, and you will have to move and resize it as necessary.
Method 4 of 4:
Adding a Photo From Your Scanner or Digital Camera (Publisher 2003 and 2007)
-
 Set up a picture frame or placeholder for your photo. See the instructions under "Adding a Photo From a File" for how to set up a picture frame or placeholder in your version of Microsoft Publisher.
 -
 Set up the photo in your scanner or camera. Follow the instructions that come with your scanner or camera for connecting it to your computer and for having the image ready to be scanned or taken.
- If you have more than one scanner or camera attached, select which device you're going to use to transfer the image to your publication.
-
 Select "Picture" from the Insert menu.
 -
 Select "From Scanner or Camera" from the Picture submenu. This displays the Insert Picture from Scanner or Camera dialog box. If you have more than one scanner or camera attached to your computer, you can select which device you're going to use to transfer the image to your publication from this dialog.
- In Publisher 2007, you can also click the "Insert Picture from Scanner or Camera" button on the Picture toolbar.
- If you have more than one scanner or camera attached to your computer, you can select which device you're going to use to transfer the image to your publication from this dialog.
-
 Determine if you wish to customize your settings. If your photo is coming from a digital camera, or if you wish to customize your scanner settings, you can customize your settings by clicking "Custom Insert." If your photo is coming from a scanner and you don't wish to customize your settings, click "Web Quality" if your publication will be published digitally or "Print Quality" if your publication will be printed out, then click "Insert."
- If your scanner doesn't support an automatic scan, you'll have to use the "Custom Insert" button.
- When customizing your settings, follow the instructions that accompany the scanner or digital camera you're using.
-
 Complete the image transfer. For a photograph being scanned, this means perform the scan. For a photograph on a digital camera's memory card, find the folder that contains the photo you want and browse for the picture itself. Click "Get Pictures" to transfer the photo to your publication.
- Your scanner or camera needs to be either Windows Image Acquisition (WIA) or TWAIN compliant to allow you to transfer images into Microsoft Publisher, and you must have installed the interface software for your device before you can transfer images directly.
- Many newer desktop and laptop computers come equipped with memory card readers, as do printers capable of printing copies of digital photographs. If you don't want to connect your camera to your computer, you can instead insert its memory card in the card reader and follow the instructions under "Adding a Photo From a File" to insert the photo in your publication. If your computer doesn't have a built-in card reader but does have a USB port, you can buy a separate memory card reader that connects to the USB port.
- Microsoft Publisher 2010 does not support the direct input of photographic images from a scanner or digital camera. Instead, you can transfer images from your scanner or digital camera into the Clip Organizer and bring them into your publication from there. While this sacrifices the immediacy of direct transfer into Publisher, it can be beneficial if you decide to use the digital image later in another publication.
Was this article helpful?
Your feedback helps us improve.
Related Articles
 How to Use Microsoft Publisher6 minutes read
 How to Use Basic Microsoft Publisher6 minutes read
 How to Download Microsoft Publisher6 minutes read
 How to convert Microsoft Publisher files (.pub) to PDF3 minutes read
 How to Wrap Text Around a Picture in Publisher4 minutes read
 How to Create an Invitation in Microsoft Publisher13 minutes read
Reader Comments 0
Sign in with email or Google to join the discussion.