6 Ways to take screenshots of Windows 11 with extremely easy keyboard shortcuts
Like Windows 10, Win 11 supports many flexible screen capture methods. You can use the PrtScn key to capture the full screen or the Windows key + Shift + S to select the capture area with the Snipping Tool. The Snip & Sketch app is also available for quick editing and storing screenshots as desired.
Summary of ways to take screenshots of Windows 11 computers
Method 1: Take a screenshot of Windows 11 with the PrtScn key
On laptop or Windows PC keyboards, there is always a PrtScn key that allows users to quickly take a screenshot of the computer screen without using software by combining the PrtScn key with another function key, or using Used individually in different ways, users can easily take a screenshot of the entire Windows 11 screen or just a certain window and then store it in different places on their computer.
Take a screenshot of Windows 11 and save it in the Screenshot folder on your computer hard drive
If you want to take screenshots of the entire screen and save them on your computer's hard drive, you just need to press the key combination Windows + PrtScn or Windows + Fn + PrtScn (depending on the configuration and keyboard system above). user's device). After screenshots have been taken, they will be saved in the available Screenshots folder by default.
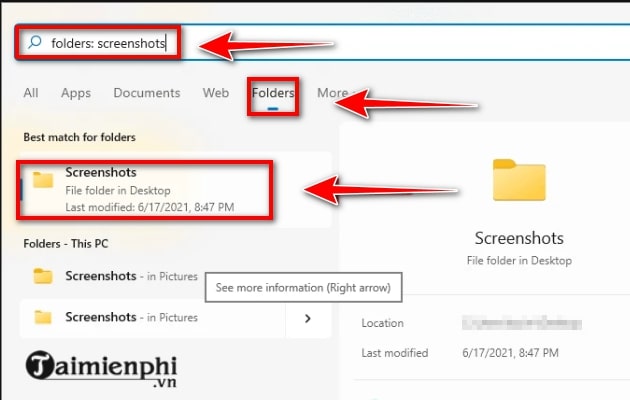
To access the Screenshots folder , you can open the Start menu then search for the keyword " Screenshots ", click on the Folders tab .
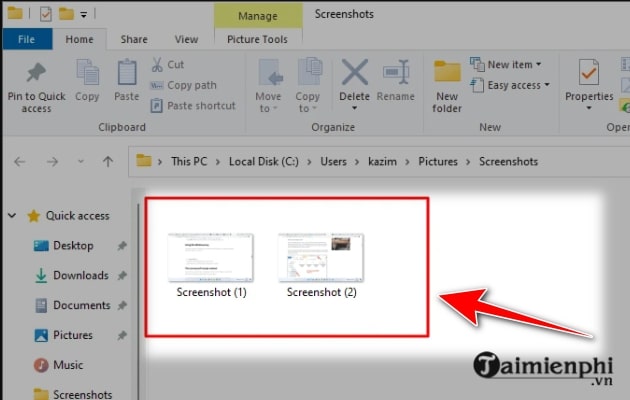
After opening the Screenshots folder, you will see the screenshots saved and numbered according to the time they were taken.
Take a screenshot of Windows 11 and copy it to the Clipboard
Taking dozens of screenshots and saving them on your hard drive can take up quite a bit of your memory space, while it also makes the process of finding a screenshot when needed difficult. more.
Instead, you can simply press the PrtScn or Fn + PrtScn key (depending on your device) to temporarily copy the full screen screenshot you need to the Clipboard . Then press Ctrl + V to paste the photo you just took anywhere you want, from image editing software to web chats that allow image sharing like Messenger.
When you don't need to capture the entire Windows 11 screen but only need to record a certain window, use the key combination ALT + PrtScn . Similarly, the photo you just took will also be copied to Cipboard and used similarly as above.
Note: Once the user has assigned the PrtScn key (or Fn + PrtScn) to open the Snip & Sketch tool (will be mentioned later in the article), the task of taking a screenshot and copying it to the Clipboard will not work. can still be used.
Method 2: Use the Snip & Sketch tool to take a screenshot of Windows 11
Snip & Sketch is a built-in application on the Windows platform, allowing users to take computer screenshots without software, comes with the ability to edit images, and will also copy screenshots. go to Clipboard.
Step 1: Start Snip & Sketch by pressing the key combination Windows + Shift + S.
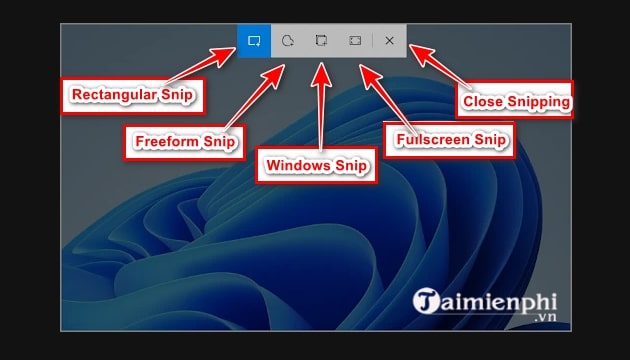
A toolbar will appear at the top of the screen. With this toolbar, you can find different manipulation options with Snip & Sketch including: Rectangular Snip, Freeform Snip , Windows Snip ), full screen capture (Fullscreen Snip) and Snip & Sketch exit button (Close Snipping).
Step 2: After capturing the computer screen, a notification window will appear in the lower right corner of the screen. Click on this notification to open the screenshot just taken with Snip & Sketch software.

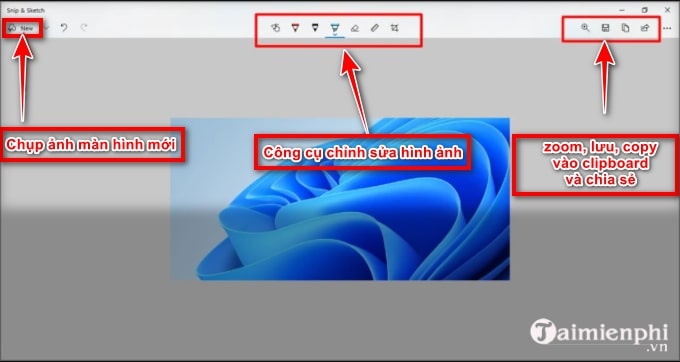
Step 3: Perform image editing steps using the built-in tools on the toolbar in the middle. While the function button combination on the right side of the toolbar includes the following functions: zoom, save image, copy to clipboard and share . If you want to take a new photo, click the New button in the left corner of the toolbar.
As mentioned above, users can completely assign the PrtScn key (or Fn + PrtScn) to quickly open Snip & Sketch software instead of using the Windows + Shift + S key combination .
To perform this key assignment, readers perform the following steps:
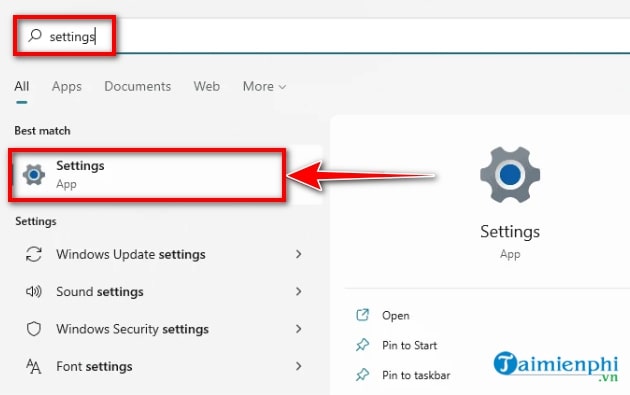
Step 1: Access the Start menu , then search for the keyword Settings , click on the Settings App icon .
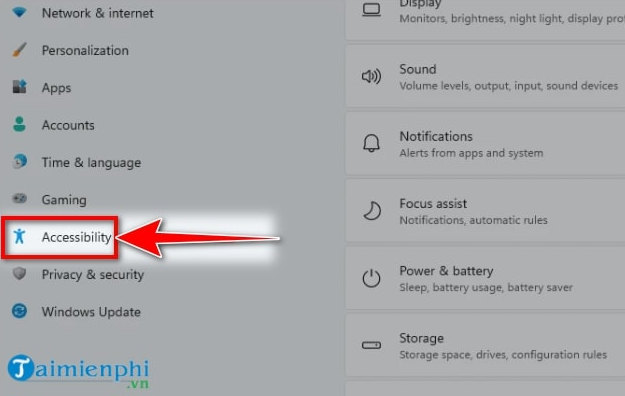
Step 2: In the left pane, click Accessibility .
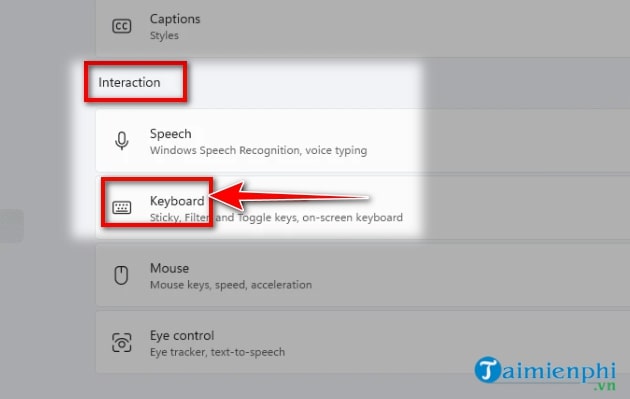
Step 3: Next, pull the menu down to the Interaction section and click on the Keyboard option .
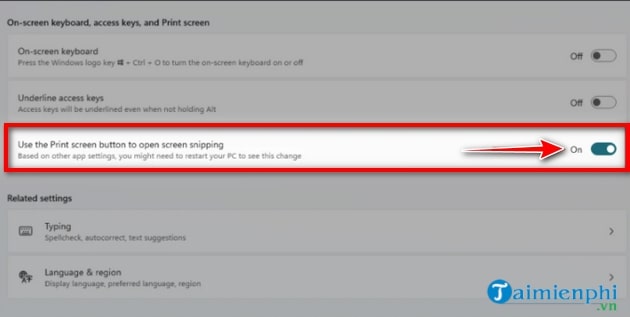
Step 4: Click the switch icon in the " Use the Print Screen button to open screen snipping " section to On mode .
Step 5: Restart the computer to apply the changes.
Now you can start the Snip & Sketch tool with just the PrtSrn key (or Fn + PrtScn)
Method 3: Take a screenshot of your Windows 11 computer with Snipping Tools
You can also take screenshots of Windows 11 with another available software easily and conveniently. That is Snipping Tools.
In general, Snipping Tools has quite similar functions to Snip & Sketch. However, unlike Snip & Sketch, after a screenshot is taken, Snipping Tools will automatically open the image through the Snipping Tools application and when taking a photo, the screen will slightly darken except for the area selected for capture. screenshot. You can also find a few image editing tools available in Snipping Tools.
To take Windows 11 screenshots with Snipping Tools, readers follow these steps:
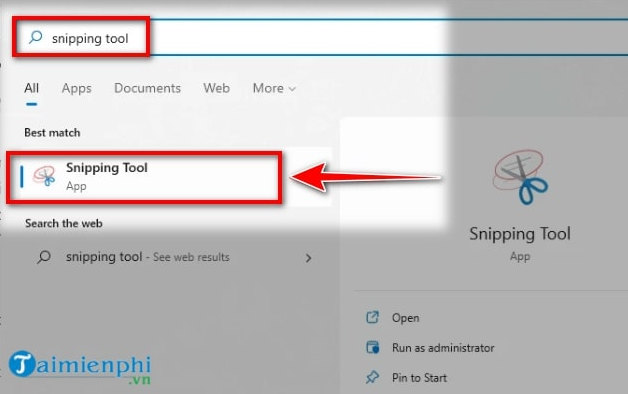
Step 1: Open the Start menu , search with the keyword Snipping Tools then click the Snipping Tool App button.
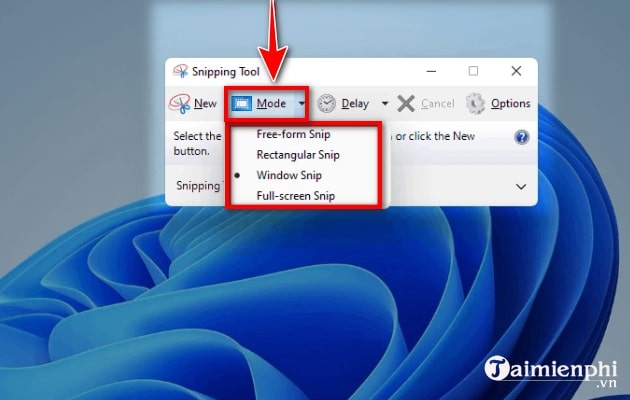
Step 2: Similar to Snip & Sketch, you can also choose 4 different screen capture modes in the Mode menu of Snipping Tool including: rectangular frame capture (Rectangular Snip), free frame capture (Freeform Snip), capture a window (Windows Snip), capture the entire screen (Fullscreen Snip).
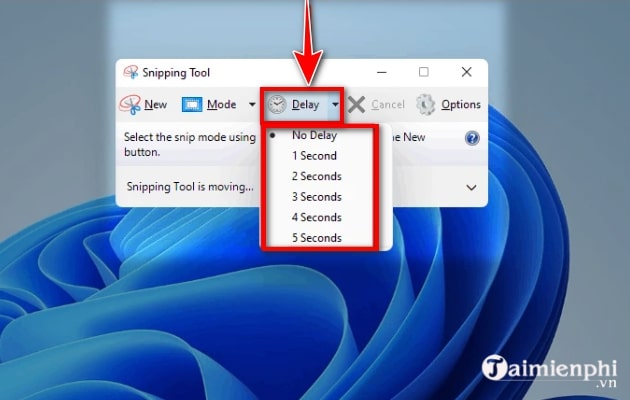
Step 3: You can also customize the delay when taking screenshots with the Snipping Tool's Delay feature .
Step 4: After selecting the shooting mode and delay when taking a screenshot, drag and hold the right mouse button (with Freeform Snip + Rectangular Snip mode) or select the window you want to take a photo of (with Windows Snip mode). ), then release the mouse and the photo will automatically open in the Snipping Tool software window.
Step 5: Next, you can use a few image editing tools such as: eraser (Eraser), highlight details (Highlighter), draw more details by hand (Pen), copy to Clipboard (Copy) and Save the image (Save snip).

Method 4: How to take a screenshot of your computer using Xbox Game Bar
Not only does it allow Windows 11 screen video recording, Xbox Game Bar also has the ability to take computer screen shots which is quite useful. To take Windows 11 screenshots with Xbox Game Bar, readers can refer to the following steps:
Step 1: Open the Xbox Game Bar software with the Windows + G key combination (or you can also open this software through the Start menu)
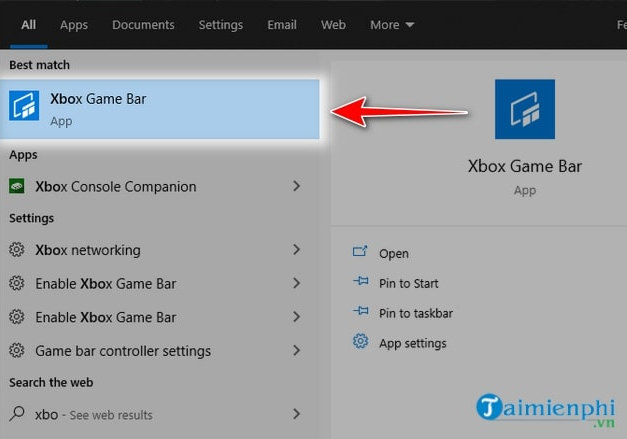
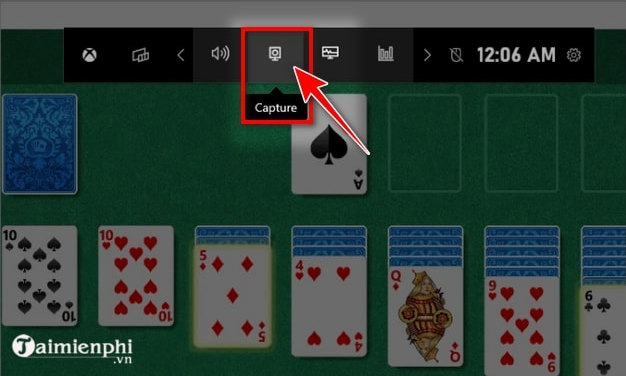
Step 2: Click the Capture button on the Xbox Game Bar toolbar.
Step 3: Next, click on the camera icon in the Capture menu to take a screenshot or use the key combination Windows + ALT + PrtScn (or Windows + ALT + Fn + PrtScn depending on your device).
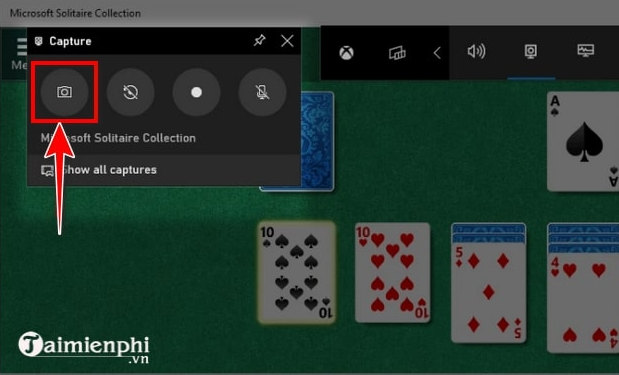
Step 4: The screenshot taken by Xbox Game Bar will be saved at the following address on your computer: C:UsersUser AccountVideosCaptures .
Note: Replace the phrase " User Account " in the above address with the account name you are using to log in to your personal computer.
Method 5: Take a screenshot of your computer using ShareX
Step 1: Download ShareX latest version here.
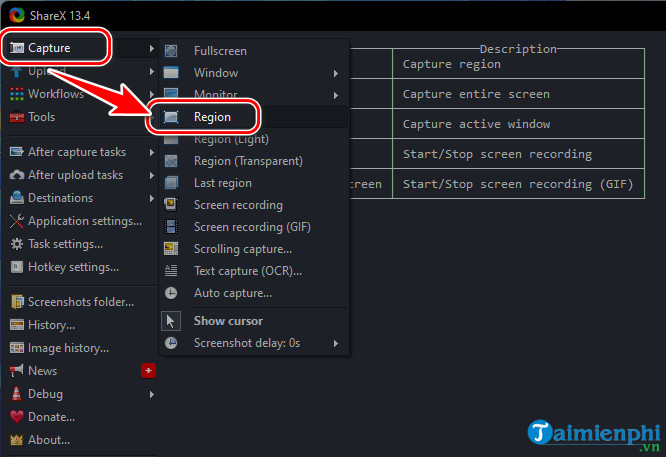
Step 2: Click directly and install as usual, open ShareX software on your computer, click Capture => select Region .
Note: If you want to take a long screenshot of Windows 11, choose the Scrolling capture function .
Step 3: Now a frame appears, place your mouse on the location you want to capture on the screen and press Left Mouse .
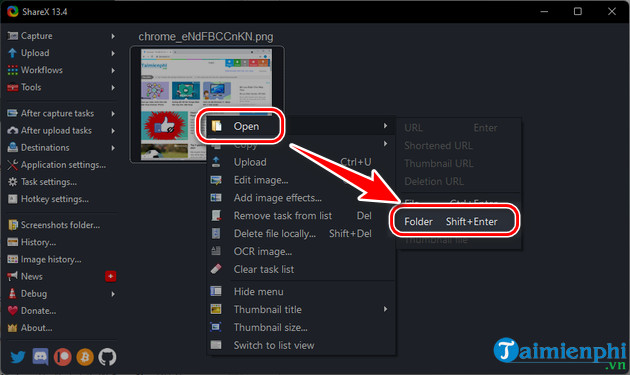
Step 4: The photo will immediately be saved to your computer. Right -click on the photo and select Open => click Folder to open the folder containing the screenshot in the step above.
Method 6: Take a screenshot of your computer using PicPick
Step 1: Download the latest version of PicPick here.
Step 2: Proceed with the installation like other software, open PicPick on your computer and select Region .
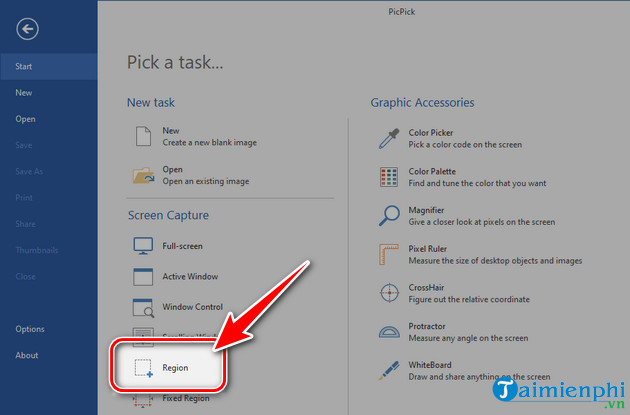
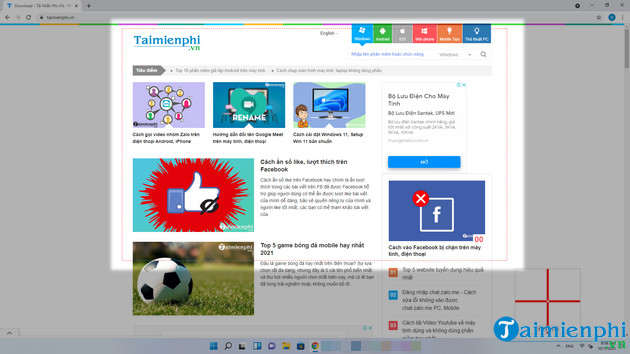
Step 3: Left Click and drag to the area you want to capture and release.
- For example: We want to capture the area below, not the entire screen.
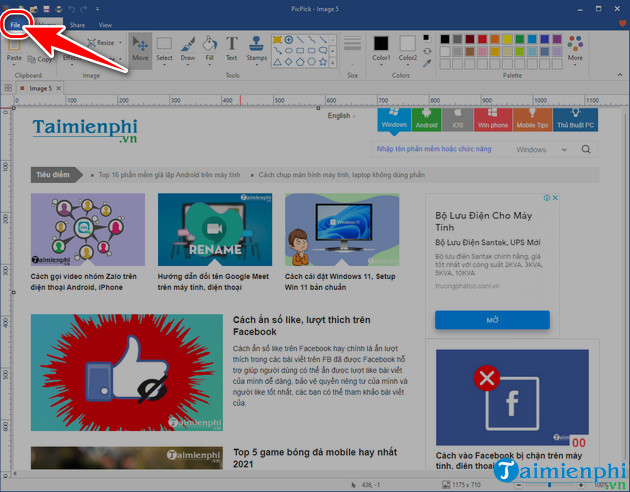
Step 4: When finished capturing, click File => select Save As to save the screenshot.
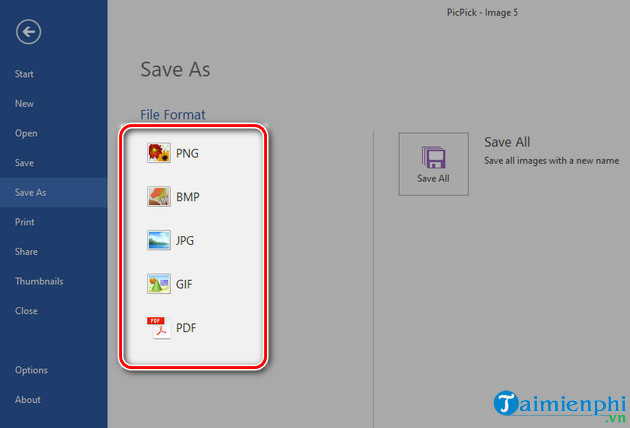
Step 5: Choose a photo format to save the photo to your computer.
Thus, with Windows 11, you can completely take screenshots without the need for third-party software, all tools such as Snipping Tool, Snip & Sketch or Xbox Game Bar allow you to take screenshots. The most satisfactory Windows 11 screenshots.
In addition, readers can also refer to many other useful tips and tricks on Windows 11 with articles posted by TipsMake such as how to record video of Windows 11 screen without using software for those who do not know. .
Windows 11 also has many other useful features to help users work and study conveniently. In particular, the screen split feature on Windows 11 laptops has been given very detailed instructions by TipsMake, you can refer to it to follow.