Table of Contents
How to Take Screenshots of Windows 10 Using Windows Ink Workspace is easier to understand when the core ideas are paired with practical examples. The sections below explain the topic clearly, highlight useful steps, and point out details that can prevent common errors.
Screen capture on every Windows computer has become a basic operation, familiar to many users. The simplest way is to use the Print Screen key, then edit the image on tools like Paint or use Adobe Photoshop software. In addition, we can also use the Snipping Tool in the article How to take screenshots on Windows 10 that we introduced.
- How to turn on auto-release memory mode Windows 10 Creators Update
- Summary of several ways to turn off Windows 10 computer
- Instructions for creating the Settings shortcut on Windows 10
Step 1:
First of all, we need to open the interface that wants to take screenshots on the computer. Next, users need to click on the Windows Ink Workspace icon on the Taskbar taskbar. In case you don't see the icon, right-click on the Taskbar and select Show Windows Ink Workspace button .

Step 2:
Next, click on the tool icon in the Taskbar and the Windows Ink Workspace interface will appear. Here, click on Screen Sketch .

Step 3:
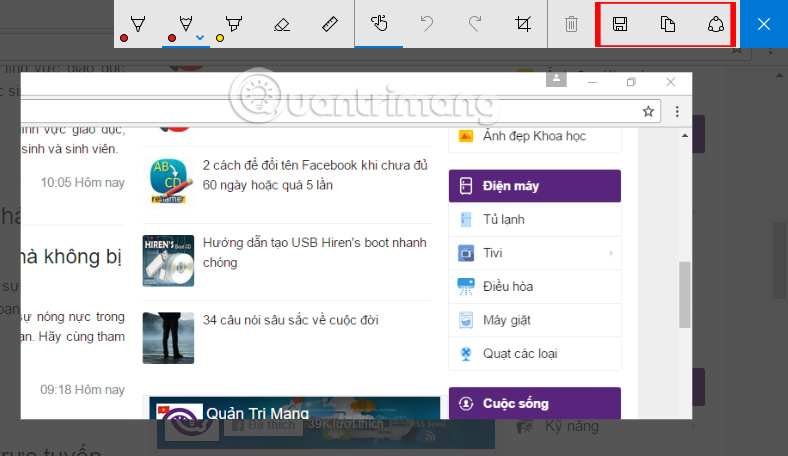
After you click this option on Windows Ink Workspace, the screenshot will be taken and an editing window will appear as shown below. The top row will be tools for you to customize the screen interface snapshot.

Step 4:
In the Screen Sketch interface, we can crop the screenshot with the Crop icon . The user moves the square frame position or collapsed, stretching to select the cutting area. Then press the tick icon to cut the selected screenshot.

Or you can draw scanned screenshots with pen types that Windows Ink Workspace provides. We can choose the types of brushes and colors at the color palette in the list.

Click the Copy or Save icon to save the screenshot. Users can also share this screenshot with the Share icon right on the Windows 10 computer.
Above is how to use Windows Ink Workspace tool to take a screenshot of Windows 10 computer screen, Anniversary Update version or more. Windows Ink tool brings users many other image editing features, in addition to the ability to capture screen interface.
I wish you all success!
FAQ
What should you know about step 1?
First of all, we need to open the interface that wants to take screenshots on the computer. Next, users need to click on the Windows Ink Workspace icon on the Taskbar taskbar. In case you don't see the icon, right-click on the Taskbar and select Show Windows.
What should you know about step 2?
Next, click on the tool icon in the Taskbar and the Windows Ink Workspace interface will appear. Here, click on Screen Sketch.
What should you know about step 3?
After you click this option on Windows Ink Workspace, the screenshot will be taken and an editing window will appear as shown below. The top row will be tools for you to customize the screen interface snapshot.
Related Articles
 TOP best AI Workspace platforms16 minutes read
 How to Save Screenshots on Mac to Your Desired Folder5 minutes read
 How to Work with Workspace in GNOME5 minutes read
 How to Take Scrolling, Long Screen Screenshots in Windows13 minutes read
 3 Quick Ways to Take Screenshots in Windows 83 minutes read
 How to Take Screenshots in Windows Phone 83 minutes read
Reader Comments 0
Sign in with email or Google to join the discussion.