Use Admodify.net for Exchange 2003 administration and recovery
ADModify.net is a smart tool for Exchange administrators and Network to edit large numbers of Active Directory objects. This tool is designed by the Exchange Support Services team, using C # .Net 2003..
ADModify.net is a smart tool for Exchange administrators and Network to edit large numbers of Active Directory objects. This tool was designed by the Exchange Support Services team, using C # .Net 2003. Its main task is to change the properties of Active Directory objects or select multiple objects to change properties in bulk. . Even if those attributes are not in the GUI , it is still specified by ADModify.NET by name (Name) and value (Value). This is the real practical tool for administrators.
In addition ADModify.NET also helps you recover data when having hardware failure in Exchange server.
There are many ways to use ADModify.net. But in this article we will cover the following main contents:
-
Preamble
-
Change properties
-
Use ADModify.net to recover data when there is a hardware problem
-
Undo function
-
Add users with certain permissions to multiple mailboxes
Preamble
Download this tool for free at the following link: http://workspaces.gotdotnet.com/ADModify
Note : ADModify.net requires .NET Framework v1.1. You cannot run ADModify.net via a network device.
After downloading, extract the files and double-click ADModify.exe . After double clicking on that .exe file, nothing is installed, but simply open the ADModify.net application.

Figure 1 : ADModify.Net initial screen.
Change properties
We will start with browsing the range of editable properties.
Click Modify Attributes , the following screen will appear:
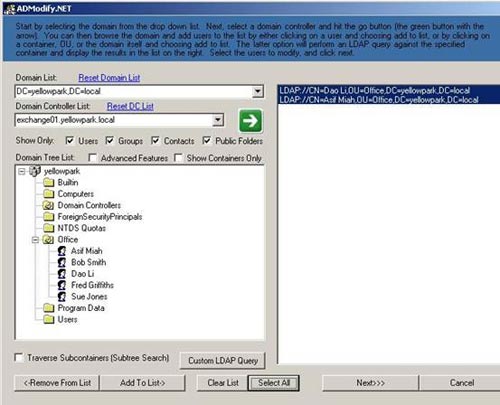
Figure 2 : Editable attributes
Select the appropriate domain from the Domain List and select Domain Controller ( DC ) - the domain controller you want to use. Click the blue arrow key, which will display a domain very similar to Active Directory Users and Computers. Expand Domain Tree List .
You can set options to display only the types of objects you want. If you do not check the Show Containers Only box, you can change each individual user in the appropriate OU. You will need to click the blue arrow key to query the Domain Tree List again .
Select the user you want to edit and click Add to List . After adding all necessary users, select the user in the right pane and click Next . The following table appears:

Figure 3 : Properties of ADModify.NET
You should consider a number of different properties tabs on the table. It seems very familiar, because they are exactly the same as the Active Directory Properties dialog box. If you have a test domain, try changing properties for several different users.
Use ADModify.net to recover data when there is a hardware problem
Recently, my source of Exchange 2003 installation server was dead. In order for users to still be able to send and receive e-mail quickly, I use ADModify.net, move the user mailbox location from a corrupted server to another Exchange Server. After recovering the hardware, I will move the mailboxes back to the original server, also using ADModify.NET.
In this example, you will need two Exchange 2003 servers installed on Windows Domain. Public Folder is synchronized between two servers.
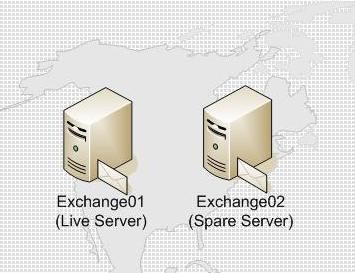
Figure 4 : Example network
Start ADModify.NET and click Modify Attributes . Select the appropriate domain from the Domain List and select the Domain Controller ( DC ) you want to use. Click the blue arrow key, expand Domain Tree List .
Select the Organizational Unit (OU) or the user you want to edit and click Add to List . Once you have added all the users you need to list, select the user in the right pane and click Next .
To change your e-mail location, click the Exchange General tab and click Set homeMTA. Select Exchange02 from the homeMTA drop-down list and click the Go!
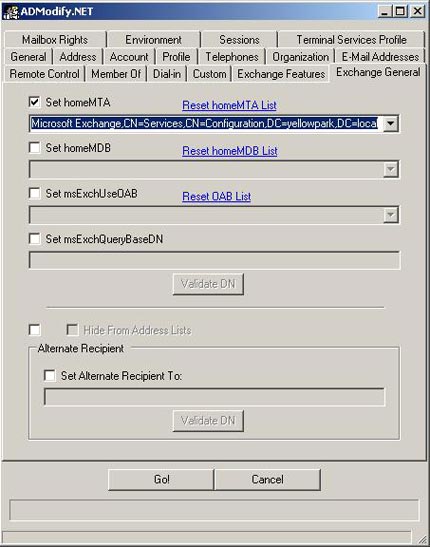
Figure 5 : ADModify.NET modifies common properties in Exchange General.
Restart ADModify.NET and repeat the process with the Exchange General label. Click Set homeMDB , then select Exchange02 from the drop down list of homeMDB and click on the Go! This will move the mailboxes from the failed server (Exchange01) to the reserved server (Exchange02).
Tip : You should move mailboxes in two stages as above. Because it will be easy to confuse the results when selecting multiple users and apply large changes to the properties of both homeMTA and homeMDB at the same time .
Depending on the network configuration and firewall, you may need to transfer the public IP address from the failed server to the reserved server to allow mail to flow into the Exchange Organization . After that, users can send and receive e-mail as usual.
Force Active Directory to replace each DC and send a test e-mail to a mailbox to see how the conversion works. It will take a certain amount of time to repair the server that has failed and bring it back to work.
After fixing the error server, to move the mailboxes back to the original server, perform the simple reverse process as follows:
Start ADModify.NET and click Modify Attributes . To change the mailbox location, click the Exchange General tab and click Set homeMTA . Select Exchange01 from the homeMTA drop-down list and click Go!
Restart ADModify.NET and repeat this process with the Exchange General label. Click Set homeMDB , then select Exchange01 from the drop down list of homeMDB and click Go!
Force Active Directory to replace each DC and send the test e-mail to a mailbox to see how the conversion takes place.
When changing the user's mailbox location as above, in fact, you cannot move the contents of each mailbox. The original mailbox contains all mail, calendar, contacts at the old location. New mailboxes are simply created in new areas. So when you move the mailbox back to the original server, you need to combine the two mailboxes into one to make sure the user gets a complete copy of the data in their mailbox.
Undo function
Another great part of this tool is the ability to undo the recently executed activity (undo). With the exception of the Remove Exchange Attributes option (removing Exchange properties) and Import Mailbox Rights (loading into mailbox permissions), all changes can be canceled.
Whenever making changes to properties, these changes are left in the form of an xml file and record the current date and time: MMDDYYYYHHMMSS.xml, which can be used to revoke the changes made.
To undo an activity, start ADModify.NET, click Undo Changes .
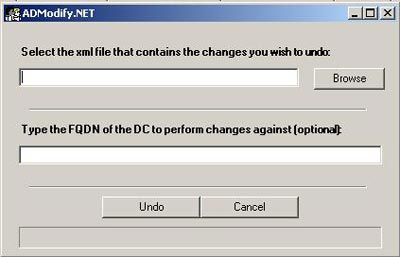
Figure 6 : Undo Change dialog box
Click Browse to select the appropriate xml file for revoking the changes. Click Undo , the changes will be revoked.
The change is recorded in the undo.log file. This file contains detailed content of all users who are Undo performers, skipped user logs, reason for skipping and summary of changes.
Add users with certain permissions to multiple mailboxes (optional Bulk Add )
Can add a user with specific permissions to multiple mailboxes at the same time. For example, add Bob user account with Full Access rights (full access) to mailboxes of Asif and Sue. Open ADModify.NET and click Modify Attributes .
Select the appropriate domain from the Domain List and select the Domain Controller ( DC ) you want to use. Unchecked in Show Containers Only .
Click the blue arrow key, which will display a domain very similar to Active Directory Users and Computers. Expand Domain Tree List .
The list of individual users within the OU is corresponding. Select the user as Asif and Sue, click on Add to List . Select Select All and Next .
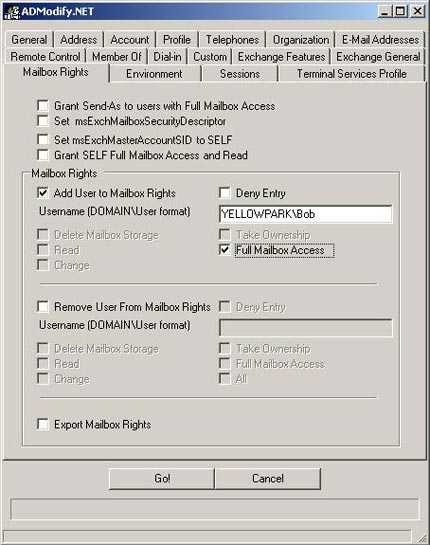
Figure 7 : Rights properties in Mailbox Rights
Click the Mailbox Rights tab. Check the Add User to Mailbox Rights check box . Enter the username in the DOMAINusername format and tick Full Mailbox Access . Then click on Go!
You can set up a number of different options here like Bulk Remove a User from Mailbox rights, Undo activities that have just been done . In which Bulk Remove a User from Mailbox rights is the same as the Bulk Add option, The only difference is that it will remove some users from the Mailbox Rights.
Conclude
In this article we have briefly discussed some of the functions ADModify.NET can do. It helps you to edit large numbers of all Active Directory objects in a synchronized manner and supports quick recovery of the system after a problem, allowing users to be uninterrupted when sending and receiving e-mail to Although the main server stopped working.
The latest version adds smart undo feature. Since then network administrators can be confident that any changes on a large number of objects can be recovered. ADModify.NET should be a simple but effective component in every Exchange administrator's toolbox boxes.