Table of Contents
This guide provides a clear, practical overview of steps to insert and animate 3D models in PowerPoint, with useful context, important details, and straightforward takeaways for everyday readers.
And these 3D models also allow us to format and create effects similar to other objects in PowerPoint.
In addition, because these are 3D models, PowerPoint also provides us with 5 other types of special effects, namely Arrive, Turntable, Swing, Jump & Turn and Leave.
Okay, and in this article I will show you how to create 3D effects and add effects to 3D models in the most detail.
#first. Steps to insert 3D models in PowerPoint
Similar to the feature of inserting Video into PowerPoint, this feature also has 2 options: inserting from existing files, or inserting from the Internet.
1.1. Insert from 3D files available in the computer
+ Step 1: Start PowerPoint => select Insert => in the Illustrations group => select 3D Model => select This Device.
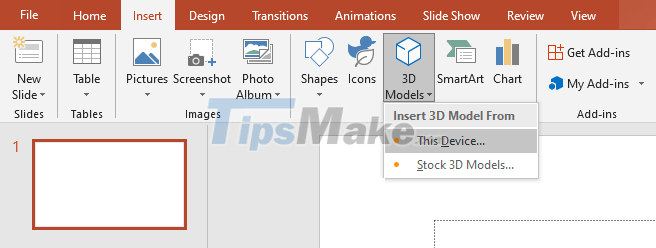
+ Step 2: When the Insert 3D Model dialog box appears, find and select the model you want to insert => select Open.

PowerPoint currently supports them in many different formats such as *.fbx, *.obj, *.3mf, *.ply, *.stl, etc. Of which *.glb is the most popular format.
1.2. Insert from Microsoft's online library
+ Step 1: Start PowerPoint => select Insert => in the Illustrations group => select 3D Model => select Stock 3D Models .

+ Step 2: When Online 3D Models appears, select the model you want to insert => select Insert

This library currently provides us with over 60 different topics: Emoji, Chemistry, Anatomy, Animals, Clothing, Furniture, Industrial, Tools, Toys, .
In addition to the available models, you can also enter the name of the model (recommended to enter in English) in the search box to find more models.

#2. Customize the viewing angle for the inserted 3D model
3-D models differ from other objects mainly in the ability to change the perspective. There are two ways to change this: select pre-designed views or customize directly on the object.
Method 1:
+ Step 1: Select the model.

+ Step 2: The Format context card appears, in the 3D Model Views group, choose one of the 18 views that PowerPoint provides.

Method 2:
+ Step 1: Select the model.

+ Step 2: Rotate the 'round button' to any angle to obtain the corresponding viewing angle.

#3. Special effects exclusively for 3D models
As I introduced above, 3-D models not only have effects like regular objects but also have 5 more special effects: Arrive, Turntable, Swing, Jump & Turn and Leave

Effect name Effect group A description of the effect Arrive Entrance Rotate and gradually Turntable Emphasis Rotate around a preselected axis Swing Emphasis Swing gently from side to side Jump & Turn Emphasis Jump and rotate Leave Exit Fading and disappearing
Different effects will have different Effect Options. Therefore, in the brief scope of this article, I will only introduce briefly.
It is not possible to explain each option specifically because it is very verbose and confusing. Instead, you just need to try it a few times and you'll understand right away.
- Direction direction.
- Intensity intensity.
- Rotation Axis Rotation Axis.
- Amount

#4. Tips for downloading PowerPoint models to your computer
Models in the Microsoft library cannot be downloaded directly in the usual ways. Instead, you need to use special methods, below are the methods I usually use.
+ Step 1: Insert the models to be downloaded into PowerPoint Silde Sil
+ Step 2: Follow the instructions in the article How to get pictures in Word, Excel and PowerPoint files?

After downloading, you can view the model in supported software, or share it with friends or simply insert it into PowerPoint when there is no Internet connection.
If you are using Windows 10, you can view it with the available 3D Viewer software.
#5. Epilogue
Well, that's it, I've just guided you in detail on how to insert and animate 3D models in PowerPoint.
In order for 3D models to make full use of it, in addition to choosing the right model for the context of the presentation, you also need to choose and customize the effect accordingly.
In addition, we should not abuse inserting too many models into the presentation. This will make the PowerPoint file very heavy, even causing the computer to hang on weakly configured machines.
Okay, hope this article will be useful to you. Goodbye and see you in the next posts!
Key Takeaways
Use the information above as a practical reference for steps to insert and animate 3D models in PowerPoint. Review each step carefully, confirm any requirements, and choose the option that best fits your situation.
FAQ
What does this guide explain about Steps to Insert and Animate 3D Models in PowerPoint?
It explains the main concepts, practical considerations, and useful steps related to steps to insert and animate 3D models in PowerPoint without requiring advanced knowledge.
Who can benefit from learning about Steps to Insert and Animate 3D Models in PowerPoint?
This information is useful for readers who want a clear overview, practical guidance, and reliable steps related to steps to insert and animate 3D models in PowerPoint.
What should I check before applying this information?
Review the requirements, confirm that your device, software, or situation matches the instructions, and back up important data before making major changes.
Related Articles
 How to Insert 3D Models into Word and PowerPoint in Office 20164 minutes read
 How to Add Animation Effects in Microsoft Powerpoint10 minutes read
 How to Insert Images Below the Word on PowerPoint: PowerPoint Tips4 minutes read
 Steps to Insert Video into PowerPoint 20197 minutes read
 How to Insert Videos into PowerPoint 20167 minutes read
 Instructions for Inserting Checkmarks in Powerpoint4 minutes read
Reader Comments 0
Sign in with email or Google to join the discussion.