Steps to insert Video into PowerPoint 2019
As you all know, the latest version of PowerPoint 2019 now supports us to insert a lot of objects into slide shows. With this version of Powerpoint, you can insert objects like:
- Board.
- Pictures, screenshots.
- Shape, icon, 3D model, SmartArt, chart.
- Add-ins.
- Link.
- Comment.
- Text Box, Header & Footer, WordArt.
- Math Formula, Symbol.
- Video, Audio, Screen Recording…
In which, Video is one of the most inserted objects in presentation slides.
In this article, I will show you how to insert Videos into PowerPoint 2019. In addition, I also show how to edit (cut) and customize how Videos work when presenting Slides.
Steps to insert Video into PowerPoint 2019
PowerPoint 2019 supports us to insert Videos from online video sharing services such as YouTube, SlideShare, Vimeo, Stream or insert available videos from the computer.
#first. Insert Videos from Online Services into PowerPoint
+ Step 1: Start PowerPoint => select Insert => select Video => select Online Video .
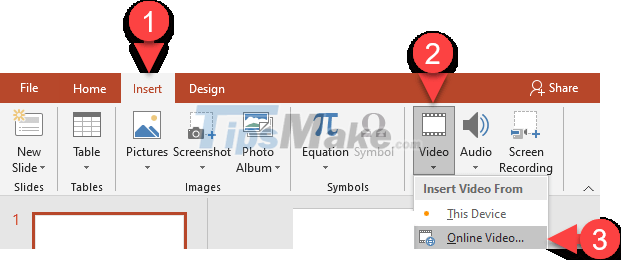
+ Step 2: Access the service where you plan to insert the Video (for example, you go to youtube.com) => search for the Video to insert => copy the address of that Video.
As soon as you paste the video's address in => if this address is valid, the Video's Thumbnail will appear as shown below.
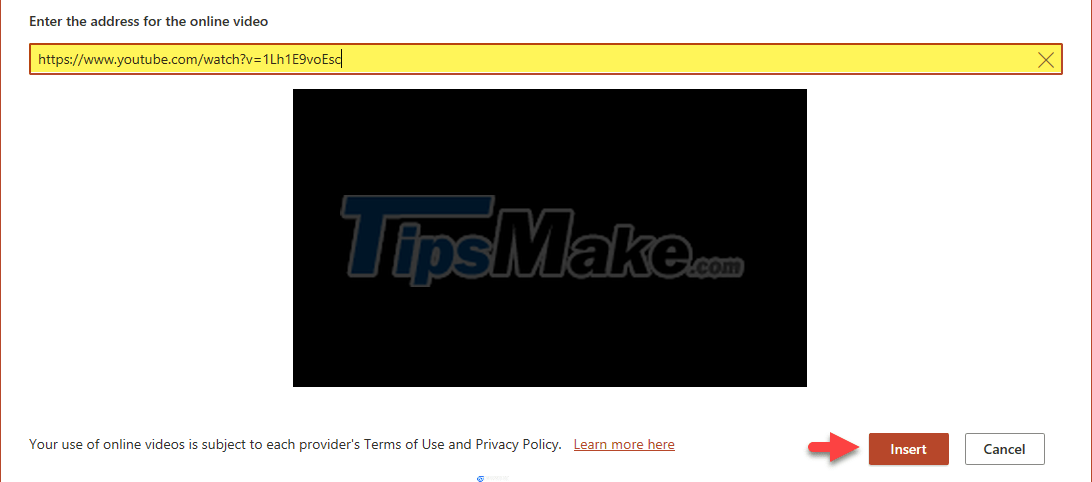
The advantage of this insertion is that it does not take up storage space, and is not afraid of the error of not finding the Video when copying PowerPoint files to other computers.
The downside is that an Internet connection is required for the computer, and it does not support editing as well as customizing how the Video works after inserting.
#2. Insert Video into PowerPoint (video is available in the computer)
+ Step 1: Start PowerPoint => select Insert => select Video => select This Device.
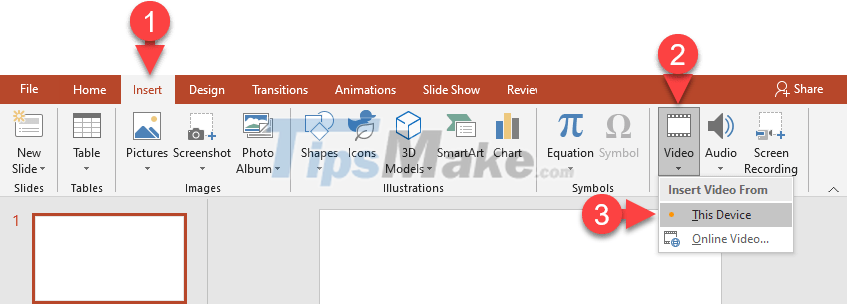
+ Step 2: The Insert Video dialog box appears => find the folder containing the Video file => select Video => select Insert.
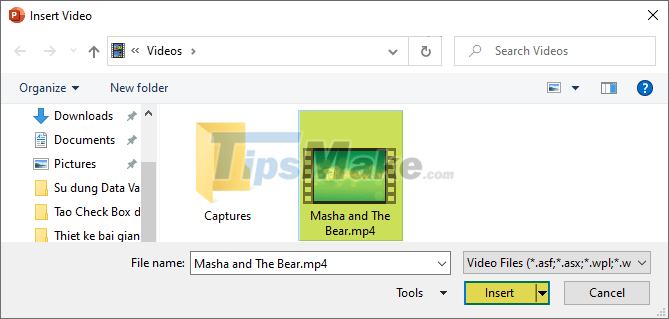
PowerPoint 2019 supports us to insert Videos with many different formats such as *.asf, *.avi, *.mk3d, *.mkv, *.mov, *.mp4, *.mpeg, *.m2ts, *wmv, …so you can be assured of compatibility
How to cut Video with PowerPoint 2019
As soon as you select Insert, the process of inserting Video will begin, the Video after being inserted into the Silde will look like the image below.
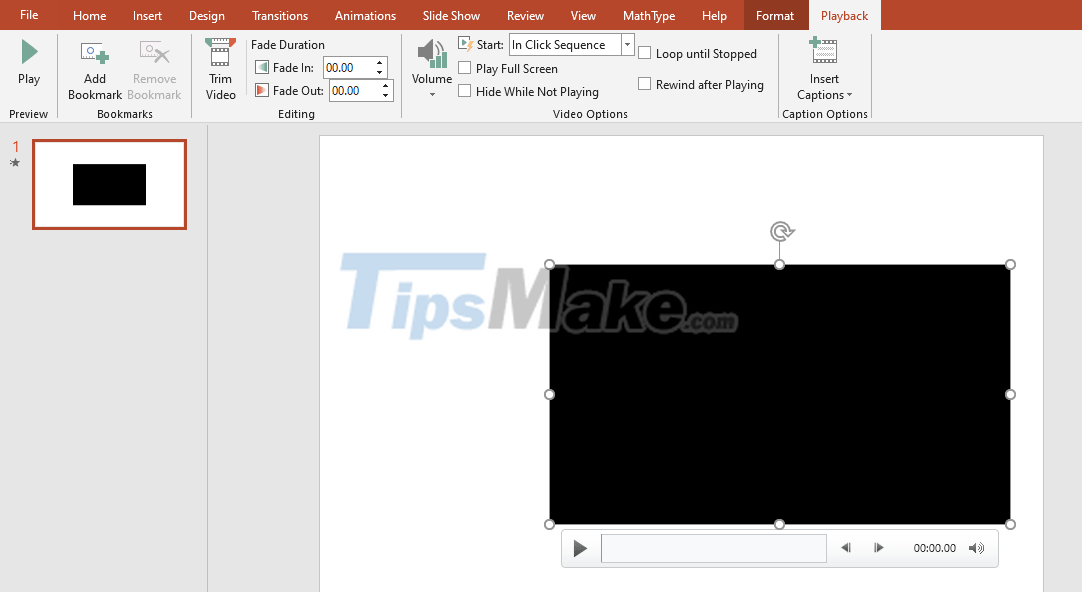
When you select Video, the Format and Playback contextual cards will appear allowing you to format, edit and customize how the Video works.
Because PowerPoint is not a Video editing software, we can only edit Videos at a very basic level, which is CUT (Trim).
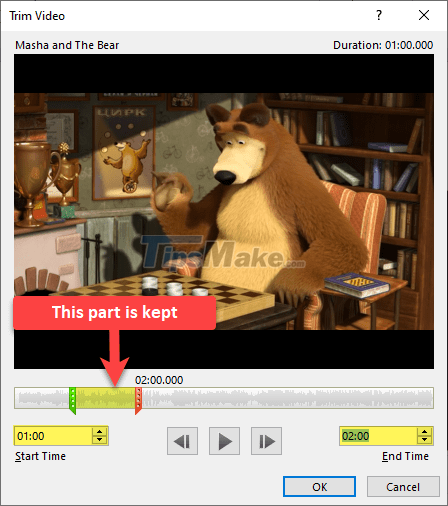
+ Step 1: Select Video => select Playback tab => select Trim Video

+ Step 2: Trim Video dialog box appears xuất
Drag and drop the 'blue bar' and 'red bar' to mark the cut position (the segment between these two GREEN and RED bars will be the retained video).
Or you can also enter the start and end times in the Start Time box and the End Time box, respectively.
=> Then select OK
In the Edit tool group, there is another feature that I find very good, which is Fade Duration. This feature allows you to customize the sound of the Video to increase in volume at the beginning and fade in at the end.
To customize this effect, you just need to enter the growing time in the Fade In box and the decreasing time in the Fade Out box.

Customize how Videos work in PowerPoint
Before coming to the actions to customize how Video works, we will learn together how to customize the volume for Video first.
Implementation: Select the Playback tab => in the Video Options group, select Volume => you choose:
- Low volume small.
- Medium medium volume.
- High volume loud.
- Mute removes the volume.

Back to the main topic, PowerPoint gives us all 5 options to customize how the Video works during the presentation.

- Start
- In Click Sequence Video plays when you click the mouse.
- Automatically Video runs automatically during slideshow.
- When Clicked On Video runs when you click on it.
- Play Full Screen Video appears in full screen mode.
- Hide While Not Playing hides Videos when not playing.
- Loop until Stopped Video plays back automatically.
- Rewind after Playing
Conclude
Okay, so I have detailed instructions for you how to insert videos into PowerPoint 2019. In general, it is no different from the older versions.
During PowerPoint presentation, you can press Alt + P to Play Video, and press again to Pause.
In addition, you can choose to Add Bookmark to add Bookmark for Video. Bookmarked points can be used to trigger an effect through the Trigge feature.
Details on how to do this can be found in the article: How to create Lyric Video in PowerPoint with Bookmark and Trigger
Hope this article will be useful to you.