Steps to fix Indexing is Paused error in Windows 11
Windows 11 users have recently complained that automatic indexing is paused on their computers, making it impossible for them to use the search function. If you are in a similar situation, here are some effective troubleshooting methods that will help you identify and fix the problem immediately.
1. Restart the Search service
Since this error is directly related to the Search service on Windows 11, the first thing you should do is restart the service through the Windows Services utility. Windows Services is a built-in utility that lists all the services installed on your system along with their startup status and type.
Sometimes, a certain feature stops working on Windows 11 due to a problem with the related service (it can be disabled or stuck). In such cases, the most effective solution is to restart the service.
Follow these steps to do this:
Step 1. Press Win + R to open Run.
Step 2. Type services.msc into the text field of the Run dialog box and press Enter.
Step 3. Once you are inside the Services window, locate and right-click Windows Search.
Step 4. Select Properties from the context menu.

Step 5. Expand the drop-down menu associated with Startup type and select Automatic (Delayed Start).
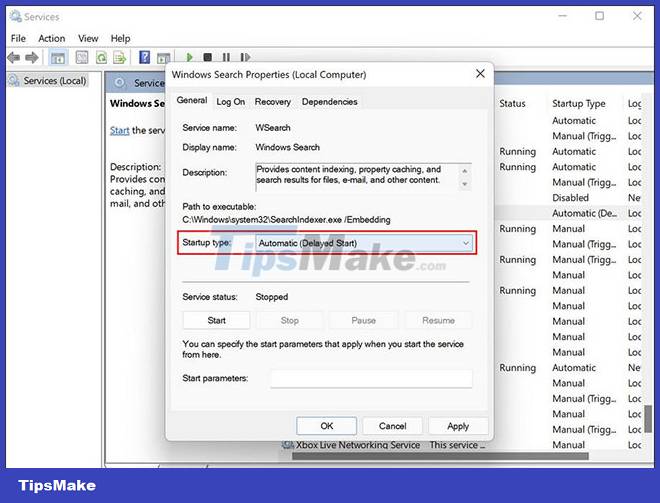
Step 6. Then, click the Start button and click OK.
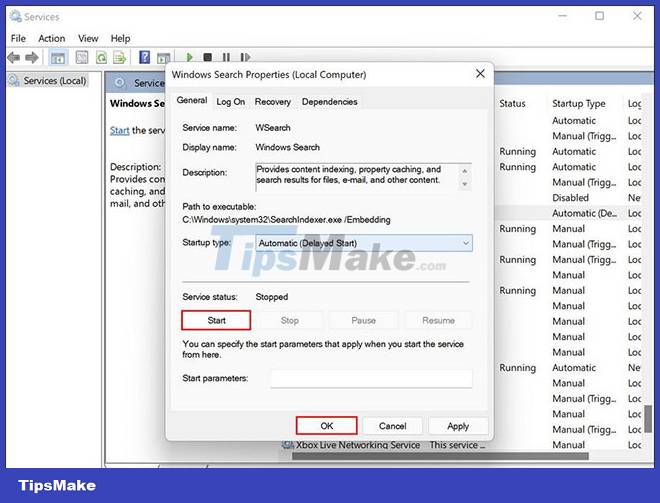
Step 7. If the service is already up, click the Stop button and then start the service again.
Alternatively, you can also use Task Manager to restart the Search service.
Step 1. Launch Task Manager and go to Services tab.
Step 2. Find Search/WSearch in the Background processes section and right click on it.
Step 3. Select Restart from the context menu.
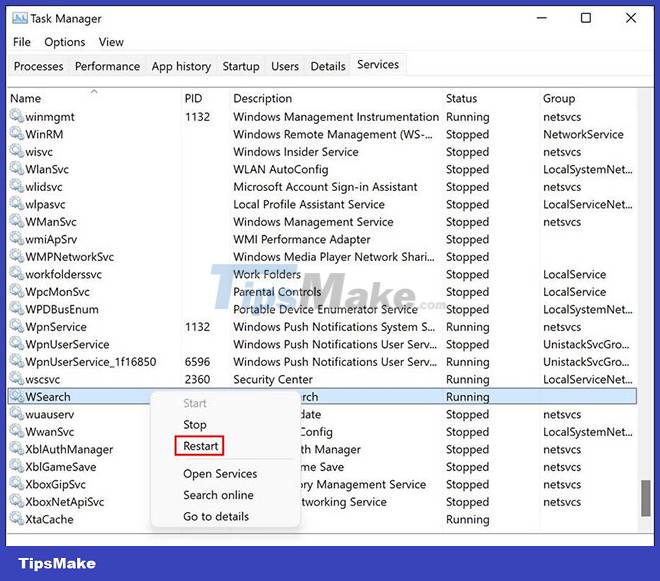
Hopefully this will get indexing on your Windows 11 system back up and running.
2. Run Search and Indexing Troubleshooter
In every version of Windows, Microsoft includes a number of built-in troubleshooting utilities that can be helpful in cases like these. You probably already know about the SFC and DISM utilities, like most Windows users, when encountering problems with the system.
Windows also comes with some of its own dedicated troubleshooters, including tools for sound, Windows updates, network, power, indexing, keyboard problems, and the list goes on. continue.
If the Search service is working fine, then you can try running the Search and Indexing troubleshooter to fix the problem. There are reports that Microsoft is aware of the indexing issues that Windows 11 users are experiencing and has come up with automatic fixes that you can apply through the troubleshooter.
Here's how you can run the indexing troubleshooter:
Step 1. Press Win + I to open Windows Settings.
Step 2. Select System from the left pane and click Troubleshoot on the right side.
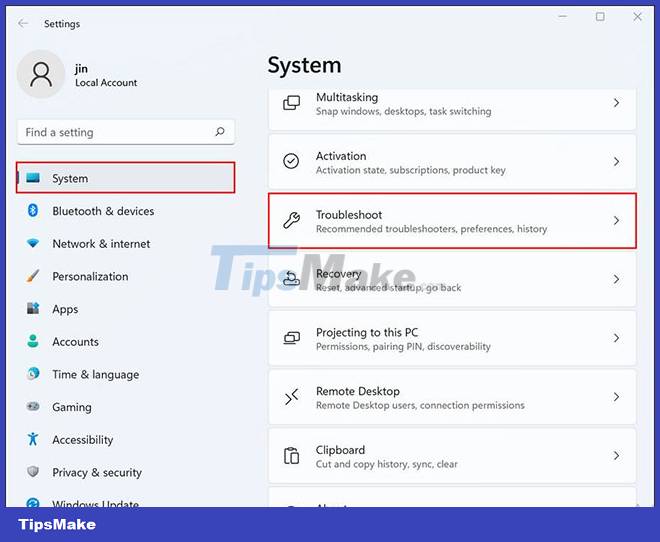
Step 3. Select Other troubleshooters.
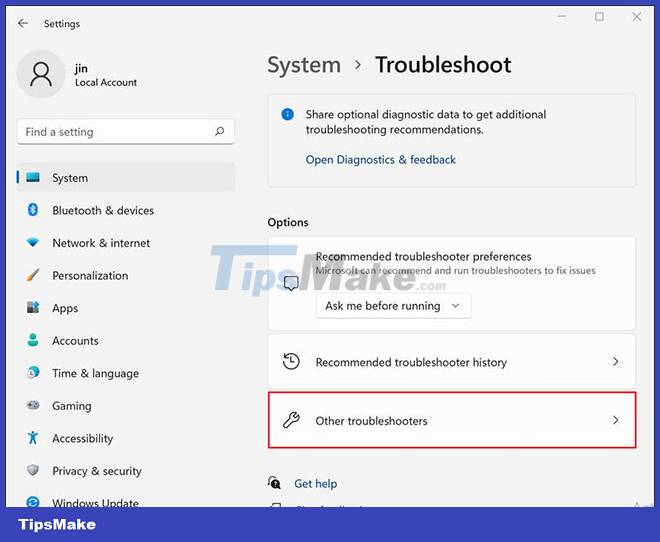
Step 4. In the next window, scroll down to the Others section and click the Run button associated with Search and Indexing.
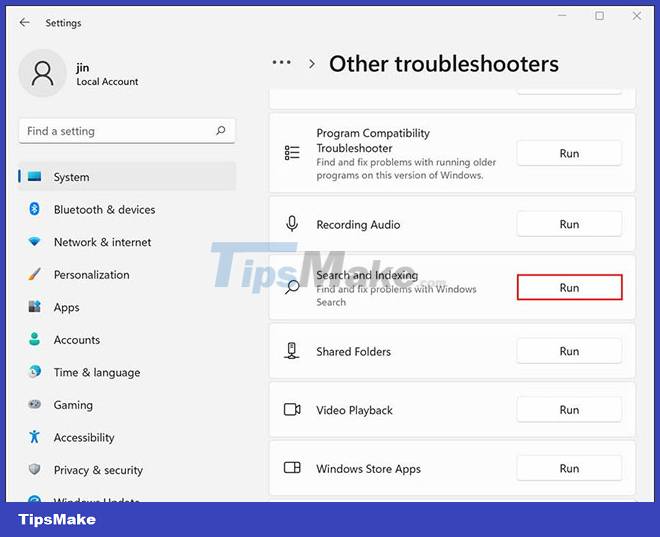
Step 5. Then select the problem you are having in the following dialog and click Next.
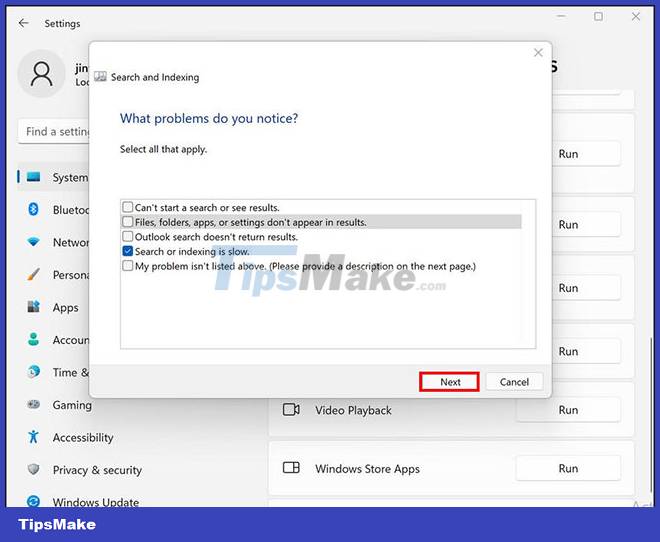
Step 6. Once done, the troubleshooter will start scanning for potential problems. If any problem is identified, it will give you the option to apply the suggested fix or ignore it.
Step 7. Select Apply this fix.
Now you can restart your computer and check if the problem is resolved.
3. Rebuild the search index
The problem can also be caused by an indexing error in your system. This is common in systems that don't fully meet the system requirements for Windows 11. If you installed a new version of the operating system on incompatible hardware, you should try rebuilding the index. search and see if that helps.
Rebuilding the index will remove all existing content and return it to its default state.
Here's what you need to do:
Step 1. Launch Control Panel and enter indexing in the search menu.
Step 2. Click Indexing Options from the search results.
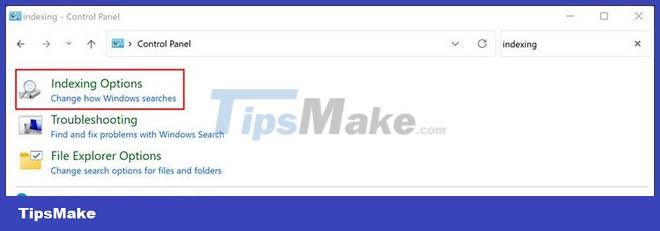
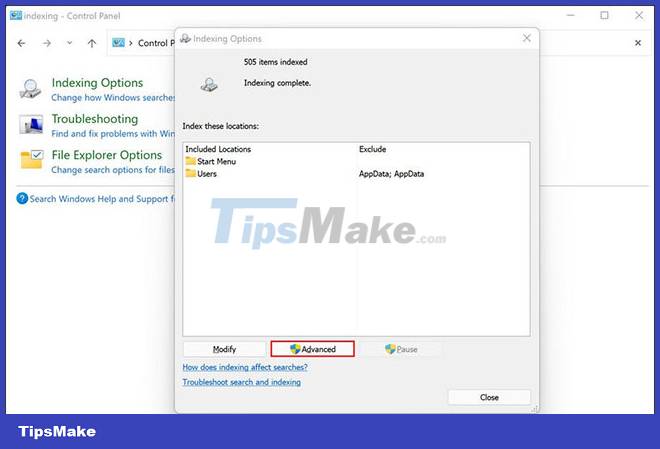
Step 3. In the following dialog, click the Advanced button at the bottom.
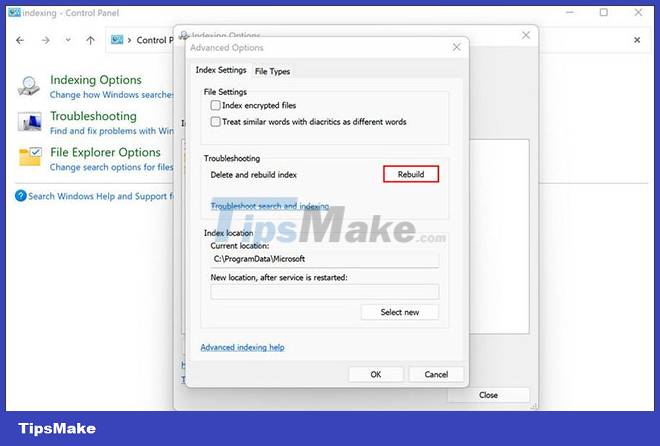
Step 4. In the Advanced Options dialog box, click the Rebuild button.
Step 5. Click OK. Windows should start rebuilding the indexing process now.
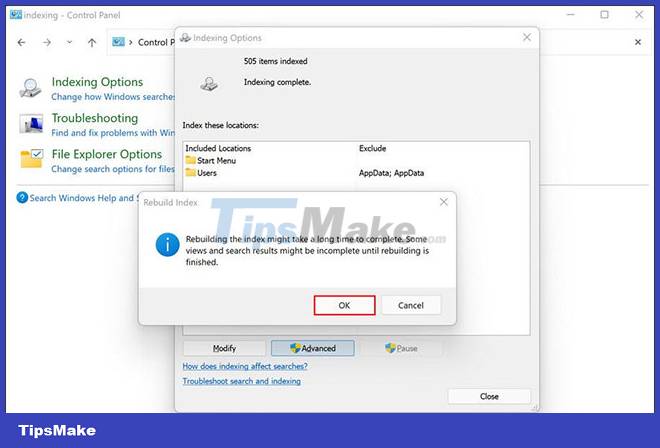
This process may take some time, depending on the data stored on your system. You should not use the search feature until the process is complete.
4. Force Outlook to use built-in search
If you are facing indexing issues in Outlook, then you can force Outlook to use its own built-in search feature instead of relying on the Windows Search feature.
Windows does not provide dedicated settings for this purpose, so we will use an advanced utility called Windows Registry to do this. However, because Registry Editor is an administrative-level utility, the article recommends that you create a backup of the Registry or use the System Restore utility to create a restore point before continuing, in case something goes wrong.
Step 1. Press Win + R to launch the Run dialog box.
Step 2. Type regedit in the text field of the dialog box and press Enter.
Step 3. Inside the Registry Editor, navigate to the location below.
HKEY_LOCAL_MACHINE/SOFTWARE/Policies/Microsoft/Windows
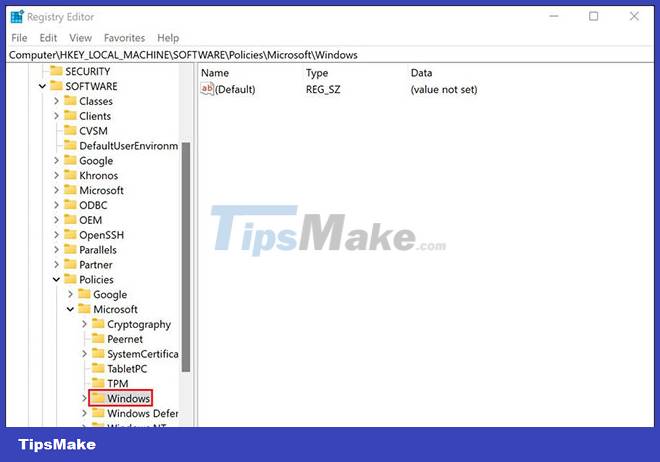
Step 4. Right-click the Windows key and select New > Key from the context menu.
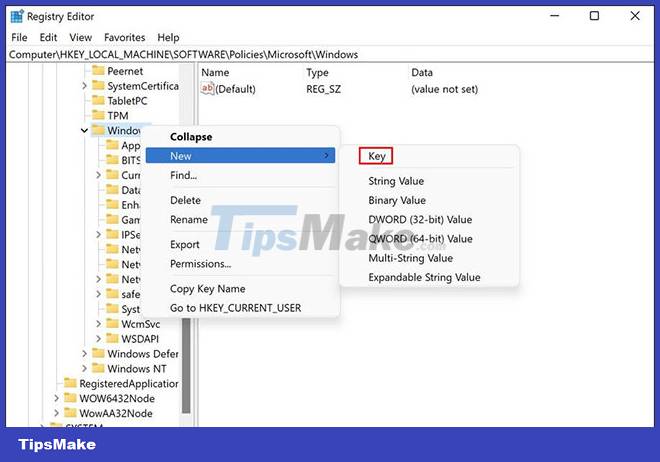
Step 5. Name this key Windows Search. Then double click on it.
Step 6. Now, right click on an empty area in the right pane and select New > DWORD (32-bit) Value.
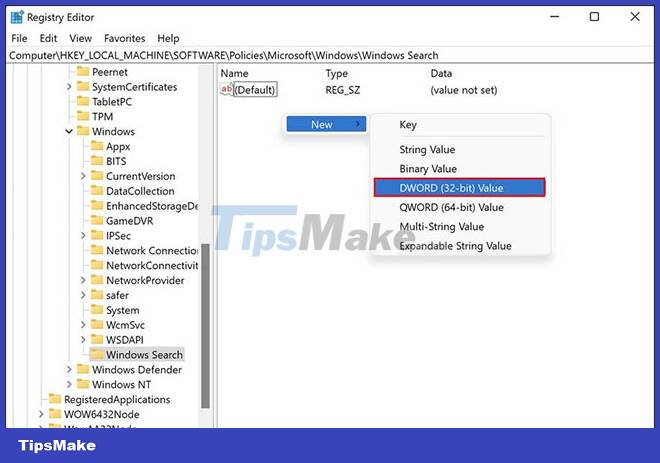
Step 7. Rename this value to PreventIndexingOutlook.
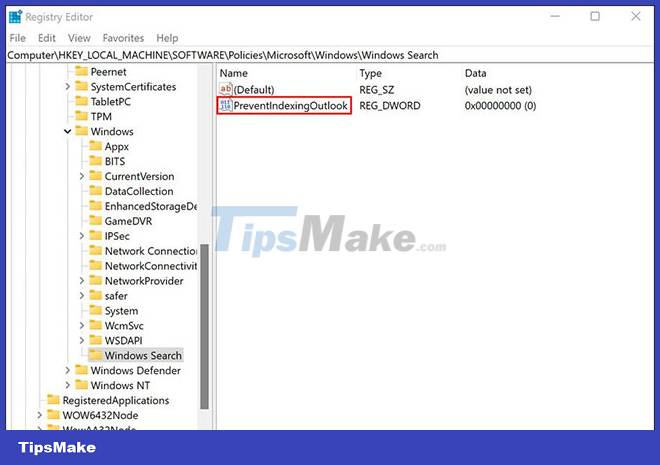
Step 8. Double click PreventIndexingOutlook and enter 1 in Value data.
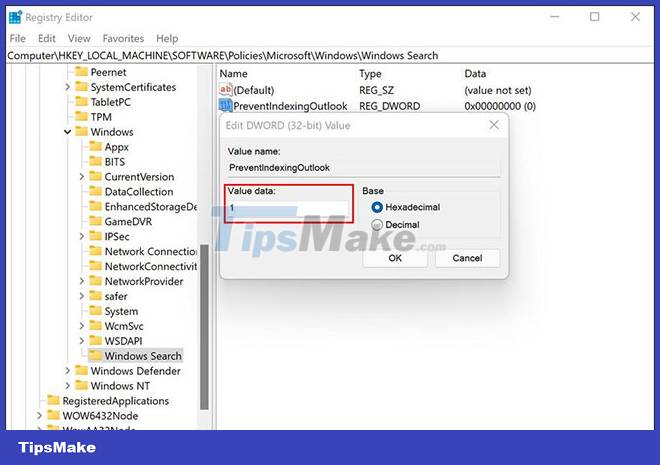
Step 9. Click OK and then close Registry Editor.
Step 10. Once done, restart the PC. After restarting, launch Outlook and check if you can use the search feature without any problems.
Now you know how to fix indexing problems in Windows 11. Indexing involves searching through files, emails, and other documents on your computer and cataloging their information for use. use later. It saves you a lot of time by showing you search results faster.
To make sure you don't experience such problems again in the future, make sure you keep your system up to date.