How to fix BlueStacks not working on Windows 10
If BlueStacks is not working on your computer, the following 9 fixes will help you get the program working properly again..
BlueStacks is one of the most popular Android emulators available for Windows. Due to its easy-to-navigate user interface and best-in-class performance, BlueStacks is loved by millions of gamers globally.
Although it is constantly updated, it still crashes from time to time. In some cases, certain games cannot be played with BlueStacks, games start to lag or shut down automatically, etc. If BlueStacks is not working on your computer, the following 9 fixes should help you make the program work normally again.
Does your computer meet the minimum system requirements?
Before starting the fixes, you should double check that your PC meets the system requirements. You can check them out by visiting the official Bluestacks website, which explains the recommended and minimum requirements.
You'll need to upgrade your computer if it doesn't meet these requirements. However, if the system is more powerful than what is required, implement the following fixes.
1. Check BlueStacks is working or not
The first step is to ensure that the BlueStacks backend is not experiencing downtime. To be sure, visit the official updownradar.com website and check the status of the app, as well as any bugs reported there.
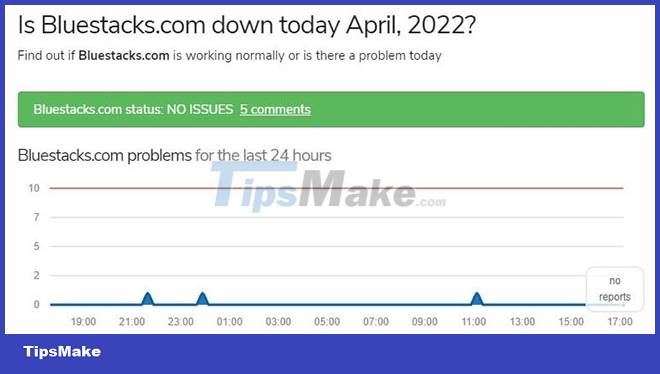
If the problem is in the BlueStacks backend, wait until the problem goes away on its own. However. If everything is fine, then the problem may be with your computer and needs a closer look.
2. Turn off anti-virus software
Depending on how you set up your anti-virus software, BlueStacks can be interpreted as a threat to the system, preventing apps from running. So please turn it off temporarily to avoid anti-virus software interfering with Bluestacks operation.
Alternatively, you can temporarily disable Windows Defender Firewall to ensure that the firewall does not interfere with application execution. If Firewall is the cause, add BlueStacks to the exclusion list as instructed by Microsoft support.
3. Restart the device and BlueStacks
If neither of the first two fixes solve the problem, try restarting BlueStacks and see if that works. If that doesn't work, you can restart your computer to make sure a temporary glitch isn't causing the problem.
If restarting the computer and apps doesn't solve the problem, it's time to make sure BlueStacks has enough memory to do its job.
4. Close parallel resource consuming processes
Every process you run on your computer puts pressure on system memory. When many resource-hungry programs consume memory concurrently, there may not be enough resources for other computer programs to operate efficiently.
You are more likely to experience this problem if the computer is not powerful enough. Therefore, it is imperative to rule it out first. To do so, click on the Windows Start icon and open the Task Manager.
On the Processes tab, check the percentage in the Memory column. If it is 100% or very close to this, filter out all the processes that contribute the most to memory usage and kill them all.
You can close any process by right-clicking on it and choosing End task.

Besides monitoring memory usage, monitor disk and CPU usage, and troubleshoot high CPU and disk usage to ensure there are enough resources for BlueStacks to function properly.
When freeing up memory doesn't help, you should update your graphics driver.
5. Update the graphics driver
Outdated graphics drivers can also halt application execution. Therefore, make sure to update your graphics driver before proceeding. Previously, TipsMake.com mentioned updating the graphics driver properly if you don't know how to do it.
6. Enable virtualization
BlueStacks recommends that you enable CPU virtualization for the program to run efficiently. Depending on the type of CPU you have, you will need to enable virtualization in different ways.
Check out this comprehensive guide by BlueStacks support to learn more about enabling virtualization for Intel and AMD CPUs.
7. Run an SFC . scan
If enabling virtualization doesn't make any difference, run an SFC scan to make sure there are no corrupted or corrupted Windows files causing the problem.
8. Upgrade or downgrade Windows operating system
Older operating systems can also cause compatibility issues with applications. So if BlueStacks is updated to the latest version, Windows must also be fully updated.
However, if BlueStacks started to malfunction after your computer updated to a recent version, you may want to revert the update.
If you need help, here's how to revert a Windows update to an earlier version.
9. Uninstall and reinstall BlueStacks
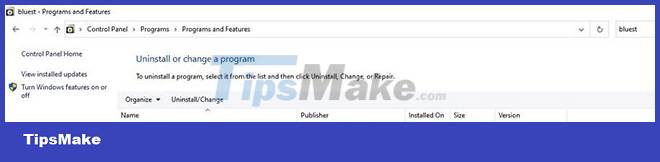
If performing all the fixes in the list does not solve the problem, you should reinstall BlueStacks as a last resort. Uninstall the existing BlueStacks before you do so. To do this, follow these steps:
Step 1: Go to Windows Control Panel.
Step 2: Navigate to Programs > Programs and Features.
Step 3: Right-click the BlueStacks program and click Uninstall.
Remove BlueStacks from your computer, then download a fresh copy of the program and install it.
Hopefully with a fresh install you can solve the problem you are having and any hidden problems in the program files.
The fixes in the list will keep BlueStacks on the right track and allow you to run your favorite apps again. If these fixes do not solve the problem, you may consider resetting your computer once.
However, if that doesn't work, it's best to temporarily switch to the BlueStacks alternative. Andy, NoxPlayer and Phoenix OS are some of the best alternatives to BlueStacks.