Set up the Auto Correct function in Word
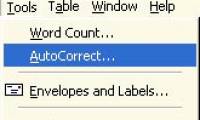
Introduce how to set up the Auto Correct function in Word. Step 1: Go to File - Option: Step 2: A dialog box appears Proofing option - in AutoCorrect options section click AutoCorrect options.
The following article introduces you in detail how to set up the Auto Correct function in Word.
Step 1: On the card File -> Option:
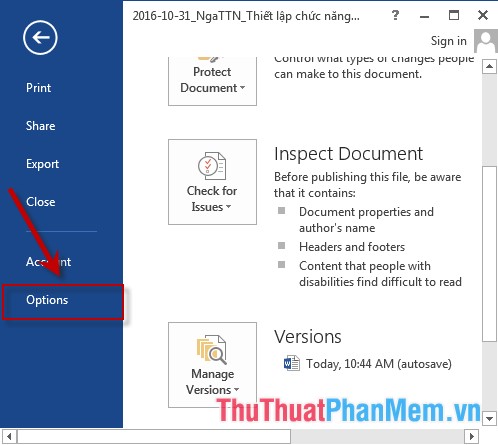
Step 2: A dialog box appears Proofing -> in AutoCorrect options, click AutoCorrect options:

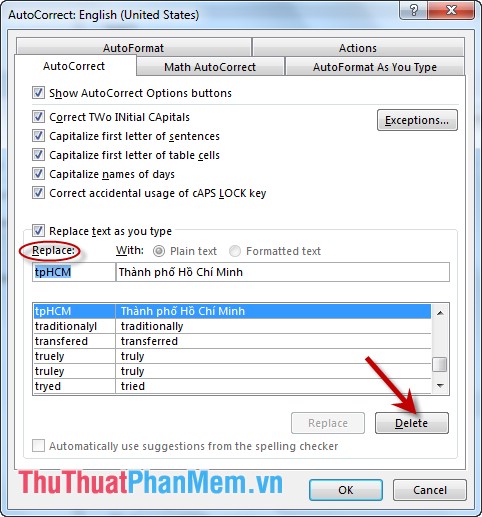
Step 3: AutoCorrect English dialog box appears, enter the following contents:
- Replace: Enter the acronym to be replaced.
- Section With: Enter the phrase instead.
Finally, click Add:

Step 4: After clicking Add phrase saved in the dialog box -> click OK:

Step 5: Return to the text to type the phrase tpHCM -> press Enter or the spacebar -> the phrase automatically converts to Ho Chi Minh City:

- In case you want to remove the abbreviated phrase, select that phrase -> press Delete:
- However, AutoCorrect has the limitation that when you want to write an acronym, you do not want to use an alternative phrase, only the way to delete the replacement phrase in AutoCorrect. So you should use the AutoText function to support you to solve both problems.
Above is a detailed guide on how to set up the Auto Correct function in Word.
Good luck!
Was this article helpful?
Your feedback helps us improve.
Related Articles
 How to set Auto Correct in Word7 minutes read
 How to turn off Auto-Correct on an Android device?2 minutes read
 Correct typos in Word1 minutes read
 Backup AutoCorrect in Microsoft Office3 minutes read
 How to delete horizontal lines in Word4 minutes read
 How to use the auto-capitalization feature on Word3 minutes read
Reader Comments 0
Sign in with email or Google to join the discussion.