Photoshop CS: Grid line system
This practical exercise shows you how to use some of the features in the Filter filter to create an abstract graphic, a cube with vertical and horizontal lines that have the same attraction as a matrix. After this exercise, you can apply
This practical exercise shows you how to use some of the features in the Filter filter to create an abstract graphic, a cube with vertical and horizontal lines that have the same attraction as a matrix. After this exercise, you can apply it to create a background for your personal blog or a website banner.
Step 1: Orient the background color
- Press the D key on the keyboard to default the Font color and the Background color to Black - White
- Press X to reverse the text color and the background color to White - Black
Step 2: Open a new Document
- Size: 300px x 300px
- Black Background (# 000000)
Step 3. Practice the steps with the File filter
- Press D to reset the font color and Background color to Black - White
- Filter> Render> Clouds

- Filter> Pixelate> Mosaic > Set the following properties

- Filter> Blur> Radial Blur > Set the following properties
- Filter> Brush Strokes> Accented Edges:

- Filter> Stylize> Find Edges.
- Next select Image> Adjustment> Invert or Ctrl + I to reverse the graphich area to black and white grid lines.
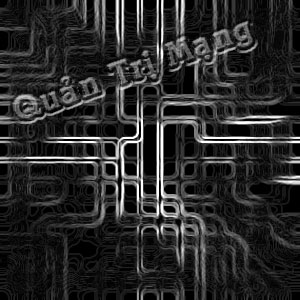
You have basically created the grid line system. Now only color for this system. You are probably familiar with how to select colors on Hue / Saturation. Now we will continue to apply this attribute in step 4
Step 4. Color correction.
- Image> Adjustmet> Hue / saturation (or CTrl + U )
Drag the Hue and saturation slider to get the color you like, don't forget to check the Colorize checkbox
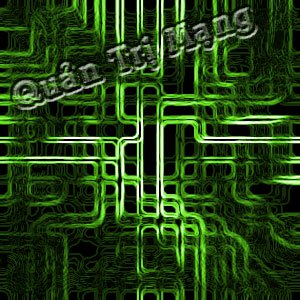
And this is the application for a website banner

- Lesson 3: Grid System in Bootstrap 5
- Lesson 38: Grid Systems from Stacked to Horizontal in Bootstrap 5
- Lesson 42: Large Grid in Bootstrap 5
- Lesson 41: Grid Medium in Bootstrap 5
- How to change spreadsheet color lines in Excel
- Lesson 40: Small Grid in Bootstrap 5
- How to use Photoshop CS5 - Part 4: Basic menus
- How to create a grid chart on MathType
- SUBTOTAL function: Calculates the sum of the values in a filtered list in Excel.
- 8 Google Sheets Formulas That Make Work So Much Easier
- How to fix filter errors in Excel spreadsheets
- Zoom: Free video chat filters can give you a long beard, devil horns or an egg for a head
- How to get Snapchat style filters on Zoom
- How to Save a Bing Background Image
- How to Remove a Background from the Desktop Background List (Windows)
- How to Use Preview Like a Pro in Mac OS X 10.6
- Learn about Microsoft Network Monitor tool - part 1
- Working with Network Monitor (Part 4)


-
 How to play Meccha Chameleon for beginners
-
Color theory, the color wheel, and color matching techniques.
-
Meccha Chameleon: Hider Tips - Meccha Chameleon Hider tips
-
Meccha Chameleon Hide-and-Seek Game Tips for Beginners - Meccha Chameleon tips
-
4 of the best color printers currently available that you should buy.
-
The quickest way to filter data by color in Google Sheets.
 How to play Meccha Chameleon for beginners
 Color theory, the color wheel, and color matching techniques.
 Meccha Chameleon: Hider Tips - Meccha Chameleon Hider tips
 Meccha Chameleon Hide-and-Seek Game Tips for Beginners - Meccha Chameleon tips
 4 of the best color printers currently available that you should buy.
 The quickest way to filter data by color in Google Sheets.
-
Application
-
Web Email
-
Website - Blog
-
Web browser
-
Support Download - Upload
-
Software conversion
-
Social Network
-
Simulator software
-
Online payment
-
Office information
-
Music Software
-
Map and Positioning
-
Installation - Uninstall
-
Graphic design
-
Free - Discount
-
Email reader
-
Edit video
-
Edit photo
-
Compress and Decompress
-
Chat, Text, Call
-
Archive - Share
-
-
System
-
Mac OS X
-
Hardware
-
Game
-
Tech info
-
Technology
-
Science
-
Life
-
Electric
-
Program
-
Mobile