Table of Contents
The following guide provides a clear overview of Frame, with the most relevant background, details, and practical takeaways.
Frame Overview
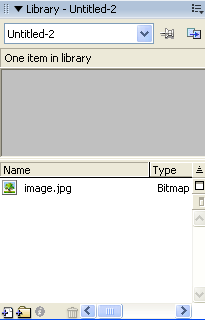
Step 1 First you can download my photo to use, and remember to put the file in place so you can easily find it. Step 2 Open the Flash program on your computer. Go to File > Import > Import to Library. In the file selection window that appears, locate the image you just downloaded, select it and then click Open. If you now open the flash library ( Ctrl + L ), you will see which image was taken (below).
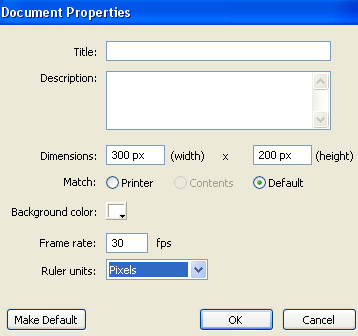
Step 3 Press Ctrl + J key on the keyboard to open Document Properties, and set the width of the file to 300 pixels, the height to 200 pixels. Choose any color as background color. Set your Flash movie 's frame rate to 30 and click ok.
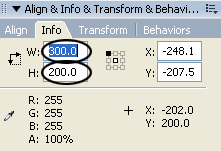
Step 4 Pick the Selection Tool (V) and use the 'drag-and-drop' technique to bring the image from the flash library to the content. This image is bigger than the file and you can shrink it to 300x200px as the size of the background. You can drag the image with the Free Transform Tool (Q) or some Info Panel ( Ctrl + I ) and set W: 300, H: 200 as shown below.
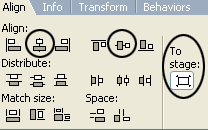
Step 5 Select the image, go to the Align Panel ( Ctrl + K ) then set the following content: 1. Make sure the To Stage button in Align / Distribute is enabled. 2. Click on the horizontal center button at Align 3. Click the vertical center button at Align
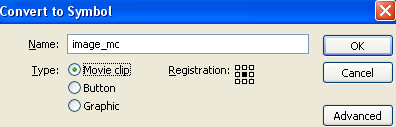
Step 6 Select the image, press F8 key ( Convert to Symbol ) to convert the image into a Movie Clip Symbol.
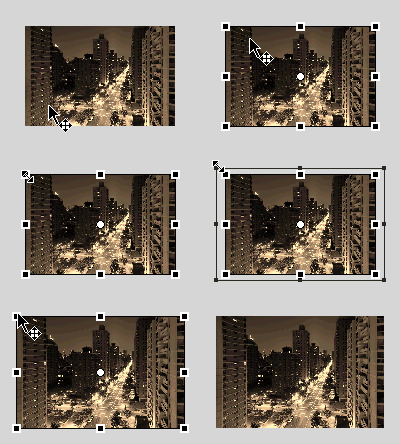
Step 7 Select frame 40 and then frame 45, press F6 key Step 8 While you're still on frame 45, take the Free Transform Tool (Q), press - hold down the Shift key and enlarge the image a little (as shown below).
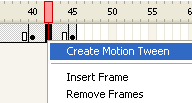
Step 9 Right-click anywhere in the gray area between the two keyframes on the timeline and choose Create Motion Tween from the menu that appears.
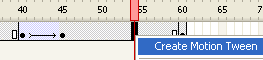
Step 10 Click on frame 60 and press F6 key. Then select the Free Transform Tool (Q) and enlarge the image again. Continue dragging the image a little left. Step 11 Right-click anywhere on the gray area between frame 45 and frame 60 on the timeline and choose Create Motion Tween from the menu that appears.
Step 12 Click on frame 65 and press F6 key. Then, enlarge the image again a bit. Step 13 Right-click anywhere on the gray area between the frame 60 and frame 65 on the timeline, choose Create Motion Tween from the menu that appears. Step 14 Click on frame 85 and press F6 key. Then, enlarge the image again a bit. Step 15 Right-click anywhere on the gray area between frame 65 and frame 85 on the timeline, choose Create Motion Tween from the menu that appears. Step 16 Click on frame 100 and press F6 key. Then, enlarge the image again a bit. Step 17 Right-click anywhere on the gray area between the frame 85 and frame 100 on the timeline, choose Create Motion Tween from the menu that appears. Step 18 Click on frame 125 and press F7 (blank keyframe). Then go back to the first frame and press Ctrl + C key (Copy). Click again on frame 125 and press Ctrl + Shift + V key (Paste in Place). Step 19 Right-click anywhere on the gray area between frame 100 and frame 125 on the timeline and choose Create Motion Tween from the menu that appears. Check the product (Ctrl + Enter)
Download the source file here!
FAQ
What happened in Macromedia Flash - City Photo Zoom Effect: Frame?
The following guide provides a clear overview of Frame, with the most relevant background, details, and practical takeaways.
What factors influenced Frame?
Frame Overview Step 1 First you can download my photo to use, and remember to put the file in place so you can easily find it.
What was the practical impact on users?
Step 2 Open the Flash program on your computer.
Related Articles
 Macromedia Flash - Effects of Lighting on Photos4 minutes read
 Macromedia Flash - Vivid Photo Effects4 minutes read
 Macromedia Flash - an Attractive Photo Appearance Effect4 minutes read
 Macromedia Flash - Photo Effects with Sound7 minutes read
 Macromedia Flash - Animation and Rotation Effects4 minutes read
 Macromedia Flash - Running Text Effect2 minutes read
Reader Comments 0
Sign in with email or Google to join the discussion.