How to use Photoshop CS6 (Part 4): Create a fading effect
Dispersion effect in Photoshop CS is relatively simple but very difficult to create the right effect. Please read this article to know how to create a standard vanish effect.
Dispersion effect in Photoshop CS is relatively simple but very difficult to create the right effect. Basically, the operation to do is to separate the object from the background and create a copy for the object layer. Then, perform a 'transformation' of one of these object layers using the Liquify tool to cover almost the entire frame.
The transformed layer will be hidden from the viewport and use a combination of the layer mask and the splatter brushes to reveal the transformed object while hiding the original object parts. The result has a feeling that the subject is blown away by the wind.
Required resources
Image
Brush Splatter
Begin
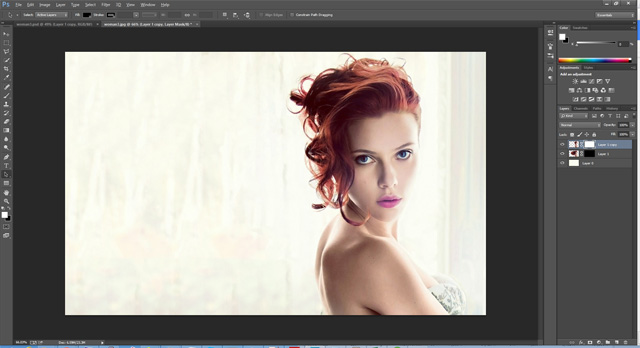
Step 1 : Open the image in Photoshop CS6 / CC.

Step 2: In the Layers panel, double-click the single layer (Background) to make Photoshop a layer. This will allow the background to be hidden later.

Step 3: With the New Layer screen, click OK to create a background transformation into a layer.
Delete background
The first thing you need to do is delete the background by removing the text as well as the curtains.
Step 1: Use the Polygonal Lasso tool to select an area around the text.

Step 2: With the selected text, press Shift + F5 or Edit> Fill from the menu to bring up the Fill box and select Content-Aware .
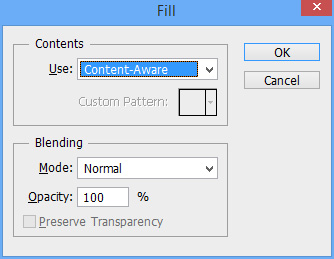
Step 3: Click OK.
Step 4 : Repeat this process for the curtains by selecting them and using Content-Aware.

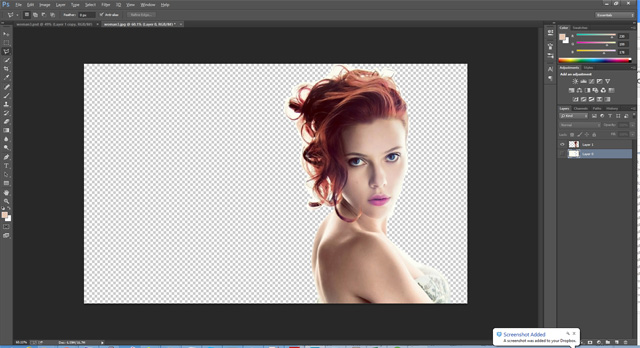
Separating the object from the background
Step 1: Use the same Polygonal Lasso tool to carefully select around the model's body, when you go to the hair area, you don't need to select the details, because we don't change the background so you don't have to worry about The correct selection around the hair area.
Step 2: With the selected model image, press Ctrl + J to create a new copy that only includes the selected area (model).
Step 3: Hold down the Ctrl key, click on the new layer to load this layer as a selection.
Step 4: Select the first layer and press Delete . This will remove the model from the background.

Step 5 : After completing these steps we should leave two layers, the top layer has the model and the bottom layer has the background with the model shadow.
Perform a background erase on the model's hair
At this point, we have separated the model from the background but on the hair still has the original background.
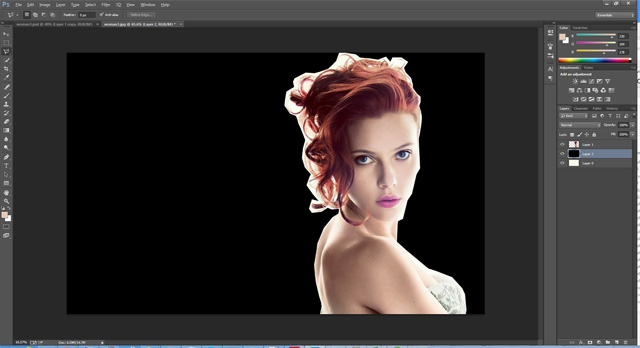
Step 1: Create a new layer between the background and the model image separated.
Step 2: Using the Fill tool ( Shift + F5 or Edit> Fill ), fill the new layer with black. This action helps to show the object to be executed.
Step 3: Select the extracted object image and then select the Background Eraser Tool.
Step 4: Take a white background pattern by pressing Alt / Option and clicking on the white area between her hair.
Step 5: Finally paint the rest of the hair to remove the sample background color.
Step 6: Repeat this process to sample the new area until most of the white background is removed and only the translucent white hair remains.
Step 7: Use the normal eraser to remove as much translucent white hair as possible without touching real hair. The end result doesn't need to be perfect because we don't change the background.

Step 8: Finally delete the black layer to see the original background.
Cover the base
Step 1: Hide the model layer and display the background layer.
Step 2: Use the Polygonal Lasso tool to select around the missing area.
Step 3: Use Content Aware tool ( File> Fill or Shift + F5 ), to cover the missing area.
Step 4: Uncheck the background by pressing Ctrl + D.

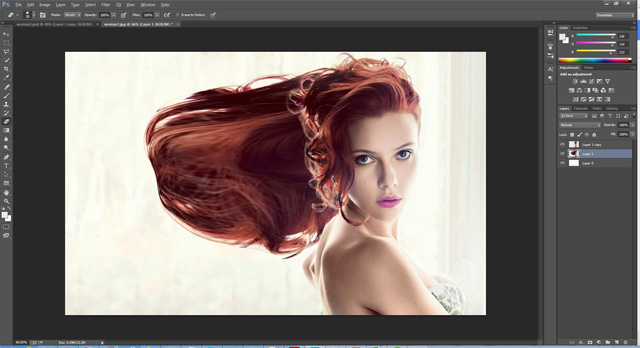
Transforming the model image has split
Step 1: Select the extracted model layer and press Ctrl + J to make a copy. Now we will have two copies of this class.
Step 2: Click on the previously separated model layer (now the middle layer).
Step 3: From the Filter menu , select Liquify to appear plugin Liquify.

Step 4 : Select a large size brush (slightly larger than the size of the model) and start pushing the negative space of the image.

Step 6: When satisfied with this change, click OK to render the image.
Step 7: With this change layer select hold Alt / Option and click the Add Layer Mask button. Holding Alt / Optoin will fill this layer with black, hiding it from the viewport.
Step 8: Finally, select the top layer and create a mask but this time do not press Alt / Option to make the mask layer white.
Create a vanish effect for the top layer
Step 1: Select the top layer and make sure the mask layer is selected. If we do not highlight the mask in this layer, the actual image will not display as expected.
Step 2: Select the Brush tool (B) from the tool panel and open the brush panel.
Step 3: If you don't have the splatter brush, click on the little gear icon on the right and select Load Brushes. Browse to the downloaded ABR file.
Step 4: Choose one of these splatter brushes.
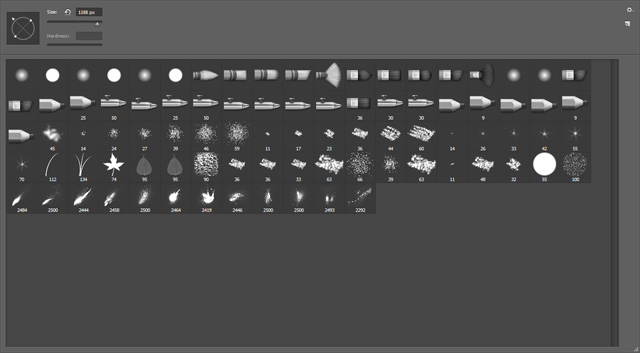
Step 5: Finally change the size and orientation of the brush to match the desired spray line (horizontal to right).
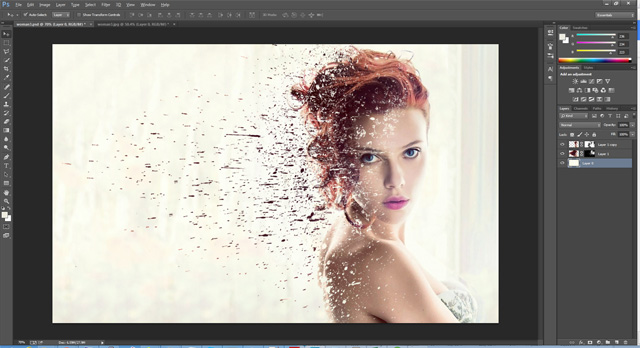
Step 6: Make sure you're painting black on the mask layer, just click around the top area before opening the brush pallet and change the brush, size, rotation or all to create an effect. Vanish looks most natural around the head.
Step 7: This section requires time and patience to achieve the desired effect.
Step 8: Pay special attention to the eyes and right side of the face, because the effect goes to the left and almost does not reach the right side. If you go over to the right side of the face too much, you can select a regular brush and repaint the mask of the layer with white on the areas where you don't want the effect to appear.

Create a vanish effect for the transform layer
The next step in this process is to repeat the same process for the middle layer (transform layer), but this time instead of drawing in black to hide the layer we will paint white to reveal the layer.
Step 1: Select the middle layer and mask layer.
Step 2: Change the color of the brush to white and select the scatter brushes as in the previous section.
Step 3: Paint in negative space to reveal part of the transformed image. These areas will look like parts that have melted from the top layer.
Some advices
It may take time and effort to get the desired effect, if not satisfied, you can cover the mask with white / black and start the process again for that layer.
Final image:

You can see the previous sections of this CS6 user guide:
- How to use Photoshop CS6 (Part 1): Create digital photos
- How to use Photoshop CS6 (Part 2): Create fashion collage images
- How to use Photoshop CS6 (Part 3) - Create Manipulation artwork with exposure effect
- How to use the Fading Tool in Photoshop
- How to create whirlpool effect on Photoshop
- How to use Photoshop CS5 - Part 21: Create water ripple effect in photos
- Learn how to create a fade effect with Photoshop CS6
- How to Create an Orton Effect in Photoshop
- How to use Photoshop CS5 - Part 29: Create a zoom effect in a photo
- How to create Picture in Picture effect in Photoshop
- How to create poster effect for photos in Photoshop
- How to use Photoshop CS6 (Part 3) - Create Manipulation artwork with exposure effect
- Tutorial to create a sparkling snow effect using Photoshop Brush
- How to cut a circle image on Paint
- How to create A3 and A4 paper sizes in Photoshop
- How to create a table in Photoshop
- How to change the image background color with the Paint 3D application
- How to create a 3x4 photo in Paint
- How to delete text in photos with Paint
- How to create SVG from PNG or JPG in Photoshop
- How to blur photos in Paint
- How to create X-ray effects in GIMP
- How to create clipping mask in GIMP
-
 Quickly fix WLAN AutoConfig errors on Windows 11
-
Add your Gmail account to Outlook with POP.
-
How to use Zperiod to automatically balance chemical equations.
-
How to center a table in Google Docs
-
How do I use the Learn Step by Step mode in Perplexity?
-
Instructions on connecting Gmail to n8n via Google Cloud Console
 Quickly fix WLAN AutoConfig errors on Windows 11
 Add your Gmail account to Outlook with POP.
 How to use Zperiod to automatically balance chemical equations.
 How to center a table in Google Docs
 How do I use the Learn Step by Step mode in Perplexity?
 Instructions on connecting Gmail to n8n via Google Cloud Console
-
 Free Tools
-
Application
-
Web Email
-
Website - Blog
-
Web browser
-
Support Download - Upload
-
Software conversion
-
Social Network
-
Simulator software
-
Online payment
-
Office information
-
Music Software
-
Map and Positioning
-
Installation - Uninstall
-
Graphic design
-
Free - Discount
-
Email reader
-
Edit video
-
Edit photo
-
Compress and Decompress
-
Chat, Text, Call
-
Archive - Share
-
-
System
-
Mac OS X
-
Hardware
-
Game
-
Tech info
-
Technology
-
Science
-
Life
-
Electric
-
Program
-
Mobile