Table of Contents
How to Create an Effect When Hovering Over (Hover) with CSS is easier to understand when the core ideas are paired with practical examples. The sections below explain the topic clearly, highlight useful steps, and point out details that can prevent common errors.
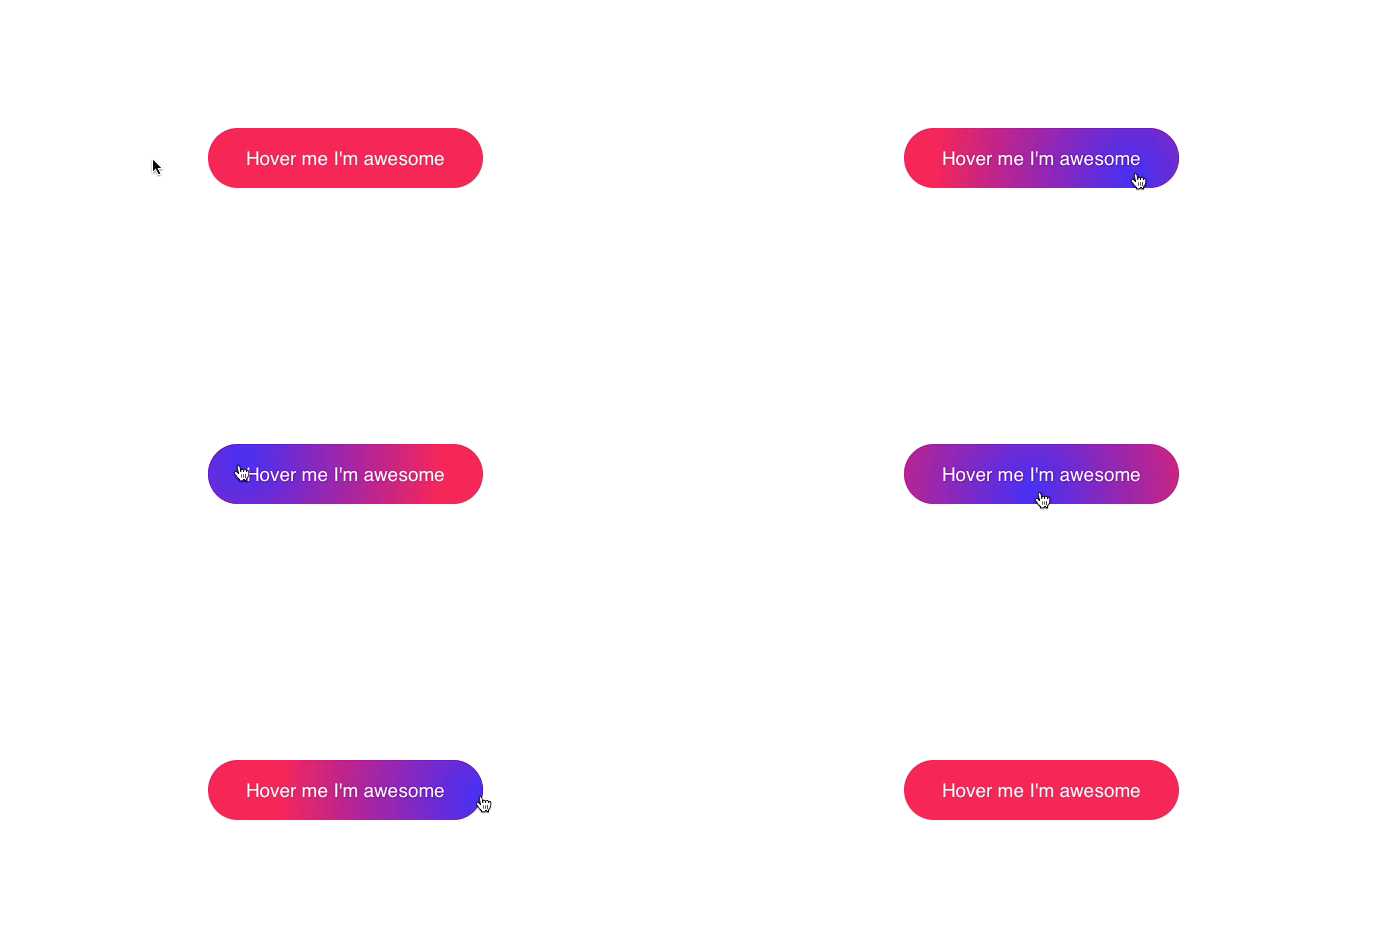 Gradient effect when hovering over the button
Position the mouse cursor
The first step is to position the mouse pointer to track movement by the code below.
document.querySelector('.button').onmousemove = (e) => {const x = e.pageX - e.target.offsetLeftconst y = e.pageY - e.target.offsetTope.target.style.setProperty('--x', `${ x }px`)e.target.style.setProperty('--y', `${ y }px`)}
The above lines of code correspond to 3 steps:
- Select the element and wait until the user moves the mouse over it.
- Calculate the position corresponding to the element.
- Save coordinates in CSS variables.
It only takes 9 lines of code to let CSS know the user's cursor position.
Create a gradient effect
Once you have the coordinates stored in the CSS variable, you can use them anywhere in the CSS file.
.button {position: relative;appearance: none;background: #f72359;padding: 1em 2em;border: none;color: white;font-size: 1.2em;cursor: pointer;outline: none;overflow: hidden;border-radius: 100px;span {position: relative;}&::before {--size: 0;content: '';position: absolute;left: var(--x);top: var(--y);width: var(--size);height: var(--size);background: radial-gradient(circle closest-side, #4405f7, transparent);transform: translate(-50%, -50%);transition: width .2s ease, height .2s ease;}&:hover::before {--size: 400px;}}
- Wrap the text inside the
spanto prevent the gradient from overflowing. - Start with the
widthandheightof0pxand bring it to400pxwhen the user moves the mouse over.Don't forget to set the transition so the effect is smooth. - Use coordinates to follow the mouse pointer.
- Using only HTML and CSS code, one can create a masterpiece full of aesthetics like this
- Top 5 popular CSS Framework that you should keep in mind
FAQ
What is How to Create an Effect When Hovering Over (Hover) with CSS?
Gradient effect when hovering over the button Position the mouse cursor The first step is to position the mouse pointer to track movement by the code below.
Why is How to Create an Effect When Hovering Over (Hover) with CSS important?
A clear understanding of How to Create an Effect When Hovering Over (Hover) with CSS helps you make informed decisions, avoid common mistakes, and use the relevant tools or techniques more effectively.
How should beginners approach How to Create an Effect When Hovering Over (Hover) with CSS?
Start with the fundamental concepts, follow the examples step by step, and test each change in a safe environment before applying it to important systems or data.
Related Articles
 How to Add Hover Text Effects in PowerPoint2 minutes read
 Tooltip CSS: Tooltip Effect in CSS6 minutes read
 How to Create Sky Effect for Photos with B6125 minutes read
 Do You Know How to Create the Like Button Effect on Facebook?4 minutes read
 How to Use Photoshop CS6 (Part 4): Create a Fading Effect9 minutes read
 How to Create an Orton Effect in Photoshop4 minutes read
Reader Comments 0
Sign in with email or Google to join the discussion.