Instructions for using Photoshop CS6 (Part 5): Create christmas cards with snowflakes on a red background

In this tutorial, we will design a simple Christmas card with decorative snowflakes in Adobe Photoshop CS6.

In this tutorial, we will design a simple Christmas card with decorative snowflakes in Adobe Photoshop CS6.

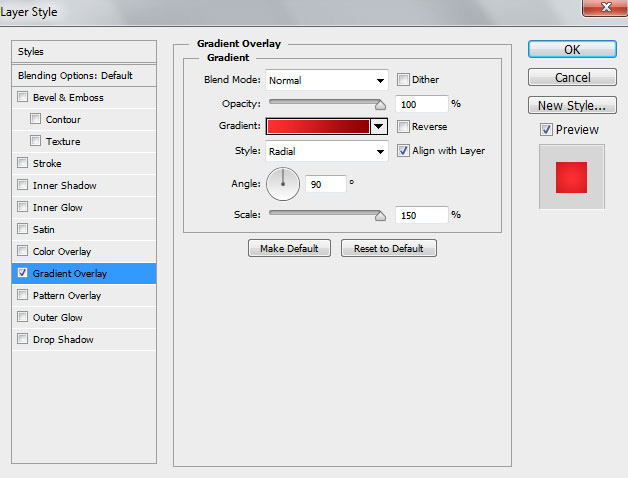
Start working, create a new document ( Ctrl + N ) in Adobe Photoshop CS6 with the size 1920px x 1200px ( RGB color mode) at a resolution of 72 pixels / inch . Create a new layer, click on the icon Add a layer style bottom part of the Layers panel and select Gradient Overlay .

images 1 of Instructions for using Photoshop CS6 (Part 5): Create christmas cards with snowflakes on a red background
Images 1 of Instructions for using Photoshop CS6 (Part 5): Create christmas cards with snowflakes on a red background

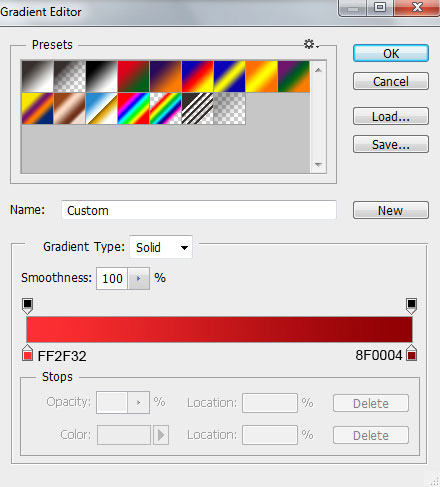
Click the color bar to open the Gradient Editor and set the color stops as shown. Click OK to close the Gradient Editor dialog box.

images 2 of Instructions for using Photoshop CS6 (Part 5): Create christmas cards with snowflakes on a red background
Images 2 of Instructions for using Photoshop CS6 (Part 5): Create christmas cards with snowflakes on a red background

We have the background:

images 3 of Instructions for using Photoshop CS6 (Part 5): Create christmas cards with snowflakes on a red background
Images 3 of Instructions for using Photoshop CS6 (Part 5): Create christmas cards with snowflakes on a red background

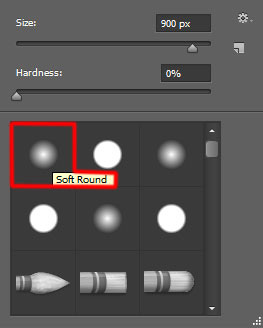
Create a new layer and select the Soft Round brush from the Brush Tool (B) . We need to customize the brush in the Brushes panel (F5), select Brush Tip Shape . Click and drag any slider to change the size, distance and corner of the brush as shown. The Preview window will display the changed brushstroke.

images 4 of Instructions for using Photoshop CS6 (Part 5): Create christmas cards with snowflakes on a red background
Images 4 of Instructions for using Photoshop CS6 (Part 5): Create christmas cards with snowflakes on a red background

Go to Shape Dynamics and apply the following settings:

images 5 of Instructions for using Photoshop CS6 (Part 5): Create christmas cards with snowflakes on a red background
Images 5 of Instructions for using Photoshop CS6 (Part 5): Create christmas cards with snowflakes on a red background

Apply Scattering :

images 6 of Instructions for using Photoshop CS6 (Part 5): Create christmas cards with snowflakes on a red background
Images 6 of Instructions for using Photoshop CS6 (Part 5): Create christmas cards with snowflakes on a red background

Select Transfer:

images 7 of Instructions for using Photoshop CS6 (Part 5): Create christmas cards with snowflakes on a red background
Images 7 of Instructions for using Photoshop CS6 (Part 5): Create christmas cards with snowflakes on a red background

Now use this white brush to represent the snow.

images 8 of Instructions for using Photoshop CS6 (Part 5): Create christmas cards with snowflakes on a red background
Images 8 of Instructions for using Photoshop CS6 (Part 5): Create christmas cards with snowflakes on a red background

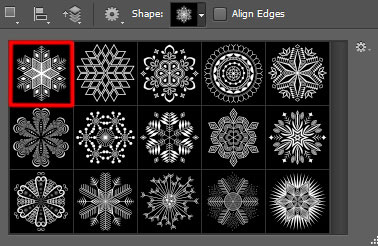
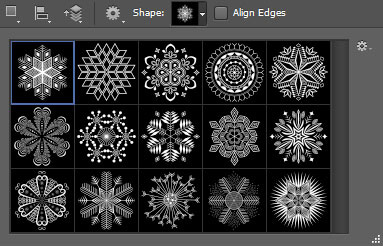
Next, download the set of custom shapes named Decorative Snowflakes Shapes.

images 9 of Instructions for using Photoshop CS6 (Part 5): Create christmas cards with snowflakes on a red background
Images 9 of Instructions for using Photoshop CS6 (Part 5): Create christmas cards with snowflakes on a red background

Create a new layer and select Custom Shape Tool (U) in the Tools bar , in Options click Shape to open the selection menu. Find the next shape at the bottom of the menu and then double-click a thumbnail to select it.

images 10 of Instructions for using Photoshop CS6 (Part 5): Create christmas cards with snowflakes on a red background
Images 10 of Instructions for using Photoshop CS6 (Part 5): Create christmas cards with snowflakes on a red background

Click and drag to draw # EE282B colored snowflakes .

images 11 of Instructions for using Photoshop CS6 (Part 5): Create christmas cards with snowflakes on a red background
Images 11 of Instructions for using Photoshop CS6 (Part 5): Create christmas cards with snowflakes on a red background

Then make multiple copies of the layer containing the snowflake and choose the Free Transform (Ctrl + T) command to resize the copies and rotate the elements, placing them like the next image:

images 12 of Instructions for using Photoshop CS6 (Part 5): Create christmas cards with snowflakes on a red background
Images 12 of Instructions for using Photoshop CS6 (Part 5): Create christmas cards with snowflakes on a red background

Group all the red snowflakes into one (press the CTRL button to select the required layers and hold the left mouse button while dragging the selected layers to the Create a new group icon at the bottom of the Layers panel ). Set the Fill to 39% for this new group.

images 13 of Instructions for using Photoshop CS6 (Part 5): Create christmas cards with snowflakes on a red background
Images 13 of Instructions for using Photoshop CS6 (Part 5): Create christmas cards with snowflakes on a red background

Next, we will draw a rectangle, apply the Rectangle Tool (U) to draw a rectangle and insert some anchor points at the top, bottom and middle. Use the Add Anchior Point Tool and Convert Point Tool to make the necessary modifications. The rectangular color is # D70010 .

images 14 of Instructions for using Photoshop CS6 (Part 5): Create christmas cards with snowflakes on a red background
Images 14 of Instructions for using Photoshop CS6 (Part 5): Create christmas cards with snowflakes on a red background

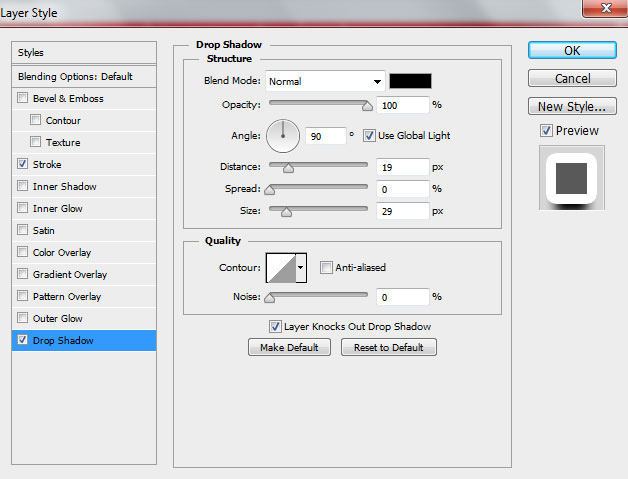
Click on the icon Add a layer style at the bottom of the Layers panel and select Drop Shadow .

images 15 of Instructions for using Photoshop CS6 (Part 5): Create christmas cards with snowflakes on a red background
Images 15 of Instructions for using Photoshop CS6 (Part 5): Create christmas cards with snowflakes on a red background

We have the next result:

images 16 of Instructions for using Photoshop CS6 (Part 5): Create christmas cards with snowflakes on a red background
Images 16 of Instructions for using Photoshop CS6 (Part 5): Create christmas cards with snowflakes on a red background

Darken the edges of the rectangle by creating a new layer and choosing the Soft Round brush to draw the edges of the rectangle with the color # 99161A.

images 17 of Instructions for using Photoshop CS6 (Part 5): Create christmas cards with snowflakes on a red background
Images 17 of Instructions for using Photoshop CS6 (Part 5): Create christmas cards with snowflakes on a red background

We have the next result:

images 18 of Instructions for using Photoshop CS6 (Part 5): Create christmas cards with snowflakes on a red background
Images 18 of Instructions for using Photoshop CS6 (Part 5): Create christmas cards with snowflakes on a red background

Hold Alt (Windows) or Option (Mac OS) and click between the brush and rectangle layer in the Layers panel to create a clipping mask.

images 19 of Instructions for using Photoshop CS6 (Part 5): Create christmas cards with snowflakes on a red background
Images 19 of Instructions for using Photoshop CS6 (Part 5): Create christmas cards with snowflakes on a red background

We have the next result:

images 20 of Instructions for using Photoshop CS6 (Part 5): Create christmas cards with snowflakes on a red background
Images 20 of Instructions for using Photoshop CS6 (Part 5): Create christmas cards with snowflakes on a red background

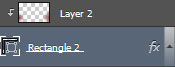
Create a copy of the rectangle layer and set Fill to 0% for this layer.

images 21 of Instructions for using Photoshop CS6 (Part 5): Create christmas cards with snowflakes on a red background
Images 21 of Instructions for using Photoshop CS6 (Part 5): Create christmas cards with snowflakes on a red background

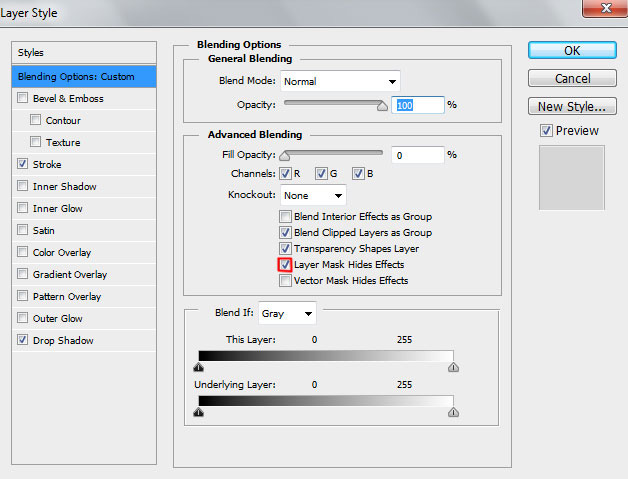
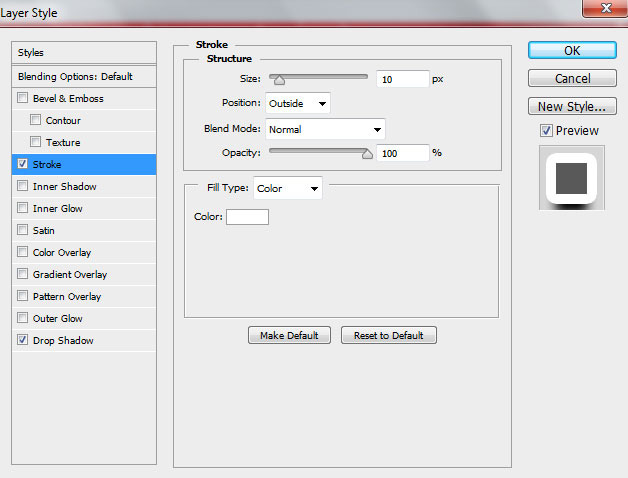
Click on the icon Add a layer style at the bottom of the Layers panel and select Stroke .

images 22 of Instructions for using Photoshop CS6 (Part 5): Create christmas cards with snowflakes on a red background
Images 22 of Instructions for using Photoshop CS6 (Part 5): Create christmas cards with snowflakes on a red background

Add Drop Shadow :

images 23 of Instructions for using Photoshop CS6 (Part 5): Create christmas cards with snowflakes on a red background
Images 23 of Instructions for using Photoshop CS6 (Part 5): Create christmas cards with snowflakes on a red background

We have the next result:

images 24 of Instructions for using Photoshop CS6 (Part 5): Create christmas cards with snowflakes on a red background
Images 24 of Instructions for using Photoshop CS6 (Part 5): Create christmas cards with snowflakes on a red background

Insert the mask on the same layer by selecting Add layer mask in the Layers panel and selecting the Soft Round black brush.

images 25 of Instructions for using Photoshop CS6 (Part 5): Create christmas cards with snowflakes on a red background
Images 25 of Instructions for using Photoshop CS6 (Part 5): Create christmas cards with snowflakes on a red background

Paint in the mask to hide the edge of the rectangle in the same way as the image shown below:

images 26 of Instructions for using Photoshop CS6 (Part 5): Create christmas cards with snowflakes on a red background
Images 26 of Instructions for using Photoshop CS6 (Part 5): Create christmas cards with snowflakes on a red background

Use big snowflakes by creating a new layer and choosing Custom Shape Tool (U) from the snowflake downloaded. This time choose # 910105 color for snowflakes.

images 27 of Instructions for using Photoshop CS6 (Part 5): Create christmas cards with snowflakes on a red background
Images 27 of Instructions for using Photoshop CS6 (Part 5): Create christmas cards with snowflakes on a red background

We have the next result:

images 28 of Instructions for using Photoshop CS6 (Part 5): Create christmas cards with snowflakes on a red background
Images 28 of Instructions for using Photoshop CS6 (Part 5): Create christmas cards with snowflakes on a red background

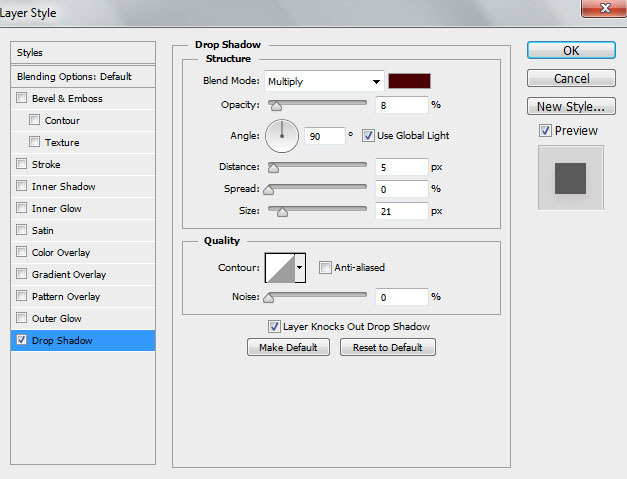
Click on the icon Add a layer style in the bottom part of the Layers panel and select Stroke .

images 29 of Instructions for using Photoshop CS6 (Part 5): Create christmas cards with snowflakes on a red background
Images 29 of Instructions for using Photoshop CS6 (Part 5): Create christmas cards with snowflakes on a red background

Apply Drop Shadow :

images 30 of Instructions for using Photoshop CS6 (Part 5): Create christmas cards with snowflakes on a red background
Images 30 of Instructions for using Photoshop CS6 (Part 5): Create christmas cards with snowflakes on a red background

We have the next result:

images 31 of Instructions for using Photoshop CS6 (Part 5): Create christmas cards with snowflakes on a red background
Images 31 of Instructions for using Photoshop CS6 (Part 5): Create christmas cards with snowflakes on a red background

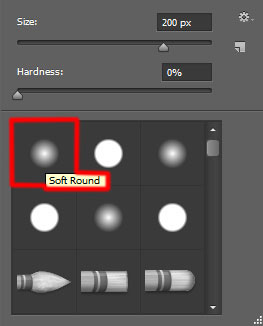
Do the same to add snowflakes on the background. The parameters Blending Options > Stroke must be selected corresponding to the size of the snowflake. The Drop Shadow parameters are the same.

images 32 of Instructions for using Photoshop CS6 (Part 5): Create christmas cards with snowflakes on a red background
Images 32 of Instructions for using Photoshop CS6 (Part 5): Create christmas cards with snowflakes on a red background

Next create a rope for the snowflake. Use the same Rectangle Tool (U) to draw the fibers and place these new layers under the snowflake layer.

images 33 of Instructions for using Photoshop CS6 (Part 5): Create christmas cards with snowflakes on a red background
Images 33 of Instructions for using Photoshop CS6 (Part 5): Create christmas cards with snowflakes on a red background

We have the next result:

images 34 of Instructions for using Photoshop CS6 (Part 5): Create christmas cards with snowflakes on a red background
Images 34 of Instructions for using Photoshop CS6 (Part 5): Create christmas cards with snowflakes on a red background

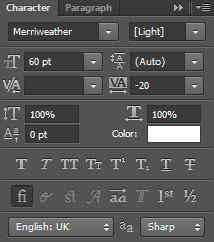
Finally insert the text on the card by selecting the Horizontal Type tool (T) . Select fonts, sizes and colors in the Character table. Here use fonts from FontSquirrel.

images 35 of Instructions for using Photoshop CS6 (Part 5): Create christmas cards with snowflakes on a red background
Images 35 of Instructions for using Photoshop CS6 (Part 5): Create christmas cards with snowflakes on a red background

Click on the gap and type Merry Christmas. Press Enter to display the text.

images 36 of Instructions for using Photoshop CS6 (Part 5): Create christmas cards with snowflakes on a red background
Images 36 of Instructions for using Photoshop CS6 (Part 5): Create christmas cards with snowflakes on a red background

Our Christmas card is complete!

Download the free Layered PSD file.

You can see more:

  1. How to use Photoshop CS6 (Part 1): Create digital photos
  2. How to use Photoshop CS6 (Part 2): Create fashion collage images
  3. How to use Photoshop CS6 (Part 3): Create Manipulation artwork with exposure effect
  4. How to use Photoshop CS6 (Part 4): Create a fading effect
3.8 | 4 Vote
« PREV : How to design a...
How to use Photoshop... : NEXT »