14 simple steps to create a snow effect for the photo
Create snow effect in photos to make the images more sparkling and bold Christmas atmosphere is approaching. The steps are extremely simple and not too complicated as you think.
- Step 1: Create a new Layer
- Step 2: Fill the new layer with black
- Step 3: Add Noise effect
- Step 4: Blur Noise (noise)
- Step 6: Set the Layer Blend Mode to "Screen"
- Step 7: Edit parameters on "Motion Blur"
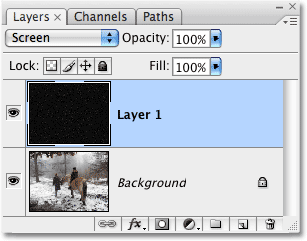
- Step 8: Duplicate the Layer
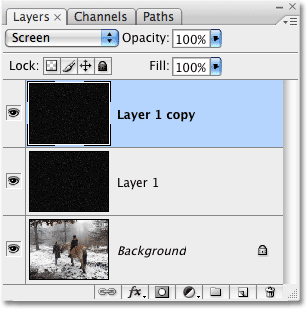
- Step 9: Rotate the new layer 180 °
- Step 10:
- Step 11:
- Step 12: Combine 2 layers of snow falling together
- Step 13: Duplicate "Layer 1"
- Step 14: Reduce the brightness of the Top Layer
- See also: How to use Photoshop CS5 - Part 21: Create a water ripple effect in a photo
The Christmas atmosphere is approaching. If you want to make your photos sparkling, with Christmas atmosphere, just take a few basic steps. The following article Admin network will guide you how to create snow effect in photos in Photoshop. The steps are extremely simple and don't take as long as you think.
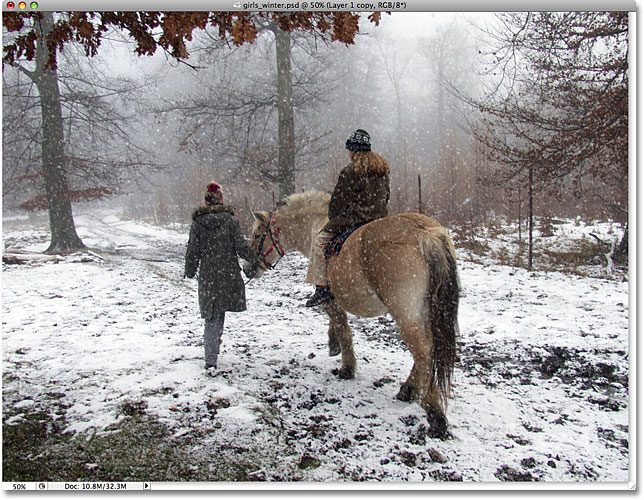
Photos before creating snow effects:

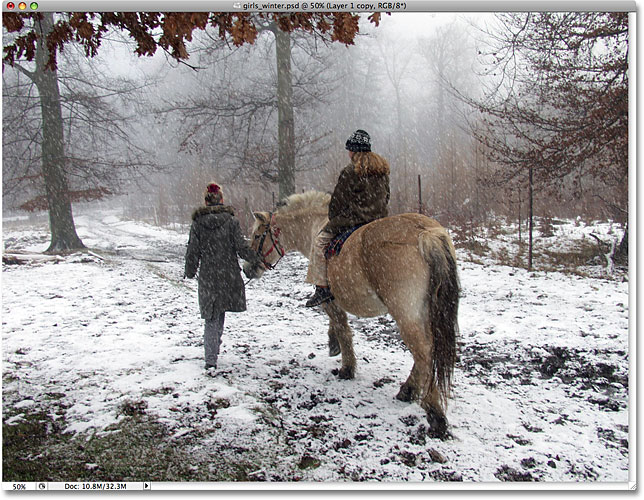
Photos after creating additional effects:

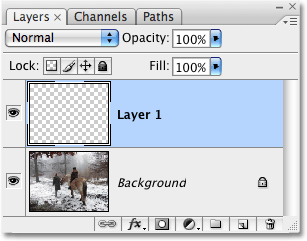
Step 1: Create a new Layer
To start, create a new layer on the image you want to edit. All you need to do is click your mouse on the New Layer icon at the bottom of the Layers Palette . You can see it is the second icon from the right-hand side, right next to the trash can icon (Trash bin).

Photoshop will automatically name the new layer you just created as Layer 1 . The newly created layer will be right above the active layer.
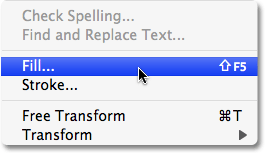
Step 2: Fill the new layer with black
After you've created a new layer, fill it with black. Normally before we make any modifications, the first step is to select the Layer in the Layers Palette , but in this case, Photoshop automatically selects the new Layer you created.
To fill the layer with black, simply use the Fill command in Photoshop. Go to the Edit Menu (Edit Menu ) at the top of the screen and select Fill.
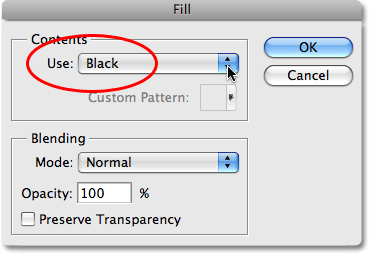
You will see a dialog box containing Fill statements. At the top of the dialog box is the content. In this section you can choose the color you want to fill for the Layer. On the list, select Black and then click OK to exit the dialog box.
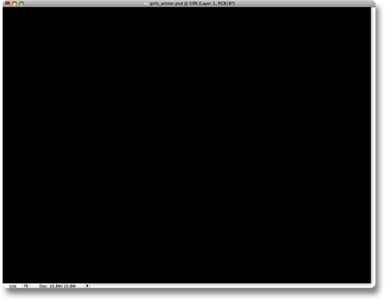
After "Layer 1" (located just above the active layer) has been filled with black, the new layer window will appear all black.
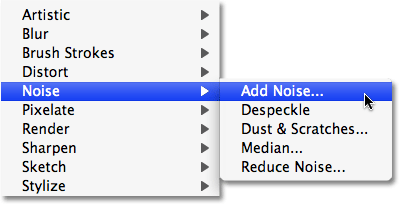
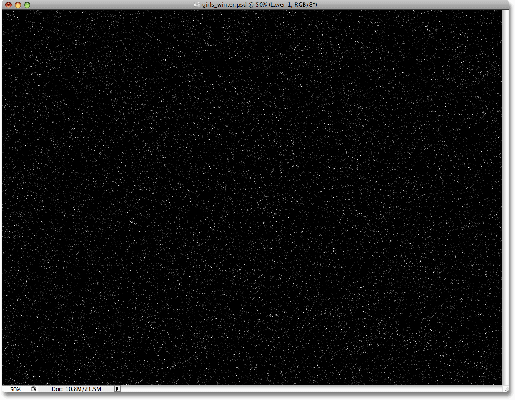
Step 3: Add Noise effect
Add effects to your new Noise Layer. Surely when I hear the word 'Noise' , many people will think about adding a certain sound. However, in Photoshop, 'Noise' is just small dots (also known as grain noise).
Photoshop has a special filter that allows you to add noise to the image. This filter is called Add Noise . Go to the Menu Filter at the top of the screen, select Noise then select Add Noise .
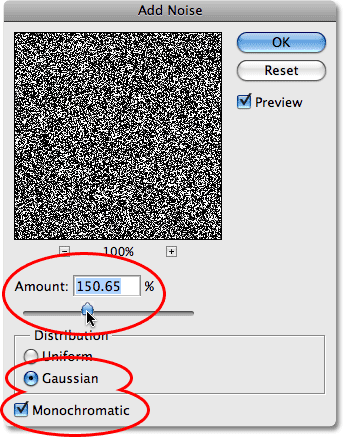
You will see the Add Noise dialog box appear. Use the Amount slider in the middle of the dialog box to adjust the amount of Noise added. Drag the slider to a value of about 150% or more.
At the bottom of the dialog box, select the Gaussian option, then select the Monochromatic option at the bottom of the dialog box, directly below the Gaussian option. This option will allow you to choose Noise that is black or white instead of Noise red and green as default.
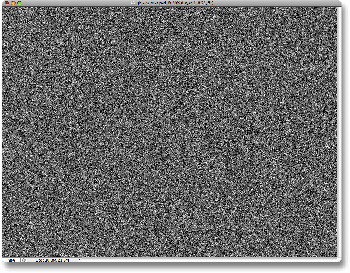
Click OK after you have completed the steps above. The new layer after adding Noise will take the following shape:
Step 4: Blur Noise (noise)
After successfully adding the Noise effect, proceed to blur the Noise step. The simplest way to blur in Photoshop is to use the Gaussian Blur Filter . Using Gaussian Blur Filter is extremely simple and allows you to control the amount of blurred parts.
Also you can use a more simple way. Go to Menu Filter, select Blur and then select Blur More.
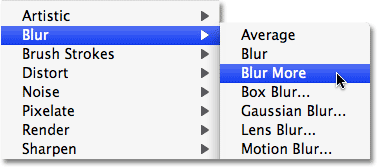
Blur and Blur More commands allow you to blur images quickly and simply, without hassles. Blur makes image blur extremely delicate, Blur More also allows you to blur the image but with more blur level. However, when using Blure More , the dialog box does not display on the screen, so you cannot control how much blur the image is. So you should use Filter Gaussian Blur to make blur noise in images more efficient.
Step 5: Reduce the number of Noise with the Level command
Go to the Menu Image at the top of the screen, select Adjustments , then choose Levels.
After the Level dialog box appears, you will see in the middle of the dialog box a graph showing the brightness, range . image. In other words this graph shows us how many pixels in the image.
Just below the graph are three small sliders - a black slider on the left, a white slider on the right, and a gray slider in the middle. These sliders are not only used to remove Noise, but also to increase the brightness of Noise when creating a snow effect.
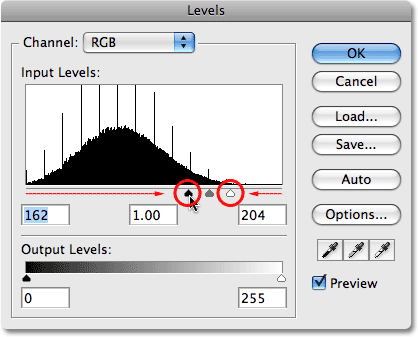
First, to increase Noise brightness, click on the white slider below the graph and drag to the left until you see the noise in your image brighter.
To delete Noise, click your mouse on the black slider and drag to the right until you see the Noise section of the image changes to black only.
Continue dragging the black slider to the right until you have cleared enough Noise . Then click OK to exit the Levels dialog box. Your new image will look like this:
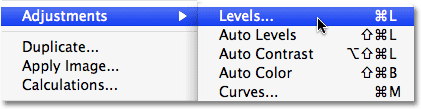
Step 6: Set the Layer Blend Mode to "Screen"
Continue with Layer 1 you selected, go to the Blend Mode option at the top of the Layers Palette . Often rarely in Photoshop software display "Blend Mode" , but you can see a dialog box that is set to "Normal" by default. The dialog box is the Blend Mode option. Your task is to select Screen on the Blend Mode option list .

The Blend Mode in "Layer 1" is set to Screen . Your new image as shown below:

See also: How to use Photoshop CS5 - Part 21: Create a water ripple effect in a photo
Step 7: Edit parameters on "Motion Blur"
Go to Menu Filter (filter), select Blur, then select Next Motion Blur.
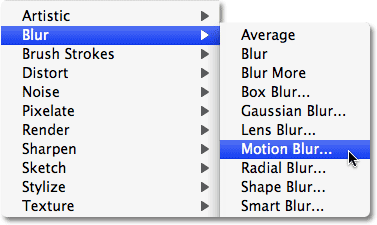
You will see the Motion Blur dialog box appear. At the bottom of the dialog box are 2 sections that adjust parameters. The first option is Angle, which allows you to directly set the amount of snowfall. You can set Angle to about -65 ° . Below is the Distance option (Distance option) that allows you to adjust the snow movement path.
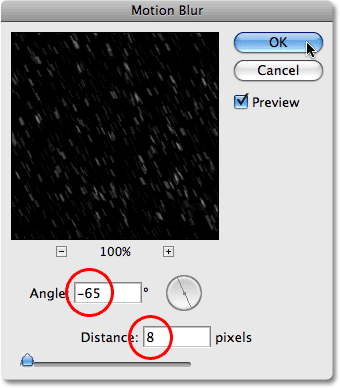
After selecting the parameters, click on OK to finish and exit the dialog box. You will see the snow effect on the photo just like real snow.

Step 8: Duplicate the Layer
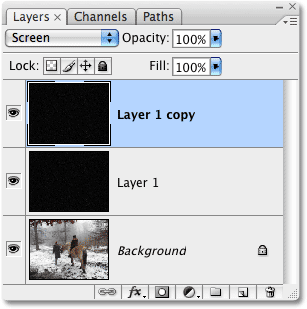
First duplicate "Layer 1". Go to the Menu Layer at the top of the screen, select New, then select Layer via Copy . Or the faster way is to press Ctrl + J (for Windows) or Command + J (for Mac) . A new layer named "Layer 1 copy" will appear, above Layer 1.
Step 9: Rotate the new layer 180 °
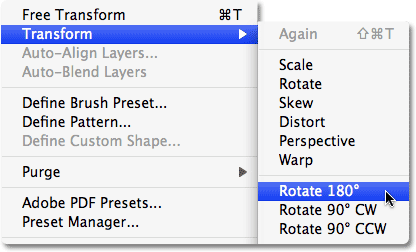
With "Layer 1 copy" selected on the Layers Palette (the Layers panel) , go to Menu Edit (edit menu) at the top of the screen, select Transform, then select Rotate 180 ° (rotate 180 °).
Step 10:
Go to Filter and choose Pixelate then select Crystallize.
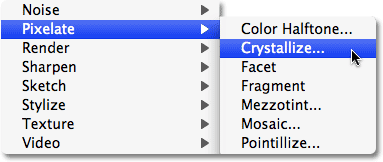
Then the Crystallize dialog box will appear.The Crystallize filter allows you to break an image into small pieces or understand it as 'Cell ', color. You can resize the Cells with the Cell Size option located at the bottom of the dialog box. The default value is 10.
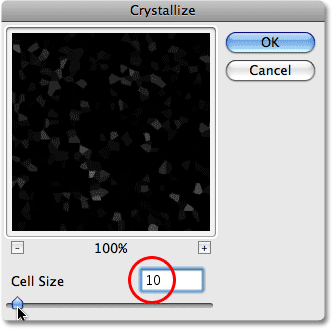
Click OK to exit the dialog box. You will get the new photo as follows:
Step 11:
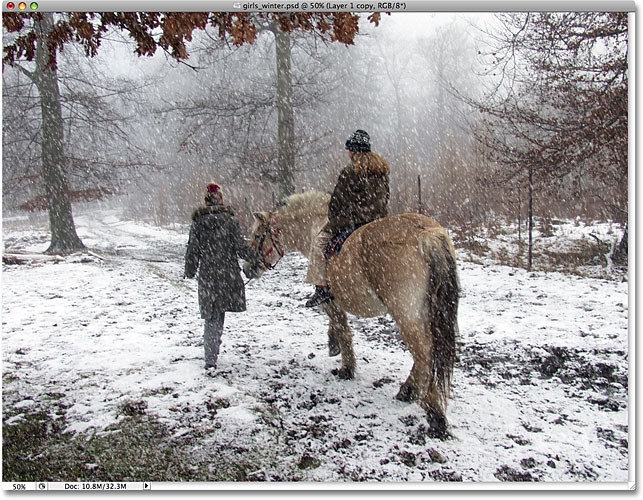
Create snowflake effect with larger size. Go to Menu Filter , select Blur then select Motion Blur again. When the Motion Blur dialog box appears, go to the Angle section to delete the -65 ° setting. Edit settings Distance options (Distance option) is about 16 pixels.

Click OK to exit the dialog box. Once completed, the snow effect in the photo will look like this:
Step 12: Combine 2 layers of snow falling together
With "Layer 1 copy" selected on the Layers palette, go to Menu Layer and select Merge Down.
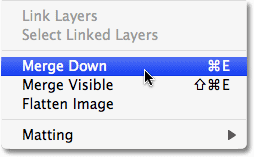
This option allows you to combine two layers together. You can see in the illustration below, "Layer 1 copy" has been merged into "Layer 1".
Step 13: Duplicate "Layer 1"
The fastest way to duplicate is to use Ctrl + J (for Windows) or Command + J (for Mac) . The Layers palette will display two layers.
Both layers contain snowflakes and are set to Blend Mode to Screen .You can see the image below, falling snowflakes are doubled brightness.
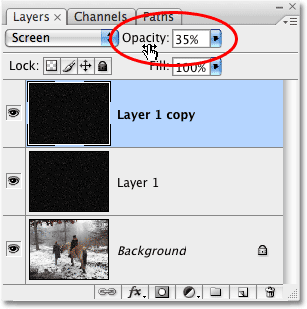
Step 14: Reduce the brightness of the Top Layer
If the snow effect in the image you are creating is too bright, you can reduce the brightness of the Top Layer . On the Blend Mode option located at the top of the Layers Palette, you'll find the Opacity option directly there.
After you have selected the parameters, you have completed the editing process. The image after you have selected and adjusted the parameters will be as follows:

Good luck!
- Tutorial to create a sparkling snow effect using Photoshop Brush
- How to create snowfall effect with DesktopSnowOK
- Create a snow effect on the Windows Taskbar
- Instructions for creating photos of sunset effects online
- How to Add Falling Snow to Photos Using Photoshop
- Create snow effect when moving mouse on Windows
- Macromedia Flash - Create a snow effect
- Simple steps to make a snow globe for your baby
- How to create sky effect for photos with B612
- How to create PowerPoint photo album with effects
- How to Add Falling Snow to Photos Using Photoshop
- How to create a snowman in Photoshop
- How to delete a person from a photo in Photoshop
- 17 best ideas and tutorials for Photoshop users
- How to style hair and beard in Photoshop
- How to use Photoshop CS5 - Part 7: Design and present with the Type Character Panel
- How to create a word cut effect on Photoshop
- Have a sharp picture in Photoshop less than 10 seconds
- How does Christmas snowman animation effect?
- How to use Photoshop CS5 - Part 11: Change colors from black and white photos
-
 How to create professional shadow effects in Photoshop
-
How to sharpen images using Photoshop
-
Photoshop CS6: How to create abstract geometric shapes
-
How to create stunning 3D pop-out effects in Photoshop
-
How to turn an image into a pencil sketch in Photoshop
-
How to Create a Monochrome Color Effect in Photoshop
 How to create professional shadow effects in Photoshop
 How to sharpen images using Photoshop
 Photoshop CS6: How to create abstract geometric shapes
 How to create stunning 3D pop-out effects in Photoshop
 How to turn an image into a pencil sketch in Photoshop
 How to Create a Monochrome Color Effect in Photoshop
-
 Free Tools
-
Application
-
Web Email
-
Website - Blog
-
Web browser
-
Support Download - Upload
-
Software conversion
-
Social Network
-
Simulator software
-
Online payment
-
Office information
-
Music Software
-
Map and Positioning
-
Installation - Uninstall
-
Graphic design
-
Free - Discount
-
Email reader
-
Edit video
-
Edit photo
-
Compress and Decompress
-
Chat, Text, Call
-
Archive - Share
-
-
System
-
Mac OS X
-
Hardware
-
Game
-
Tech info
-
Technology
-
Science
-
Life
-
Electric
-
Program
-
Mobile