How to Optimize Windows 7
Method 1 of 8:
Deleting Unused Programs
-
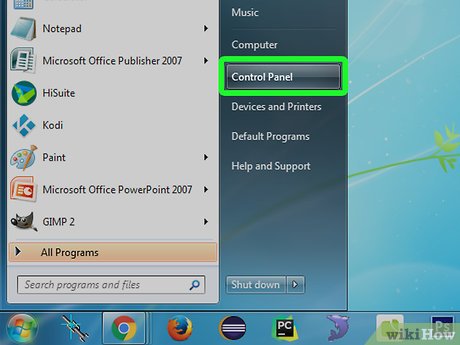
 Click the Start menu and select "Control Panel". If you've accumulated a bunch of installed programs over the years of using Windows 7, they may be slowing you down by always running in the background. Getting rid of programs you no longer use is the first step towards optimizing your computer's speed.
 -
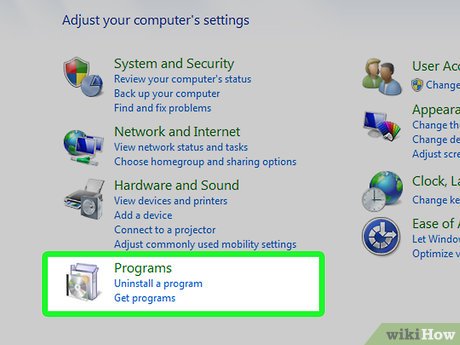
 Click "Uninstall a program" or "Programs and Features". This will load a list of all the installed programs on your computer. The list may take a while to load if you have a lot of programs installed.
 -
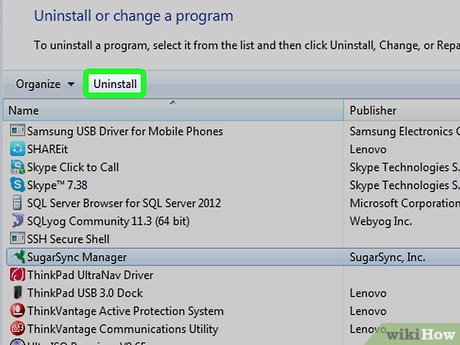
 Select a program that you no longer user and click Uninstall. Follow the prompts to remove the program. The uninstallation process may take a few minutes.
 -
 Repeat this for each program you don't use anymore or don't recognize. If you aren't sure what a program is, perform a web search on it. Generally, you'll want to keep anything on the list that you use or that is published by Microsoft or any of your hardware manufacturers.
- Not all hard manufacturer software is necessary. For example, many HP computers come with a lot of HP software pre-installed which isn't necessary for your computer to run. Search each program listed online to determine if it is necessary to keep installed.[1]
Method 2 of 8:
Improving Startup Speed
-
 Click the Start menu and type .msconfig. Press ↵ Enter.
 -
 Type .msconfig and press ↵ Enter.
 -
 Click the .Startup tab. This will list all of the processes that start with Windows.
 -
 Uncheck every program that you don't need to start with Windows. Lots of programs will launch in the background when Windows starts to "save you time", but when too many fill up your list, your startup time suffers dramatically. Uncheck everything that isn't absolutely vital to starting your essential programs.
- Nothing in the list is an essential service for Windows. Windows will boot just fine with nothing checked, though some of your peripherals may not start without the correct software loaded.
- If you don't know what something is, search both the "Startup Item" name and the program listed in the "Command" column.
-
 Click .Apply after unchecking everything you don't need.
 -
 Reboot your computer. Your changes will take effect when Windows starts up again.[2]
Method 3 of 8:
Cleaning Up Your Hard Disk
-
 Delete old files that you don't use anymore. Windows needs a certain amount of free space on your drive to perform well. If your drive is too full, your computer may slow to a crawl or you might experience errors. Microsoft doesn't specify exactly how much free space you should have, but the general rule of thumb is about 20% of your hard disk capacity, or 2.5X the amount of RAM you have installed.
- You can check how large your hard disk is by pressing ⊞ Win+E and selecting your hard drive. It is more important to keep free space on your Windows hard disk if you have more than one installed.
- You can check how much RAM you have installed by pressing ⊞ Win+Pause.
-
 Press .⊞ Win+R and type cleanmgr. This will launch the Disk Cleanup utility. This utility will scan your hard drive and remove unused and old temporary files. You can free up a significant amount of space using this utility.
 -
 Select your hard disk. This is typically the C: drive. Disk Cleanup will scan the drive for files to be removed, which may take a few minutes.
 -
 Check the box for each item you want to remove. The amount of space you will recover will be listed next to each entry. Generally, it is safe to remove everything that Disk Cleanup reports.
 -
 Click the .Clean up system files button. Once you have everything checked, click the button to remove the files. Disk Cleanup will handle the process automatically.
Method 4 of 8:
Unclogging Your Web Browser
-
 Open the web browser that you typically use. If you've been using your web browser for a long time, it could be accumulating cruft that will slow down your browsing experience. Removing the excess add-ons and files can give your browser a significant boost.
 -
 Remove any toolbars you don't use. If you've installed extra toolbars for your browser, they may be slowing you down. If you've found that you aren't using these extensions, remove them to increase performance.
- Click here for detailed instructions on removing toolbars.
-
 Delete the cache and temporary files. Your browser will store data to help improve the time it takes for websites to load. Over time, however, these files can build up and do more harm than good.
- Click here for detailed instructions on deleting these files.
- You can quickly access the Delete Cache window in most browsers by pressing Ctrl+⇧ Shift+Del.
-
 Reinstall your browser or switch to a new one. If you are using Internet Explorer, you may want to switch to Chrome or Firefox, as both boast performance gains over Internet Explorer. If you are using a different browser already, reinstalling may fix poor performance.
- Click here for instructions on installing (and reinstalling) Chrome.
- Click here for instructions on installing (and reinstalling) Firefox.
Method 5 of 8:
Getting Rid of Adware and Viruses
-
 Install an antivirus program (if you don't already have one). In this day and age, having an antivirus program is essential to protect your computer against online threats. You should only have ONE antivirus program installed at a time, as having more than one can cause conflicts and errors.
- Click here for detailed instructions on installing an antivirus program.
-
 Download and install a few anti-malware programs. Besides an antivirus, you should really have a couple different antimalware programs on hand to scan for malware and adware. These are malicious programs that aren't as serious as viruses, but can be significant personal security risks and can also slow your system down.
- Some of the most popular programs includes Malwarebytes' Antimalware, Spybot Search & Destroy, Adwcleaner, and Lavasoft Ad-Aware. Unlike antivirus programs, you can and should have multiple antimalware programs installed.
-
 Reboot into Safe Mode. Safe Mode boots Windows with only the essential system files, which can help find and remove more viruses and malware.
- To boot into Safe Mode, restart your computer and hit F8 before Windows loads. Select "Safe Mode" from the Advanced Startup menu. Click here for more detailed instructions.
-
 Run your antivirus scanner. Allow your computer to complete a full virus scan while in Safe Mode. Quarantine or delete any infected files that are found.
 -
 Run each of your malware scanners. Run through each of your antimalware programs, allowing each one to perform a complete scan. Remove or quarantine any infected files that each scan finds.
Method 6 of 8:
Turning Off Extra Effects
-
 Click the Start menu. Windows uses a variety of special effects to make transitions between windows smooth, as well as to add transparency and other visual flair. While this makes Windows look great, it can also have a major impact on your system's performance, especially if it is older. Disabling these effects can really help speed up your system.
 -
 Type .sysdm.cpl and press ↵ Enter.
 -
 Click the .Advanced tab.
 -
 Click the .Settings... button in the "Performance" section.
 -
 Uncheck any effects you want to disable. All of Windows' effects will be listed in the "Custom" list. Uncheck anything that you don't want to use anymore.
- Unchecking "Enable transparent glass" will give you one of the biggest performance increases.
- If you don't care about visual effects at all, select "Adjust for best performance" to turn everything off.
-
 Click .Apply to save your changes. Windows will take a few moments to make the changes, and then you can see what your new settings look like.
Method 7 of 8:
Reformatting and Reinstalling
-
 Back up all of your important data. One of the easiest ways to get the best performance possible out of Windows 7 is to simply wipe your computer clean and start over again. This may seem like a hassle, but once you've backed up all of your data, it should only take about an hour.
- Reformatting will delete all of the data stored on your computer, so make sure everything you need is backed up. Click here for tips on backing up all of your important files.
-
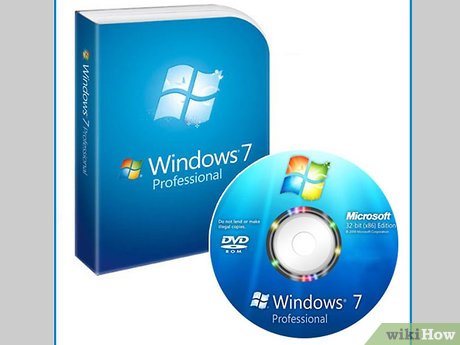
 Find your Windows installation disc and product key. You will need your Windows installation disc in order to start the reinstallation process. You will also need your product key in order to reactivate Windows. You can usually find the product key on your installation disc's case, but it may be affixed to your computer instead.
 -
 Insert the disc into your computer and reboot.
 -
 Open your BIOS setup menu. This will allow you to change the boot order for your computer and boot from the setup disc. You can access most BIOS menus immediately after startup by pressing F2, F10, F11, or Del.
 -
 Set your boot order. Navigate to the Boot menu in your BIOS and set your computer to boot from the optical drive first. This will allow you to boot from the installation disc.
 -
 Restart your computer after setting your BIOS. Press a key when prompted to boot from the Windows 7 installation disc.
 -
 Follow the prompts to install Windows 7. The installation process has gotten much more straightforward over the years, and Windows 7 requires minimal input to reinstall.
- Click here for detailed instructions on reinstalling Windows 7.
Method 8 of 8:
Upgrading Your Hardware
-
 Use a spare USB drive to increase your available RAM. Windows 7 allows you to use a USB thumb drive as a "RAM expansion" using a utility called ReadyBoost. This let's you repurpose old USB drives to help improve your computer's performance.
- Attach a USB flash drive or external hard drive to an available USB port on your computer. An "Autoplay" dialog box will appear on the screen as soon as your computer recognizes the device.
- Choose the "Speed up my system" option under "General Options" in the Autoplay dialog box.
- Click the ReadyBoost tab when the Properties dialog box appears.
- Select "Dedicate this device to ReadyBoost" if you want to apply all the available space on your extra storage device to your computer and use it as memory.
- Select "Use this device" and adjust the slider to designate the amount of memory you want to apply to ReadyBoost. This option is useful if you want to reserve space on your storage device.
- Click Apply then OK to save your settings.
-
 Upgrade your RAM. While ReadyBoost can give you a performance boost, physically upgrading your RAM will provide much greater benefits. The type of RAM you need depends on the type of hardware you have installed in your computer, so this will be a little more involved (and expensive) than using ReadyBoost.
- Click here for detailed instructions on installing new RAM.
-
 Install a solid state hard drive. Solid state drives are a newer technology that use memory chips instead of spinning disks like a traditional drive. This can lead to massive boosts in performance for tasks that are hard disk dependent, such as booting up your computer. Solid state drives are still pricier than traditional drives, but prices are going down.[3]
- Click here for detailed instructions on installing a solid state drive.
-
 Install a new graphics card. If you play a lot of games, installing a new graphics card can take your games to a whole new level. A good graphics card can be pretty pricey, but the performance gains are often worth it if you take games seriously.
- Click here for detailed instructions on installing a new graphics card.
-
 Upgrade your processor. The processor is the "brain" of your computer, and is one of the main factors involved when determining the speed at which things run. Upgrading your processor is one of the more complex upgrades you can perform, and it is also one of the most expensive.
- Click here for detailed instructions on installing a new processor.
Share by
Lesley Montoya
Update 04 March 2020


