How to Dramatically Speed up Windows XP
Method 1 of 2:
Simple Cleanup
-
 Use an optimization program. Free and paid tools are available, such as CCleaner or Tuneup Utilities. Many Antiviruses also come standard with optimization scanners such as Norton 360. Windows XP also comes with several free tools. See Remove Junk System Files and Defragment the hard drive in this article.
 -
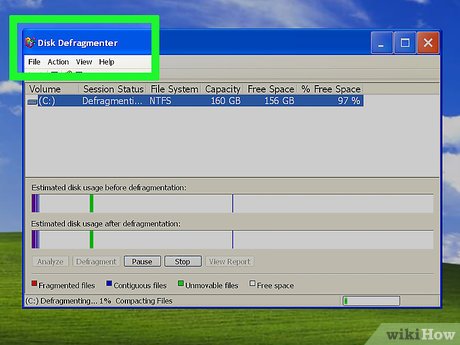
 Defragment the hard drive. After a lot of disk activity, your computer's hard drive will become fragmented, and accessing files on it is slower than normal. Windows XP comes with a free defragmentation tool. To start it, click Start>All Programs>Accessories>System Tools>Disk Defragmenter. Click the Analyze button to determine whether the drive needs to be defragmented. If the percent of defragmentation is high, click the Defragment button. You can defragment multiple drives.
 -
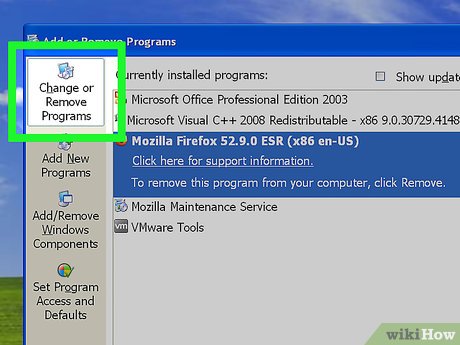
 Remove unused programs. You're bound to have a few programs installed which you know that you don't need or use. Go to Start > Control Panel > Add or Remove Programs. Removing unneeded programs will free up some space. Uninstalling the programs may also reduce CPU usage by removing some background processes related to them.
 -
 Remove junk system files. Windows can automatically do this for you. Click Start>All Programs>Accessories>System Tools>Disk Cleanup. Select your system drive to clean (usually C:) and click OK, wait for the junk file scan to finish, then choose what you want to clean up. Commonly selected cleanup options are Downloaded Program Files, Temporary Internet Files, Offline Webpages, Recycle Bin, Setup Log Files, Temporary Files, and Thumbnails. You can also select Dr Watson Debug (Windows Error Reporting) files.
 -
 Delete unwanted personal files. Look through your documents for old, unwanted pictures, letters, etcetera and delete useless downloads, such as program setup files which were already used. They are waiting on your hard drive, slowly filling it up.
 -
 Remove startup programs. Startup programs are programs of your computer which set themselves to start when Windows starts. This slows startup of Windows and the background processes of the startup programs will slow down operation of your computer. To disable startup programs, click Start>Run, type MSCONFIG, and click OK. Click the Startup tab and uncheck programs which you do not need. Avoid unchecking programs that you don't recognize or you know are essential to Windows. Unchecking them may cause undesired Windows operation.
- If you experience problems after disabling some startup programs, run MSCONFIG again and choose Normal Startup from the General Tab.
- Applications like CCleaner can also disable startup programs.
-
 Uninstall unnecessary Windows features. Click Start>Control Panel>Add or Remove Programs>Add/Remove Windows Components. Click the type of the feature(s) which you want to uninstall and click Details. Uncheck the feature(s) and click OK on the details dialog. After you have chosen what you want to remove, click Next on the whole window.
- If you are planning to reinstall some Windows components which you uninstalled, be sure to have your Windows XP installation disc handy. ]
-
 Change the Power Scheme to High Performance. Click Start>Control Panel>Performance and Maintenance>Power Options to open the Power Options dialog. In Power Options, change the Power Scheme to Always On.
- Note that changing the power scheme to Always On might deplete laptop batteries quicker than usual, so don't do this on your laptop.
-
 Remove viruses and malware from your system. If you are not protected by an antivirus program, you can pick up malware and viruses from the internet. Not only are malware and viruses bad for your system's health or your privacy, they can slow your machine down to a crawl. If you do not already have an antivirus program, many free alternatives are available. You can also purchase something such as Kaspersky or Norton. If you do not want to buy anything, download and install Malwarebytes and Avast, update them, and perform a full scan, removing any malicious software detected. If you prefer different programs, do the same thing with them. If you already have an antivirus program, completely scan your computer with it.
- If you know that an antivirus will drastically slow down your computer, uninstall the antivirus after you've scanned the computer with it. Be sure to reinstall it and re-scan the computer occasionally.
- A good and free second opinion scanner is herdProtect. HerdProtect scans files on your computer with multiple antiviruses, and in the cloud, so it is ideal for slow computers.
- To keep your computer clean, you can upload suspicious files which you downloaded onto a service called VirusTotal. VirusTotal scans uploaded files with multiple antiviruses and gives you the result.
-
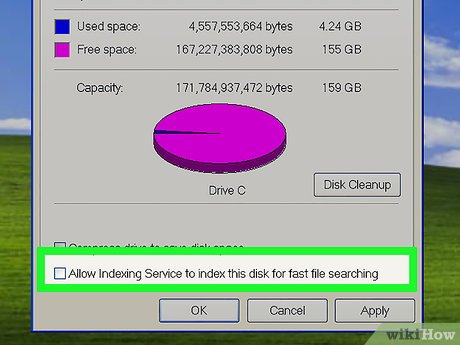
 Disable the Indexing Service. The Indexing Service scans your hard drive and indexes files to help speed up file searching. It runs in the background, and uses up lots of precious memory. The Indexing Service is unrecommended, especially if you do not search for files a lot, or you only search your documents. To disable the Indexing Service, click Start, open My Computer, right-click on the hard drive (usually C:), go to Properties, and clear the check mark next to Allow indexing service to index this hard drive for faster searching. Click OK. It may take a while for the operation to complete.
 -
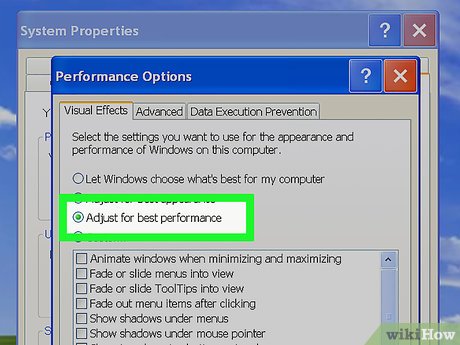
 Reduce Visual Effects. Windows XP enables many visual effects by default, like the Minimize and Maximize effect, or shadows. They may enhance the look of your computer, but aren't necessary or worth it, especially if they slow down your computer. To disable visual effects of your computer, click the Start button, right click My Computer and select Properties, click the Advanced tab, click the Settings button in the Performance area, then choose Adjust for best performance. You can also set your own preferences if you want to retain some effects.
 -
 Remove bloatware and adware. Some PC manufacturers may install "bloatware", unwanted programs which are usually installed without consent, on their computers before selling them. "Adware" may be installed on your computer in shady program installers, disguised as the software you were installing or listed as "offers". Look in Add/Remove Programs (click Start>Control Panel>Add Remove Programs) for software which you didn't install and remove them.
 -
 Empty the Recycle Bin. When you delete files, they are usually sent to the Recycle Bin, unless you specified otherwise. You might think that they've been deleted, but they are really still on your hard drive. In order to permanently delete them, you need to open the Recycle Bin and delete them from there. You should empty the Recycle Bin occasionally if you don't. To empty the Recycle Bin, right click the Recycle Bin shortcut on your desktop and click Empty Recycle Bin.
 -
 Remove the background image on your desktop. Right click the Desktop, click "Properties", and go to the "Desktop" tab. Change the wallpaper to "None".
Method 2 of 2:
Advanced Steps
-
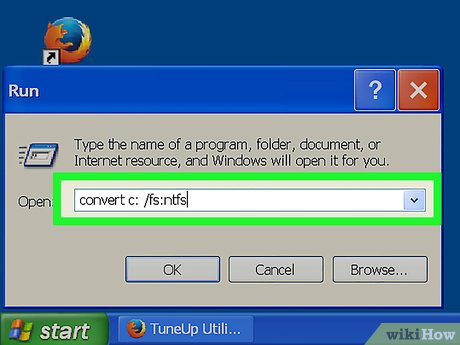
 Convert your hard drive type to NTFS. If your drive is using FAT16 or FAT32, you can gain performance by converting it to NTFS.
- To do so, press WinKey + R simultaneously to open the Run dialog, type CONVERT C: /FS:NTFS, and click OK. Follow the instructions and your drive will be converted to NTFS.
-
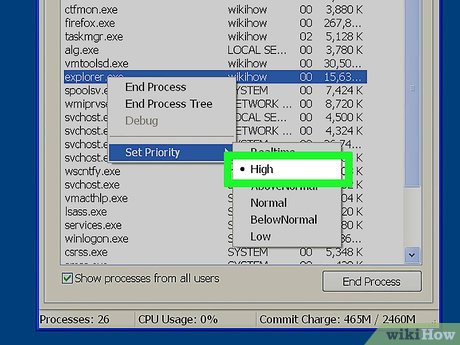
 Set priorities of programs. Setting the priority of a program determines its importance to the computer and whether it will receive extra processing power from it or not. If you often use a program or a program freezes constantly when you use it, setting its priority to a higher state often helps. To set the priority of a program, open the program which you want to increase the priority of, press Ctrl+Alt+Delete simultaneously on your keyboard to open the Task Manager, click the Applications tab, right click the name of the program, click Go To Process, right click the selected process, click Set Priority, and either choose High or Realtime.
 -
 Disable GUI boot. When Windows starts, you might see the loading bar and the Windows XP logo. This is the GUI boot. However, this is useless and can lengthen the boot of Windows. To disable GUI boot, press the WinKey+R simultaneously to open the Run dialog. Type MSCONFIG into the Run dialog and click OK. In Microsoft Configuration Utility, click the Boot tab and check No GUI boot.
 -
 Speed up browsing in Windows Explorer. Go to My Computer > Tools menu > Folder Options > View tab. Uncheck "Automatically search for network folders and printers" and "Launch folders in a separate process". Click Apply, then click OK.
 -
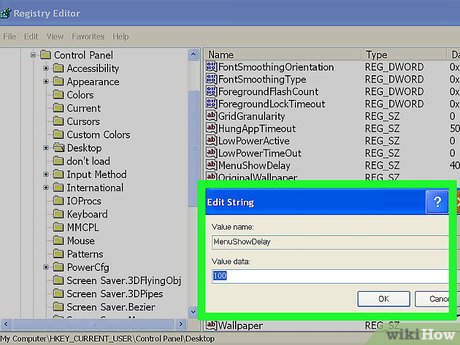
 Force context menus to load faster. The context menu has a fade effect by default. The menu may take a long time to fade in or out, especially if there are many commands on it. Press WinKey + R simultaneously, type "regedit" in the Run dialog, then press Enter to open the Registry Editor. Now navigate to HKEY_CURRENT_USERControl PanelDesktop in the Registry Editor, click Desktop, double click "MenuShowDelay" in the right pane, reduce the Value Data number to around 100 (but not too less), and click OK.
 -
 Disable unnecessary services. Services are Windows processes which essentially run Windows. Think of them as the cogs of a motor. Services exist for various reasons like giving you the ability to search, access the internet, use your USB device, run your programs, etc. They might be helpful, but some services take up lots of your memory and are not useful to you or the computer. To disable services, press WinKey + R simultaneously to open the Run dialog, type services.msc, click OK to open Services, double click on the service(s) that you want to disable, and change the startup type to Disabled. Click OK once you're done. Following is a list of services that can be disabled on most machines: Alerter, Clipbook, Computer Browser, Distributed Link Tracking Client, Indexing Service, IPSEC Services, Messenger, Netmeeting Remote Desktop Sharing, Portable Media Serial Number, Remote Desktop Help Session Manager, Remote Procedure Call Locator, Remote Registry, Secondary Logon, Routing & Remote Access, Server (do not disable if you share folders with other Windows systems in your household), SSDP Discovery Service, Telnet, TCP/IP NetBIOS Helper, Upload Manager, Universal Plug and Play Device Host, Windows Time, Wireless Zero Configuration. (Do not disable Wireless Zero Configuration if you use a wireless network)
- Do not disable services which you know may be vital for your computer or programs which you use.
-
 Increase the speed of your hard disk by disabling Last Access Update. Lass Access Update updates the Last Accessed date in the properties of a file. This is not entirely useful and slows down the computer, so it is safe to disable. To disable Last Access Update, press WinKey + R simultaneously to open the Run dialog, type "regedt32" and click OK to open the Registry Editor, find HKEY_LOCAL_MACHINESystemCurrentControlSetControlFileSystem in it, select FileSystem, click Edit>New>DWORD Value at the top of the window, name it "NTIS Disable Last Access Update" in the right pane, then double click the new value and change the value data to "1", and save it.
 -
 Improve Windows XP's shutdown speed. When Windows shuts down, it waits for background processes to close. Slow shutdowns are caused by faulty processes which fail to close. Eventually, Windows XP force-closes these processes. This tweak reduces the time that Windows XP takes before automatically closing any running programs when you give it the command to shutdown. To perform the tweak, press WinKey + R simultaneously to open the Run dialog, type in "regedit", and click OK to open Registry Editor. Find HKEY_CURRENT_USERControl PanelDesktop, click Desktop, double click Wait To Kill App Timeout in the right pane, change the value to "1000", and click OK. After that, double click Hung App Timeout in the right pane, change the value to "1000', and click OK. Then, find HKEY_LOCAL_MACHINESystemCurrentControlSetControl, click Control, double click Wait To Kill Service Timeout in the right pane, change the value to "1000", and click OK.
Share by
David Pac
Update 04 March 2020

