Table of Contents
This updated guide examines How to Create a Virtual Machine in Windows Server 2012 and organizes the essential facts, background, and practical takeaways in clear American English.
Step 1 - Open " Server Manager " and then click " Hyper-V ".

Step 2 - Click ' New ' on the right panel or click the Action button in the options as shown in the screenshot below.

Step 3 - Double-click the Virtual Machine option as shown in the figure below.
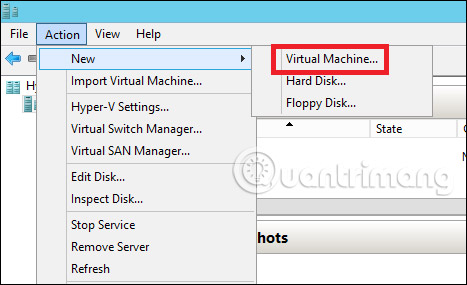
Step 4 - A new table will be opened. Type the name of the new virtual machine and then click Next .

Step 5 - A new table will open and this is where you must specify the memory. Remember that you cannot select more memory than you have in the system.

Step 6 - In the Connection box, select the physical network adapter and click Next .

Step 7 - Now it's time to create a virtual hard drive. If you already have a virtual hard drive, select the second option.

Step 8 - Select the ISO image to be installed and then click Finish .


Step 9 - Connect to the virtual machine. To do so, right-click on the virtual machine name and then select Connect .

Step 10 - After that, your ISO installation will continue.

:
- 10 new features in Windows Server 2012
- Instructions for creating a Domain Controller - DC on Windows Server 2012
- Instructions for installing Windows Server 2012 step by step
FAQ
What is How to Create a Virtual Machine in Windows Server 2012 about?
It provides a structured overview of virtual machine, explains the main context, and highlights practical takeaways for readers.
Why does this topic matter?
Understanding the main concepts helps readers evaluate the issue, avoid common mistakes, and make better-informed decisions.
How should readers use this information?
Use the guidance as a practical starting point, confirm details that may have changed, and follow current product, safety, or security recommendations.
Related Articles
 Create Virtual Machines in Hyper-v on Windows Server 20082 minutes read
 Back up Virtual Machines with Windows Server 2008 R2 and Hyper-v6 minutes read
 How to Create a Windows 10 Virtual Machine with Vmware Player and12 minutes read
 Create Virtual Machines with Hyper-v on Windows 8 and Windows 1016 minutes read
 Steps to Install Windows Server 2022 on a Virtual Machine6 minutes read
 Use Quick Migration to Move Virtual Machines Between Hyper-v8 minutes read
Reader Comments 0
Sign in with email or Google to join the discussion.