How to import Hyper-V virtual machines in Windows 10
You can use Hyper-V export and import functions to quickly copy virtual machines. Virtual machines can then be used to back up data, or it could be a way to move a virtual machine between Hyper-V servers.
Table of Contents
General information
As we know, Hyper-V allows running virtual computer systems on a physical server.These virtualization systems (also known as guest) can be used and managed similarly to physical computer systems, however, they basically exist in Virtualized and isolated environment.
You can use Hyper-V export and import functions to quickly copy virtual machines.Virtual machines can then be used to back up data, or it could be a way to move a virtual machine between Hyper-V servers.
The import function allows you to restore virtual machines.You don't need to export a virtual machine to import it again.Simply understood, the import function will attempt to recreate the virtual machine from anything available.The import of a virtual machine will register that virtual machine with the Hyper-V server.An exported virtual machine can be imported back into the server from which it was created, or it can also be imported into a new server.
This article will show you how to import a Hyper-V virtual machine (client) on your Windows 10 computer (server).However, you must log on to Windows as an administrator to be able to import the Hyper-V virtual machine.
Note: Hyper-V is only supported in Windows 10 Pro, Windows 10 Enterprise, and Windows 10 Education versions.
Proceed to import Hyper-V virtual machines using the Hyper-V Manager
1. Open the Hyper-V manager (Hyper-V Manager).
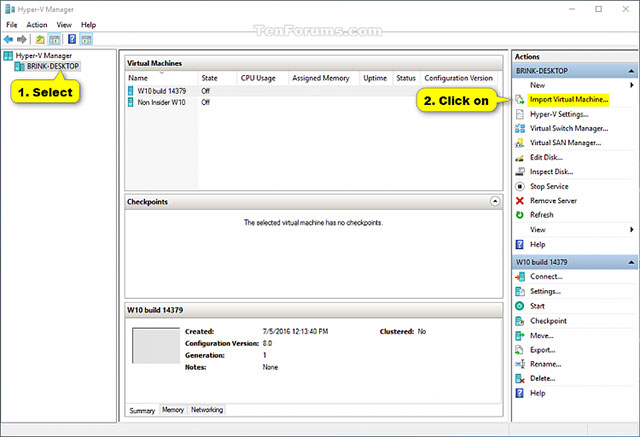
2. On the left side, select the Hyper-V server you want to import a virtual machine into (for example: "BRINK-DESKTOP") and click Import Virtual Machine in the Actions pane on the right (see screenshot below).
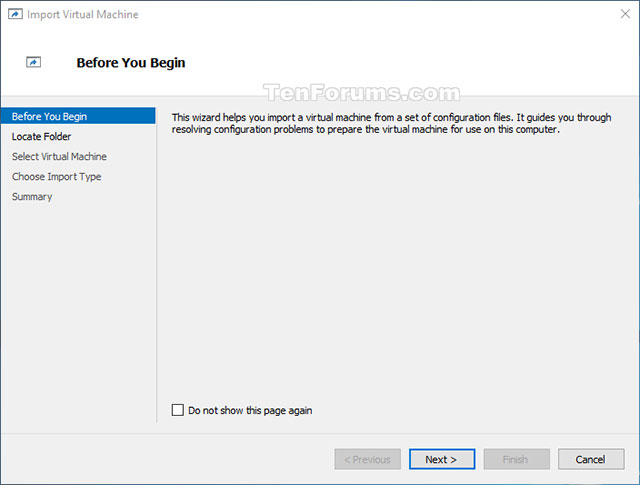
3. In the Before you Begin window, click Next (see screenshot below).
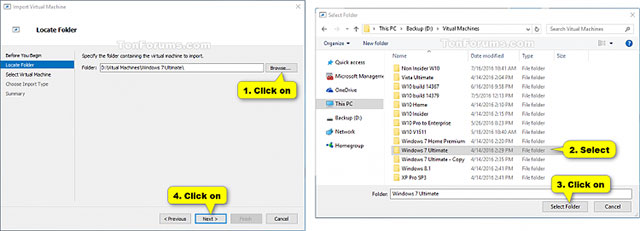
4. Click Browse , then navigate to and select the folder (eg "Windows 7 Ultimate") containing the virtual machine (.vmcx file) you want to import, click Select Folder and then Next (see snapshot) screen below).
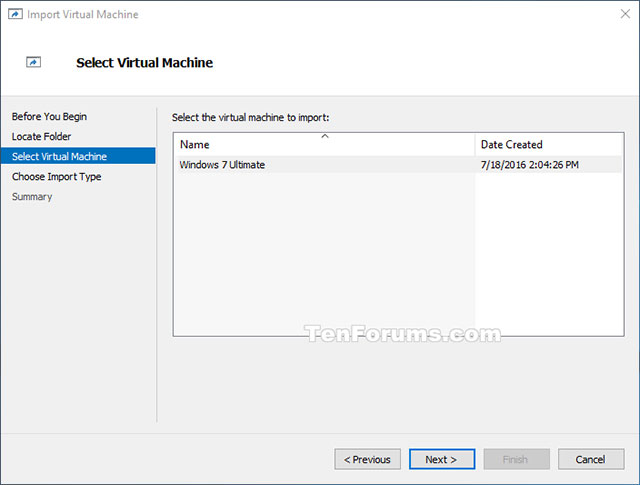
5. Select the virtual machine (eg "Windows 7 Ultimate") that you want to import, and click on Next (see screenshot below).
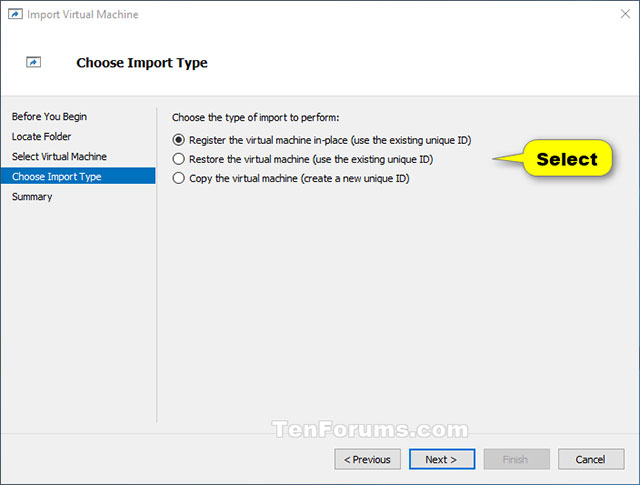
6. Select the input type you want to perform, click Next and go to step 7 or step 8 below (depending on the input method you have selected (see screenshot below).
Input type
Describe
Register the virtual machine in-place (register the virtual machine in place)
The current location of the Export file is the place from which the virtual machine will be run.When imported, the virtual machine will have the same ID as when it was exported.Therefore, if the virtual machine has been registered with Hyper-V, it needs to be deleted before the import is performed.When the import process is complete, the Export files will become files in the running state and cannot be deleted.
Restore the virtual machine
You are given the option to store VM files in a specific location or use the default locations for Hyper-V.This input will create a copy of the exported file and move them to the selected location.When imported, the virtual machine will have the same ID as when it was exported.Therefore, if the virtual machine is already running in Hyper-V it needs to be deleted before the import can be completed.Once the import process is complete, the exported files will not be affected and can be deleted or re-imported.
Copy the virtual machine
This input is similar to the recovery type above, in which you select a location for VM files.The difference is that when you import the virtual machine there will be a new unique ID.This allows virtual machines to be imported into the same server multiple times.
7. If you select Register the virtual machine in-place
Click Finish on the Summary window and go to step 9 below (see screenshot below).

8. If you select Restore the virtual machine or Copy the virtual machine
A) If you want, you can specify new or immediate use of existing directories to store virtual machine files.When done, click Next .(see screenshot below).
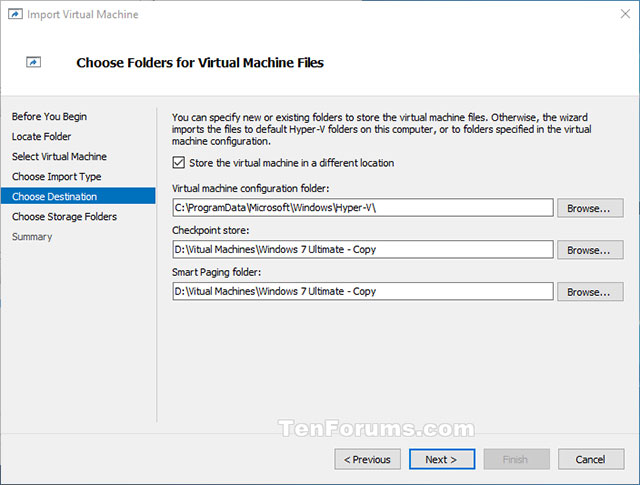
B) Browse and select the folder where you want to store the imported virtual hard disks (.vhdx files) for this virtual machine and click on Next (see screenshot below).

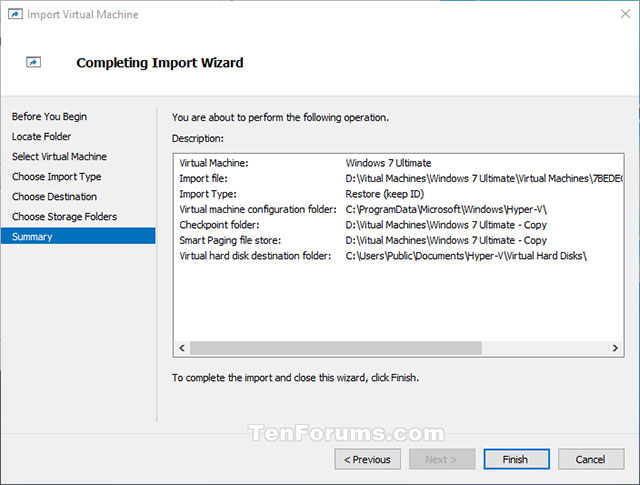
In the Summary window, click Finish and move on to step 9 below.(see screenshot below)
Note: It may take a while for the computer to finish copying virtual machine files and hard disks to the selected folder location (s).
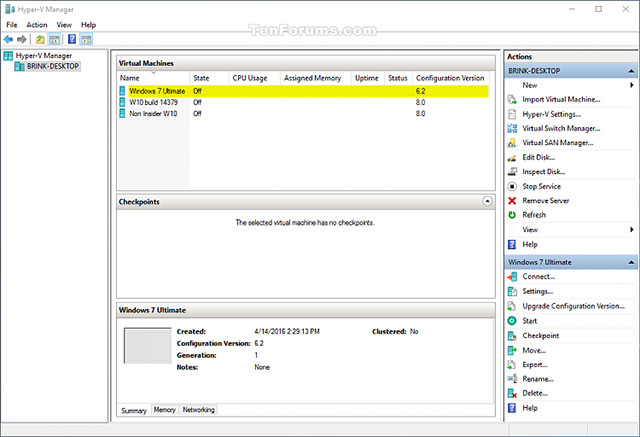
9. The Hyper-V virtual machine (for example, "Windows 7 Ultimate") is now imported into the selected Hyper-V server (for example, "BRINK-DESKTOP").(see screenshot below)
10. After completing the virtual machine import, you can close Hyper-V Manager if you want.
Enter Hyper-V virtual machines using PowerShell
1. Open PowerShell.
2. Perform step 3 (in-place), step 4 (in-place) (in-place) or step 5 (copy) below for the input type you want to perform.
3. Register the virtual machine in place (Register the virtual machine in-place) (use existing unique ID)
Attention
The current location of the Export files is where the virtual machine will be run.When imported, the virtual machine has the same ID as when it was exported.Therefore, if the virtual machine has been registered with Hyper-V, it needs to be deleted before the import process can proceed.When the import process is complete, the Export files will become running status files and cannot be deleted.
A) Type the command below into PowerShell, press Enter and go to step 6 below (see screenshot below).
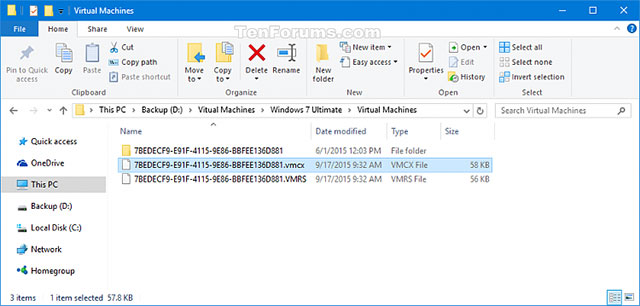
Import-VM -Path ' full path of virtual machine file .vmcx '
Note: Replace the ' full path of the virtual machine file .vmcx ' in the above command with the actual full path of where the .vmcx virtual machine file you want to import is located.
For example
Import-VM -Path ' D: Vitual Machines Windows 7 UltimateVirtual Machines7BEDECF9-E91F-4115-9E86-BBFEE136D881.vmcx '

4. Restore virtual machine (Restore the virtual machine) ((using existing unique ID)
Attention
You have the option of storing VM files in a specific location or using the default locations for Hyper-V.This input will create a copy of the exported file and move them to the selected location.When imported, the virtual machine has the same ID as when it was exported.Therefore, if the virtual machine is already running in Hyper-V, it needs to be deleted before the import process can be completed.Once the import process has completed, the exported files will not be affected and can be deleted or re-imported.
A) Type the following command in PowerShell, press Enter and go to step 6 below (see screenshot).
(To use the default Hyper-V directory for importing and copying virtual machines .vmcx and .vhdx files on virtual hard disks)
Import-VM -Path ' full path of .vmcx ' file -Copy
Or
(To specify the Hyper-V directory for importing and copying virtual machines .vmcx and .vhdx files on virtual hard disks)
Import-VM -Path ' full path of the .vmcx ' -Copy -VhdDestinationPath file ' full path of the directory to copy the full .vhdx' -VirtualMachinePath 'file of the directory to copy the .vmcx file '
Note
- Replace the ' full path of the .vmcx file ' in the above commands with the actual full path of where the .vmcx virtual machine file you want to import is located.
- Replace the ' full path of the directory to copy the .vhdx file ' in the second command above with the actual directory path of where you want to copy the virtual hard disk .vhdx file of the virtual machine you want to import.
- Replace the ' full path of the directory to copy the .vhdx file in the second command above with the actual directory path of where you want to copy the .vmcx virtual machine file of the virtual machine you want to import.
For example:
Import-VM -Path ' D: Vitual Machines Windows 7 UltimateVirtual Machines7BEDECF9-E91F-4115-9E86-BBFEE136D881.vmcx' -Copy -VhdDestinationPath 'D: Vitual MachinesWindows 7 Ultimate - Copy' -VirtualMachinePath 'D: Vitual MachinesWindows 7 Ultimate - Copy '

5. Copy the virtual machine (Copy the virtual machine) (create a new unique ID)
This type of input is similar to the Restore type above, in which you select a location for VM files.The difference is that when the virtual machine is imported, it will have a new unique ID.This allows Virtual Machines to be imported into the same server multiple times.
A) Type the following command in PowerShell, press Enter and go to step 6 below (see screenshot).
(Use the default Hyper-V directory to import and copy the virtual machine .vmcx and the .vhdx files on the virtual hard disk)
Import-VM -Path ' full path of the .vmcx file ' -Copy -GenerateNewId
Or
(Specify the Hyper-V directory to import and copy the virtual machine .vmcx and the .vhdx files on the virtual hard disk)
Import-VM -Path ' full path of the .vmcx ' -Copy -VhdDestinationPath file ' full path of the directory to copy the .vhdx' -VirtualMachinePath 'file The full path of the directory to copy the .vmcx file -GenerateNewId
Attention
- Replace the ' full path of the .vmcx file ' in the above commands with the actual full path of where the .vmcx virtual machine file you want to import is located.
- Replace the ' full path of the directory to copy the .vhdx file ' in the second command above with the actual path of the directory where you want to copy the virtual hard disk .vhdx file of the virtual machine you want to import.
- Replace the ' full path of the directory to copy the .vhdx file ' in the second command above with the actual path of the directory where you want to copy the .vmcx virtual machine file of the virtual machine you want to import.
For example:
Import-VM -Path ' D: Vitual Machines Windows 7 UltimateVirtual Machines7BEDECF9-E91F-4115-9E86-BBFEE136D881.vmcx' -Copy -VhdDestinationPath 'D: Vitual MachinesWindows 7 Ultimate - Cop y' -VirtualMachinePath ' D: Vitual MachinesWindowsPath ' D: Vitual MachinesWindows 7 Ultimate - Copy -GenerateNewId

6. Once done, you can close PowerShel if you want.
Good luck!
See more:
- How to export Hyper-V virtual machines in Windows 10
- Setting up Ubuntu virtual machine with Hyper-V Quick Create on Windows 10
- Create virtual machines with Hyper-V on Windows 8 and Windows 10
- Instructions for installing Ubuntu on VMware Workstation - Part 1
Was this article helpful?
Your feedback helps us improve.
Related Articles
 How to Export and Import Virtual Machines in Hyper-V5 minutes read
 How to export Hyper-V virtual machines in Windows 105 minutes read
 Create virtual machines with Hyper-V on Windows 8 and Windows 1015 minutes read
 How to rename Hyper-V virtual machines using PowerShell and Hyper-V Manager5 minutes read
 Create virtual machines in Hyper-V on Windows Server 20082 minutes read
 How to check if your computer is running Windows 10 Hyper-V?2 minutes read
Reader Comments 0
Sign in with email or Google to join the discussion.