How to create and use Hyper-V checkpoints in Windows 10
General information
Checkpoint is a powerful feature of Hyper-V, making it easy to undo all changes on a virtual machine.You can experience comfortable with the test application on the virtual machine, change the settings, edit the registry . and when necessary, you can completely cancel all changes and restore the previous checkpoint after only one Short time with few clicks.
A standard checkpoint will be responsible for storing virtual machine characteristics and status correctly (see section 3 in this tutorial on the difference between a production checkpoint and a standard checkpoint).While Windows Restore Point only stores and restores the state of the Windows system, does not store the state of the application and restores or deletes user files, a standard Hyper-V checkpoint can be stored and restored. A complete system including the state of the application and the user's file system.Hyper-V checkpoints can be compared to images of a system rather than a restore point although that comparison is not entirely accurate.
You can create as many checkpoints as you want.Creating a checkpoint only takes a few seconds.For example, to test sysprepping Windows 10 Technical Preview in Audit Mode, you can create a first checkpoint before entering Audit Mode after the installation is completed and Windows starts to boot OOBE / Welcome. Mode.set up a second checkpoint after logging in as an administrator integrated in Audit Mode, and the third checkpoint before using Sysprep with the answer file.Now when something doesn't work as you expected, you just need to go back to any checkpoint you created before instead of starting over.
In the Windows 10 Creators update, you can use checkpoints and saved status information on virtual machines that are acting as nested Hyper-V servers.
In this tutorial, we will create checkpoints together and apply them.
For this tutorial, you will need to have a Hyper-V enabled and set up as described in "Creating virtual machines with Hyper-V on Windows 8 and Windows 10" and at least one virtual machine running. dynamic.
How to create and use Hyper-V Checkpoint in Windows 10
- General information
- Create a checkpoint
- Apply (restore) a checkpoint
- Checkpoint installation
Create a checkpoint
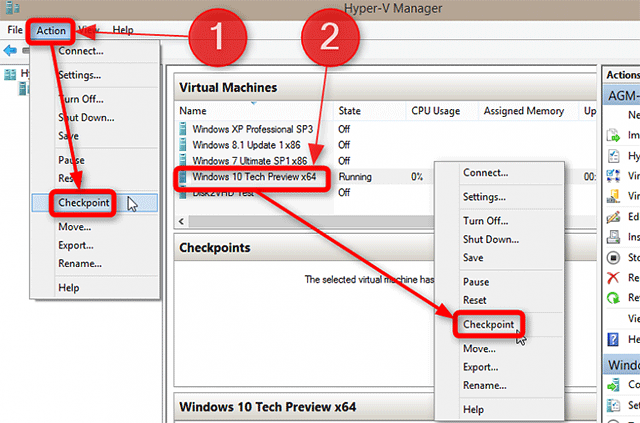
1. Checkpoints can be created in Hyper-V Manager from the Action menu (# 1) or from the context menu (right click) (# 2).First, select a virtual machine, then create a checkpoint for that virtual machine.Virtual machines do not necessarily need to be run, you can create a checkpoint as soon as the virtual machine is turned off.
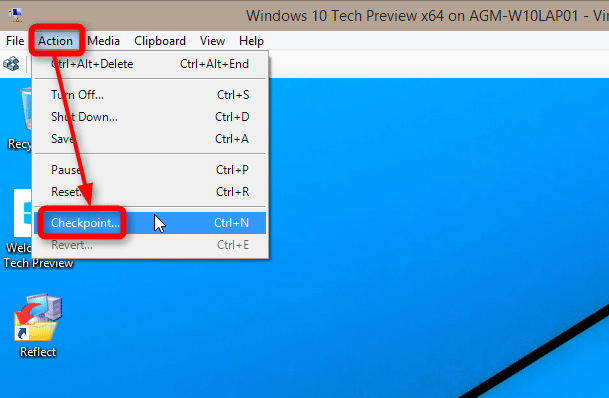
As mentioned, a checkpoint can also be created from the Action menu in Virtual Machine Connection> Action menu.
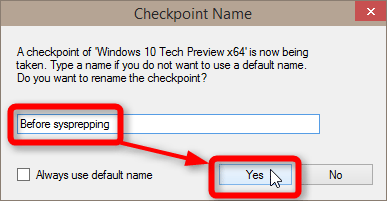
2. When you select the checkpoint in the Action or Context menu as mentioned in section 1 Hyper-V will ask if you want to change the name of that checkpoint (the default name, name, date and time ). If you want to rename the checkpoint, click Yes (use the default name, choose No ).
3. This process can be displayed in the status bar of Virtual Machine Connection.

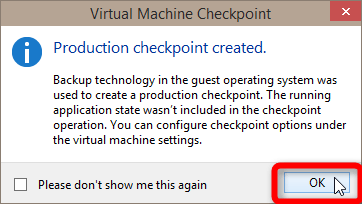
4. When the checkpoint has been created click OK :
5. You can see all the checkpoints that you created in Hyper-V Manager.Select a virtual machine to view its checkpoints, Now is the current state.
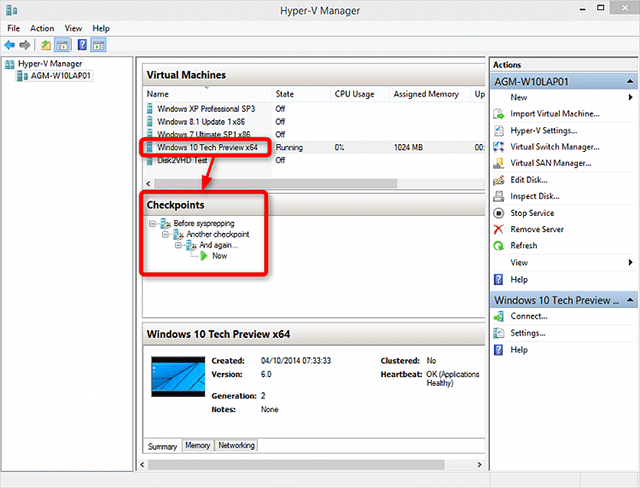
Apply (restore) a checkpoint
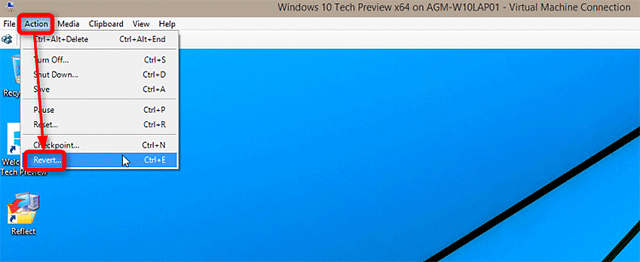
1. To revert (restore) to the last checkpoint created directly from the Virtual Machine connection, select Action> Revert.
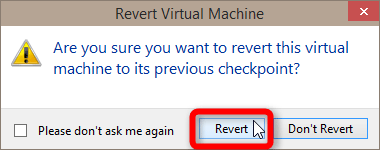
2. Confirmation.
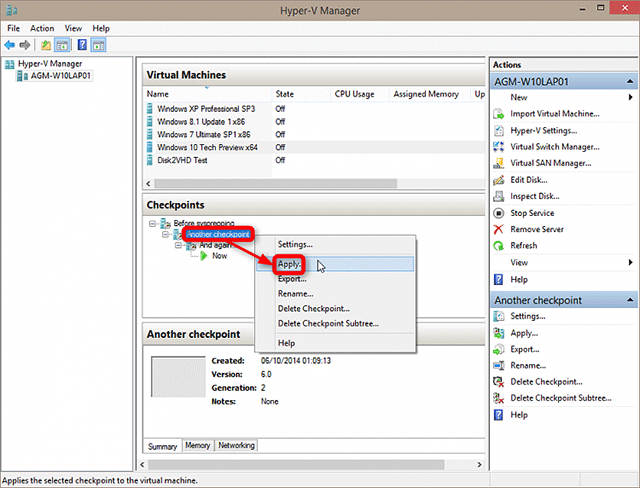
3. To apply any current checkpoint, select your virtual machine in Hyper-V Manager and double-click a checkpoint.Also, another way is to right-click on a checkpoint and select Apply .
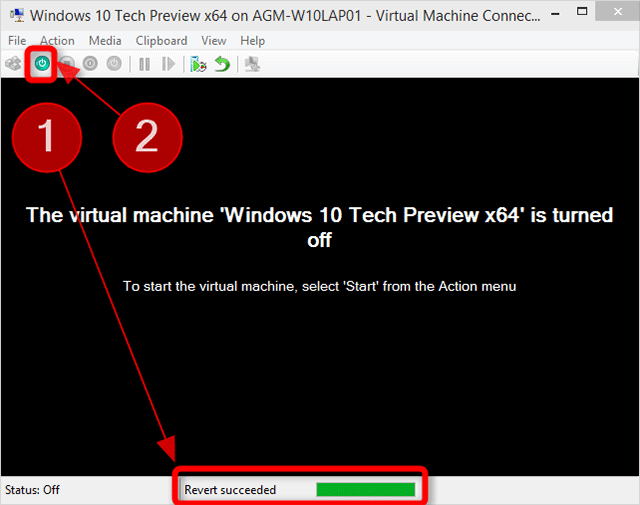
4. The checkpoint you have selected will be applied and the virtual machine will turn off.Hyper-V notifies you that this task was successful (# 1).Next, start the virtual machine to the checkpoint you have chosen by clicking on the Start button (# 2).
Checkpoint installation
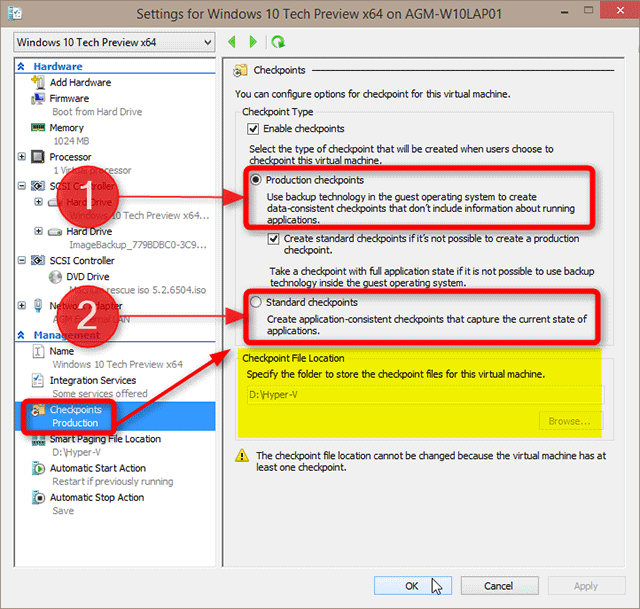
1. In the general settings of the virtual machine, you can choose which checkpoint you will use.
Production checkpoint
- Production checkpoint is responsible for storing machine status but will not store the status of the applications being closed.For example, if you have an Excel spreadsheet open but you don't save your work, applying this checkpoint will help restore the virtual machine to the state you last saved.When a production checkpoint is applied, Windows will boot as if it were a cold boot, the welcome screen and the desktop after logging in will be empty without any application running.
Standard checkpoint
- A standard checkpoint will be responsible for storing the machine state of the virtual machine with the status of the applications.All open applications and unsaved jobs will be saved in this checkpoint, if you have PowerPoint with an unsaved slideshow that is still open when the standard checkpoint is created, the status in the checkpoint will be saved. .However, this can also result in a small security risk, which is a standard checkpoint when applied, it will skip the initial startup steps and log directly into the desktop, so anyone Having access to your device can view your files and use your access.
2. The location of checkpoints (highlighted above screenshot) can only be changed as soon as the virtual machine is not using checkpoints.When the first checkpoint is created and saved, you can no longer change the location of that virtual machine's checkpoints.
Good luck!
See more:
- How to import Hyper-V virtual machines in Windows 10
- How to export Hyper-V virtual machines in Windows 10
- Setting up Ubuntu virtual machine with Hyper-V Quick Create on Windows 10
- What is virtualization? Why should you use this technology?
You should read it
- ★ How to rename Hyper-V virtual machines using PowerShell and Hyper-V Manager
- ★ Instructions for using Hyper-V on Windows 8 (Part 1)
- ★ How to export Hyper-V virtual machines in Windows 10
- ★ How to import Hyper-V virtual machines in Windows 10
- ★ Create virtual machines in Hyper-V on Windows Server 2008