How to Edit a Document on iPhone
This wikiHow teaches you how to open different types of documents in editing mode in a compatible app, using an iPhone. Depending on the type of your document, you may need to use a specific app to open and edit it. Open the Word app on...
Table of Contents
Method 1 of 5:
Using Word
-
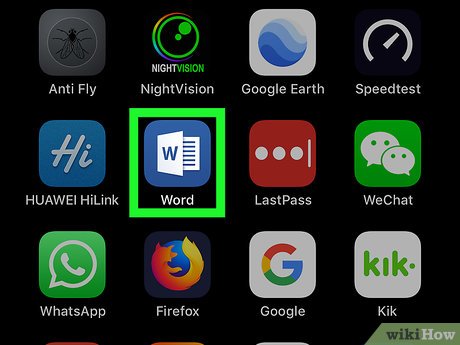 Open the Word app on your iPhone. The Word icon looks like a white document sheet on a blue background.
 -
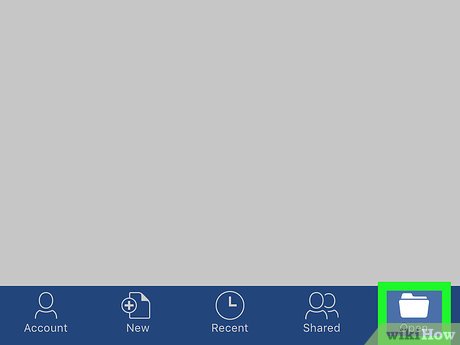 Open the document you want to edit. Tap the Open button on the bottom-right corner, and select the document you want to edit.
 -
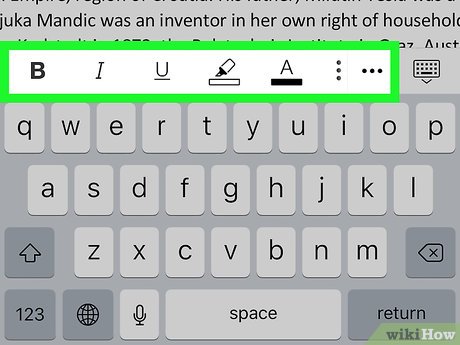 Use the formatting toolbar above your keyboard. The editing toolbar is located above your keyboard. You can use these tools to edit your document in Word.
- You have different tools for bolding, italics, underlining, highlighting, and text color here.
- If you want to see more tools, tap the three-dot icon on the toolbar.
-
 Tap the back button to save changes. This button looks like a left-arrow in a circle in the upper-left corner of your screen.
Method 2 of 5:
Using Google Docs
-
 Open the Google Docs app on your iPhone. The Docs icon looks like a blue document sheet on a white background.
 -
 Find and tap the file you want to edit. This will open the document in full-screen.
 -
 Tap the pencil button on the bottom-right. It looks like a white pencil icon on a blue button. This will open your document in editing mode. You can now make edits.
 -
 Edit the document as needed. You can change the text in the document and/or use the formatting tools.
- Your formatting tools are located on a toolbar above the keyboard.
- If you want to see more tools, tap the "A" icon near the top-right corner of your screen.
-
 Tap the blueicon on the top-left. This will save your edits.
Method 3 of 5:
Using Pages
-
 Open the Pages app on your iPhone. The Pages icon looks like a white pen icon on an orange background.
 -
 Tap the document you want to edit. This will open your document in full-screen.
- If you don't see your document on the Recents list, tap Browse on the bottom-right to view a list of all your files.
-
 Edit the document as you want. You can delete some text, add new text, add emojis, or paste something from your clipboard.
- To view your formatting tools, tap the paint brush icon near the top-right corner.
-
 Tap Done on the top-left. This will save all the changes to your document.
Method 4 of 5:
Using OfficeSuite
-
 Open OfficeSuite on your iPhone. The OfficeSuite icon looks like colored building blocks on a white background.
 -
 Find and tap your document. You can open a document from your iPhone's local storage, iCloud Drive, or another cloud account like Dropbox or Google Docs.
 -
 Tap the pencil icon on the top-right. You can find the white pencil icon on a blue toolbar in the upper-right corner of your screen. It will open your document in editing mode.
 -
 Make edits to your document. You can change the text in your document, and use the formatting tools to format it.
- Your formatting tools pop up at the top of the editing screen.
- To see more tools, swipe left on the formatting toolbox at the top.
-
 Tap the checkmark icon on the top-left. This will save all your edits.
Method 5 of 5:
Using WPS Office
-
 Open the WPS Office app on your iPhone. The WPS icon looks like a white "W" on a red background.
 -
 Find and tap the document you want to edit. This will open your document in full-screen.
- If you don't see your document in the Recent tab, tap the Documents button at the bottom, and select your document here.
-
 Tap the pencil button. This is a white pencil icon in the upper-right corner of your screen. It will open your document in editing mode.
 -
 Edit the document as you wish. You can delete some of the old text, add some new text, and use the formatting tools on the toolbar.
- Your formatting tools are located on a toolbar above the keyboard.
- To see more formatting options, click the icon on the right end of the formatting toolbar.

-
 Tap the floppy disk icon on the top-left. This will allow you to save your edited document.
 -
 Tap Save on the top-right. This will save all the changes to your document.
- You can change your saving location by tapping Change path under Path.
- You can also save your document in a different file format. Tap the drop-down menu under "Format," and select any compatible file format here.
Was this article helpful?
Your feedback helps us improve.
Related Articles
 How to create document signature on iPhone3 minutes read
 How to Edit Documents on iPhone10 minutes read
 How to Make Two Columns in Word2 minutes read
 How to edit notes in the Pages iPhone app2 minutes read
 How to batch edit photos on iPhone? - Using free Picky app5 minutes read
 Improved photo, video layout without cropping on iPhone 11, iPhone 11 Pro2 minutes read
Reader Comments 0
Sign in with email or Google to join the discussion.