Table of Contents
This guide explains how to convert a Word File to Excel, with clear steps, practical tips, and important checks before you begin.

Method 1: Save Plain Text format and import into Excel
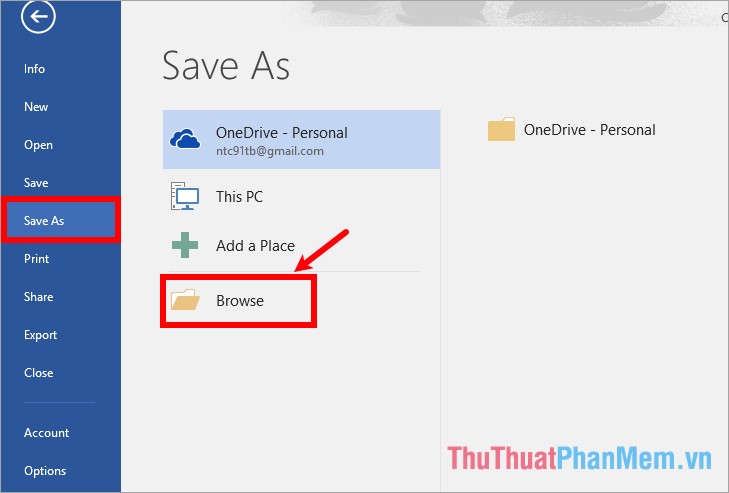
Step 1: Open the Word file that you want to convert to Excel worksheet, select File -> Save As -> Browse (or press F12 key ) to open the Save As window to save the file.
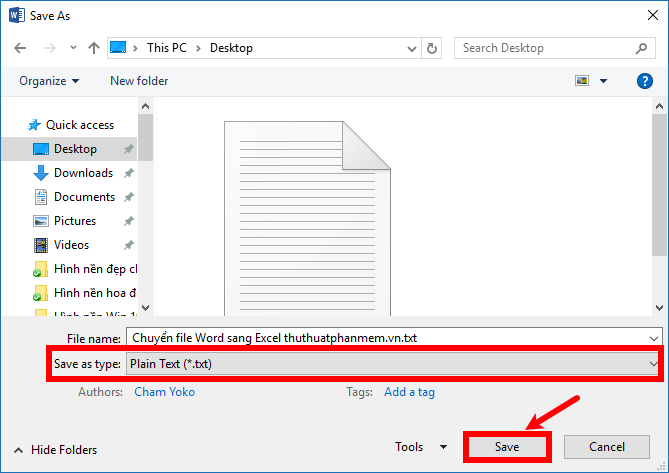
Step 2 : In the Save As window, enter the navigation to any folder to save the file, in the Save as type section, select Plain Text format and select Save .
Step 3: File Conversion appears, select Other encoding and select Unicode (UTF-8) if your Word uses built-in Unicode to avoid converting to Plain Text with font errors. Then click OK to save the Word file as Plain Text.

Step 4 : Open the new Excel file, on the Excel interface, select Data -> From Text tab .

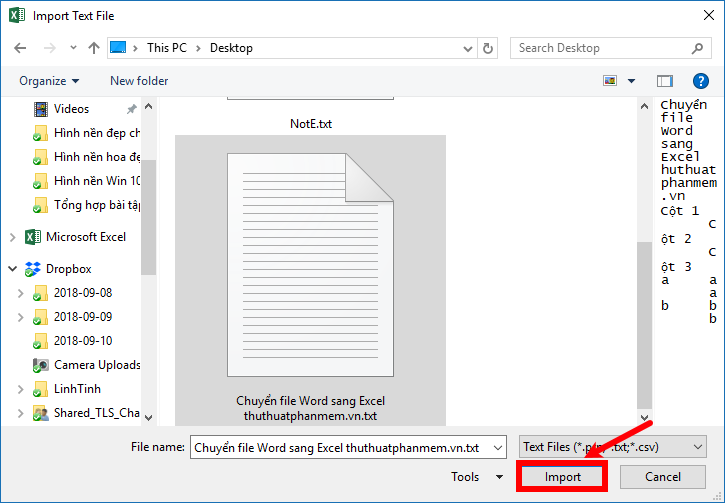
Step 5 : The Import Text File window appears, select the Plain Text file you just saved and select Import .
Step 6 : In the Text Import Wizard window - select Step 1 of 3, select Delimited , if the data in Word is a table and include column headings, then check the box for My data has headers . Next click Next .

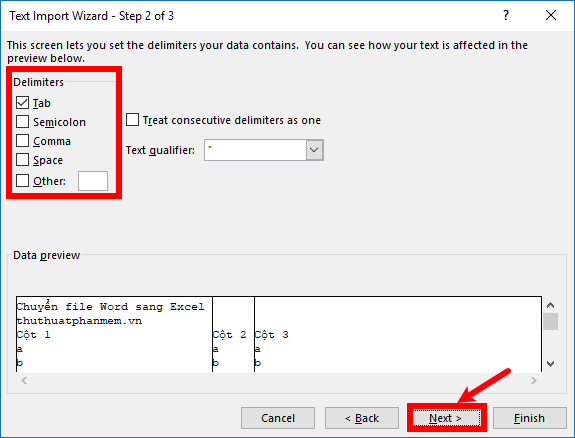
Step 7 : Next in the Text Import Wizard window - Step 2 of 3 you choose the delimiters included in Word to separate the column in Word, if you do not want to separate the data by the delimiter, you deselect in all options then click Next .
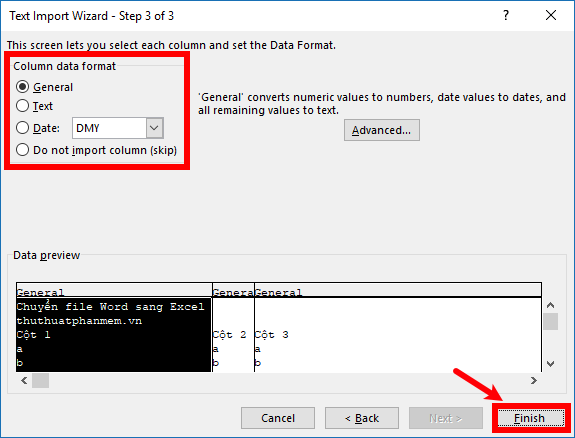
Step 8: Select the type of data format in the Text Import Wizard - Step 3 of 3. Next, click Finish .
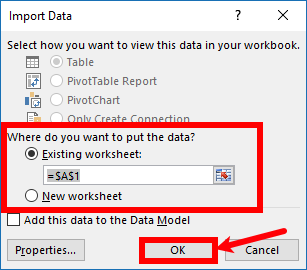
Step 9: Next, in the Import Data dialog box, select the location to put the data into: Exitsting worksheet (current sheet); New worksheet (new sheet). Then click OK .
Then you save the Excel file again, so you've moved the Word file to Excel already.

Method 2: Use MS Word To Excel Converter Software
Step 1: You need to download and install MS Word To Excel Converter Software to the system.
- Link to download software http://www. sobolsoft. com/convertwordexcel/download/setup. exe
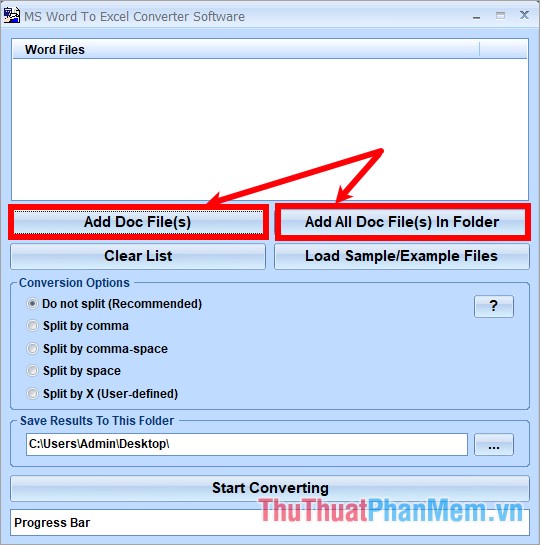
Step 2 : Run the program, on the interface you select Add Doc File (s), you can select all Word files in a folder by selecting Add All Doc File (s) In Folder.
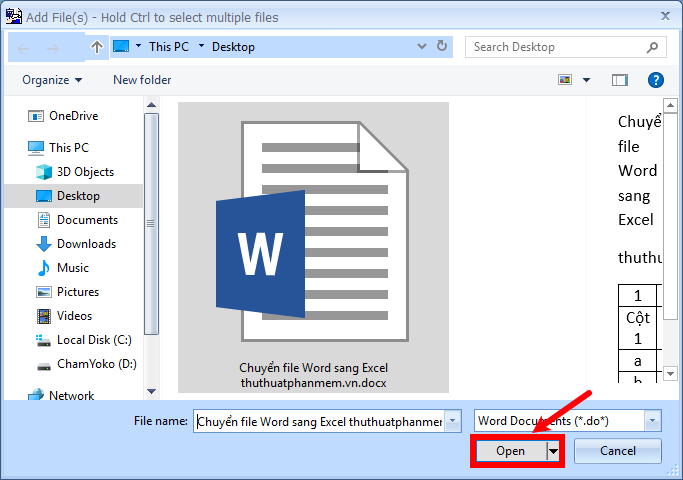
Step 3 : The Add File window appears, select the Word file to convert to Excel and click Open .
Step 4 : In the Conversion Options section (1), choose the separation options:
- Do not split: do not split.
- Split by comma: separated by commas.
- Split by comma-space: separate with commas - spaces.
- Split by space: separated by spaces.
In the Save Results To This Folder (2) section, select the path to save the Excel file after converting from Word file. Then choose Start Converting (3).

The success message appears, select OK .

The result you will receive Excel file, you can open up to see the results.

Above the article has guided you two ways to convert Word files to Excel, hope you will be able to quickly convert Word files to Excel with two ways that the article has shared. Good luck!
FAQ
What should I know about Convert a Word File to Excel?
Focus on the key features, requirements, limitations, and practical use cases explained in this guide.
How do I get the best results with Convert a Word File to Excel?
Follow the recommended steps, use current software or information, confirm compatibility, and review settings before major changes.
Are there any risks or limitations?
Potential limitations depend on compatibility, data quality, cost, privacy, support, and how the product or method is used.
Related Articles
 Convert Word File to Csv File: How to Convert Word to a Csv File4 minutes read
 How to Convert Excel to Word5 minutes read
 How to Convert Cad to Word, PDF, Excel: Autocad5 minutes read
 How to Convert PDF Files to Word Online Very Fast3 minutes read
 How to Convert Money Amounts to Words in Excel, No Add-in Needed5 minutes read
 How to Convert a Word File to an Image File - Save the Word File as an5 minutes read
Reader Comments 0
Sign in with email or Google to join the discussion.