
How to Configure Profile Manager in OS X Mavericks Server App 3.X
Part 1 of 3:
Configure and Start Service
-
 Open Server App from Launch Pad.
 -
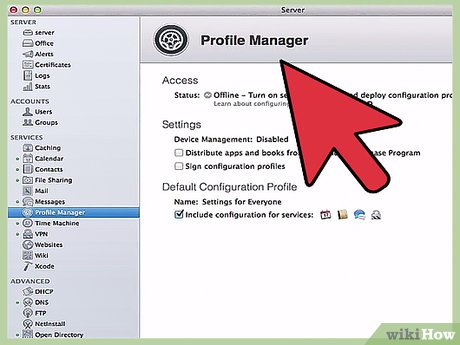 Click on Profile Manger located in the left pane of the window.
 - Configure Device Management by clicking on the Configure button.
- Read the overview and click the Next button when finished.
- Enter your organizations information and click the Next button when finished.
- Choose the certificate that you would like to use and click the Next button when finished. NOTE: If you produced a certificate yourself, you will receive a warning that it is not signed by a trusted certificate authority.
- Enter your Apple ID and password to obtain a push certificate from Apple and click the Next button when finished.
- Wait for service to finish setting up and click the Finish button when done.
- Enable the ability to 'Enroll devices using the Device Enrollment Program'. You will have to register your domain on Apple's Deployment Program website before you can continue. If you are running the server out of your home, this feature is not needed.
- Enable the ability 'Distribute apps and books from the Volume Purchase Program'. This feature is not needed if you are running the server out of your home.
- Choose your default configuration profiles by clicking on the Edit button.
- Name the profile, check the box if you would like to include services that have been configured, and click the Ok button when finished.
- Enable Sign Configuration Profiles by clicking the Edit button.
- Choose the certificate that you would like to use from the drop down menu and click Ok when finished.
- Turn on the Profile Manager service by click on the switch in the upper left hand corner of the window.
Part 2 of 3:
Configure Profiles for Your Devices
- With the Server App open and Profile Manager selected, you can get to the configuration area by two different means.
- Open Safari and type in the following: www.yourdomain.com/ProfileManager
- Clicking the arrow next to Open Profile Manager near the bottom of the window.
- Enter an authorized users credentials that has administrative privileges.
- To start configuring the settings by Group, Users, Devices, or Device Groups. Click on the desired choice. Suggestion is to do this by Group.
- Click on the Settings tab and click the Edit button.
- Go through the list and start entering your desired configurations then click Ok button when finished.
- Click Save so that the settings will be pushed to the User, Group, Device, or Device Group.
- Repeat for each User, Group, Device, or Device Group.
Part 3 of 3:
Enroll Devices
- Open the enrollment site (i.e. www.yourdomain.com/mydevices) on the device that you wish to enroll.
- Log in with the user's credentials that the device will belong to.
- Click on the Profiles tab
- Download and install both Profiles starting with the Trust certificate.
- Click on the Devices tab.
- Click the Enroll button and install the Remote Management Profile.
- Your device is now enrolled and will automatically receive profiles that are associated with the user, group, or device group.
Update 04 March 2020
You should read it
- Home button on iOS 10 device slowly responds, this is how to fix errors
- Fix the Home button error does not work on iPhone
- Turn off password display in Windows 8 when logging in
- MS PowerPoint - Lesson 9: PowerPoint presentation
- How to Prevent Notifications when Screen Mirroring on a Mac
- How to fix the problem of left clicking on Windows
- How to restart iPhone on iOS 11 when not using the power button
- 20 small tricks with Edge browser you should know (Part 2)
- Create Button in CSS
- How to Add Email Accounts to a Mac
- Ways to use the Eject button on the Macbook
- How to Right Click on a Mac
Maybe you are interested
4 Free Websites That Teach You More Than Any Paid Course One light year is equal to how many kilometers, how many years of earth Top 9 food to keep your body warm in winter Want to get rich, the most important thing is not money but liver You definitely won't be rich if you have 1 of the 10 signs below! How to read 10,000 words within a minute?