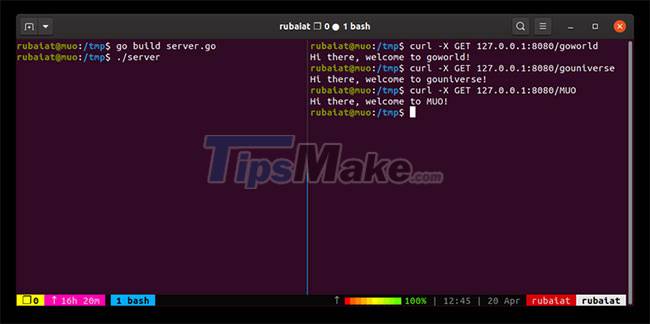
How to build a basic web server using Go
Go is an interesting programming language for building modern web apps as well as system software. It made a big splash following its release and powered services like Docker, Kubernetes, Terraform, Dropbox, and Netflix.
What's more, Go's powerful collection of built-in packages makes it a great choice for web programming. This article will show you how to write a basic web server in Go.
Enter the required packages
The net / HTTP package provides everything needed to create web servers and clients. This package presents some functions useful for handling web programming.
You can import it by adding the following line at the beginning of your source code:
import "net/http"We will also use the fmt package to format the string and the log package to handle errors. You can import them individually as shown above or import all packages using a single import statement:
import ( "fmt" "log" "net/http" )You can proceed to write the main function after importing the necessary packages. Go ahead and save the source file with the .go extension . If you are using Vim, use the command below to save and exit Vim:
:wq server.goWrite the main function
Go programs are located directly in the main function, aptly named "main". You will need to make a server call here. Add the following lines to the source code and see what they do:
func main() { http.HandleFunc("/", index) log.Fatal(http.ListenAndServe(":8080", nil)) }The example is defining the main function using the keyword func . Go has strict rules for the placement of opening braces, so make sure that the starting brace is on the correct line. The first statement in main defines that all web requests to the root path ( "/" ) will be handled by the index, a function of type http.HandlerFunc .
The second line starts the web server through the http.ListenAndServe function . It signals the server to continuously listen for incoming HTTP requests on port 8080 of the server. The second parameter of this function is needed to block the program until the end.
Since http.ListenAndServe always returns an error, the example wraps this call inside the log.Fatal call . This statement records any error messages generated on the server side.
Implement the processing function
As you can see, the main function calls the handler index to resolve client requests. However, the example has yet to define this functionality for its server.
Let's add the necessary statements to make the index function usable:
func index(w http.ResponseWriter, r *http.Request) { fmt.Fprintf(w, "Hi there, welcome to %s!", r.URL.Path[1:]) }This function takes two different arguments of type http.ResponseWriter and http.Request . The http.ResponseWriter parameter contains the server's response to the incoming request, of the form of an http.Request object .
The Fprintf function from the fmt package is used to display and manipulate text strings. The post is using this to display server responses to web requests. Finally, the r.URL.Path [1:] component is used to fetch the data after the root path.
Add all the rest
Your Web server Go will be ready after you have added all the rest. The code will look like this:
import ( "fmt" "log" "net/http" ) func index(w http.ResponseWriter, r *http.Request) { fmt.Fprintf(w, "Hi there, welcome to %s!", r.URL.Path[1:]) } func main() { http.HandleFunc("/", index) log.Fatal(http.ListenAndServe(":8080", nil)) }The first line is needed to compile this Go web server code as an executable file.

You should read it
- 7 great ideas using Raspberry Pi as a server
- How to build Linux web server with an old computer
- Build VPN server
- The difference between web server and app server
- Network basics: Part 3 - DNS Server
- How to build a game server on Linux
- How to set up your own Git server on Linux
- Use IIS to set up FTP Server on Windows
- How to change DNS server on the most popular routers
- How to Build a GraphQL API with Apollo Server and MongoDB
- What is VPS? VPS used to do? What is VPS different from Server?
- How to use server actions in Next.js
Maybe you are interested
Plant Empires - Merge Defense Monsters TikTok Launches AI Alive, Its Latest AI-Powered Photo Video Creation Tool 14 Best Free Apple Watch Faces Why the foundation of the world's tallest tower Burj Khalifa must be powered 24/7 How to download Lien Lien test on the phone See only the battery status of the iPhone if you replace the original battery
