Use IIS to set up FTP Server on Windows
Set up an FTP Server (File Transfer Protocol Server) to share and convert large files with unlimited traffic.
Set up an FTP Server (File Transfer Protocol Server) to share and convert large files with unlimited traffic.
In the previous article, Network Administrator showed you how to set up individual FTP Server using FileZilla. In the following article, Network Administrator will guide you how to create an FTP Server using IIS.
On different Windows versions, IIS (Internet Information Services) is set up a bit differently. IIS 5.0 version on Windows 2000, IIS 5.1 on Windows XP Professional. IIS 6 on Windows Server 2003 and Windows XP Professional 64-bit. IIS 7 is on Windows Server 2008 and Windows Vista.
IIS 7.5 was released with Windows 7, IIS 8 was released with Windows 8 and IIS 8.5 released with Windows 8.1.
See also: Instructions for setting up individual FTP Server using FileZilla.
1. Set up and configure FTP Server on IIS (Internet Information Services)
To set up FTP Server on ISS, the first factor to ensure that you have installed ISS (Internet Information Services).
Note that ISS only comes with Windows Pro, Professional, Ultimate or Enterprise versions.
On Windows Vista and earlier versions of Windows, click Start => Control Panel and then select Add / Remove Program , then click Add / Remove Windows Components .
With Windows 7 and higher Windows versions, on Control Panel you click Program and Features and then select Turn Windows features on or off .


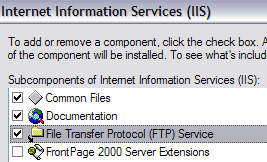
On the Windows Components interface, scroll down to find and select the Internet Information Services (IIS) option .
Next click Detail and check the File Transfer Protocol (FTP) Service then click Next.

With Windows 7 and higher Windows versions, click on the checkbox next to Internet Information Services and FTP Server . At the FTP Server section, select FTP Service .

Also, make sure the Web Management Tools option is selected.
Click OK and then click Next . Windows will install the necessary IIS files with the FTP Service.
You can now request to insert a Windows XP or Windows Vista drive. No need for Windows 7 or higher versions.
2. Set up and configure IIS for FTP
After IIS has been installed, you will have to restart your computer. Your next task is the IIS configuration table to set up the FTP Server.
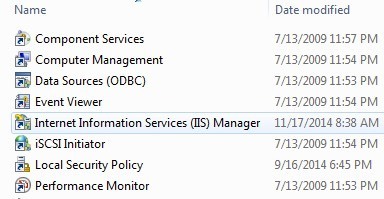
Go to Start, select Control Panel, then click Administrative Tools. Here you will see the Internet Information Services icon .
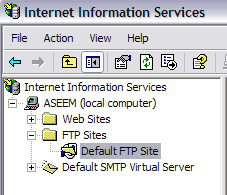
When you open IIS on Windows Vista or earlier versions, you will see the computer name appear on the menu on the left.
Click the + symbol next to the computer name, you will see some other options, including two options: Web Sites, FTP Sites.
Expanding the FTP Sites option will see the Default FTP Site . Your next task is to click on the Default FTP Site option.
After clicking on the Default FTP Site, on the screen you will see two buttons in the top corner like the VCR button: Play, Stop and Pause.
If the Play button is gray, the FTP Server has been activated. Now that your FTP Server is running, you can connect the FTP Server through the FTP Client software.
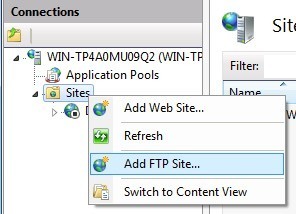
On Windows 7 and higher versions, IIS will be slightly different. First of all, there are no Play buttons or similar buttons. In addition, you will see a series of options on the right side of the screen such as authentication, SSL settings, live browsing .

To open the FTP Server here, right-click Sites and then select Add FTP Site to open the FTP Wizard.
Here you proceed to name the FTP site and select the file location.

Next, configure Bindings and SSL.
Basically Binding is the IP address you want the FTP site to use. Select the Start FTP site automatically and select No SSL .
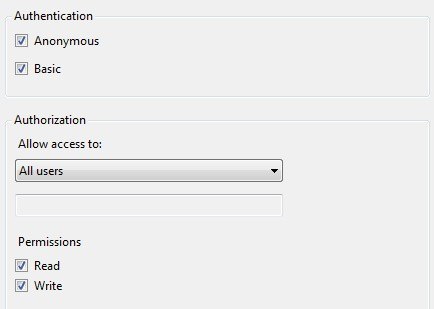
Finally set up authentication and authorization.

With Authentication , you can choose Anonymous or Basic authentication , or you can select both options. With Authorization , you can choose All Users, Anonymous users or Specific users .
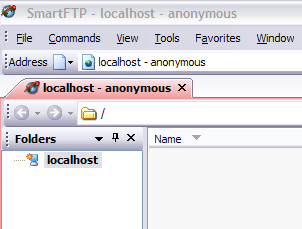
Alternatively, you can access FTP Server Local by opening Explorer and entering ftp: // localhost in the address bar. Here you will see the downloaded folders.

If you use an FTP program, perform the same steps as above. Open the FTP Client software and enter localhost as the Host name and select Anonymous to login. After connecting you can see the folder.
Now proceed to find the data you want to share. On IIS, the default FPT site is located in C: Inetpubftproot . Here you can add data. However, if you want to select data in another location, you do not need to move inetpub .
On Windows 7 and higher versions, you can select any location you want through the Wizard. However, you can only select one folder. If you want to add multiple folders to the FTP site, you must add the virtual directory.
Next open the ftproot folder and add the files to that folder.
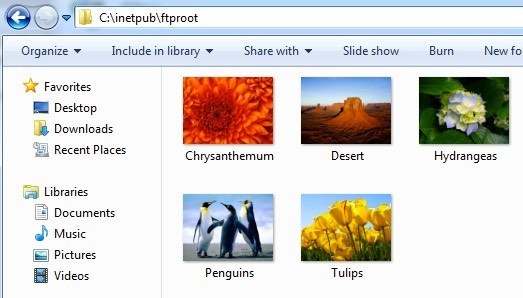
Refresh the FTP Client, you will see the added files.
3. How to connect to another computer on Local Network?
To connect to another computer on Local Network, you must open the Windows Firewall to allow FTP connection to your computer. In other words, all other external computers will be blocked.
To do this, go to Start and select Control Panel and select Windows Firewall .
On the Windows Firewall interface, click the Advanced tab.
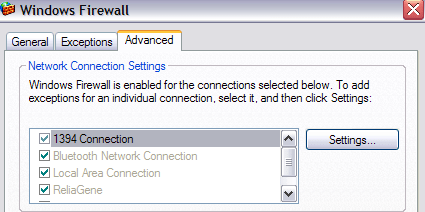
In the Network Connection Settings section, click all connections in the list of left pane, then click Settings . You can now open the available ports on your computer.
In the example below, the server is an FTP Server so we select the FTP Server .

Now a small popup window will appear on the screen. This popup window contains the settings you can change. Click OK to close this popup window.
On the Windows Firewall main window, click OK.
On Windows 7 and higher versions, the port opening process on the Firewall will be slightly different.
First open Windows Firewall from the Control Panel then click Advanced Settings in the left pane. Next select Inbound Rules and then scroll down to find the FTP Server option (FTP Traffic-In), right-click the option and select Enable Rule .

Next click on Outbound Rules and then scroll down to find the FTP Server (FTP Traffic-Out) option, right-click the option and select Enable Rule .
Now the Firewall will open to allow FTP connection. You can connect the FTP Site to another computer on the network.
However, before connecting, you need to get the IP address on your computer.
Go to Start , click Run, then enter CMD to open the Command Prompt window. On the Command Prompt window enter IPCONFIG and note the IP address of your computer.

On the FTP Client on another connected computer, enter the IP address you just noted above and connect Anonymously . Now you will see all the files on the local computer on the FTP client. Also you can go to Explorer and enter FTP: IP address to connect.
At this point the FTP site will work, you can add as many folders as you want. When users connect, they will connect to the path of a specific directory.
Go back to IIS, right-click the Default FTP Site and select New and then choose Virtual Directory .
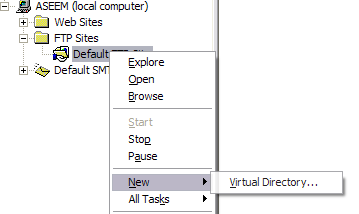
On Windows 7, right-click on the Site name and select Add Virtual Directory.

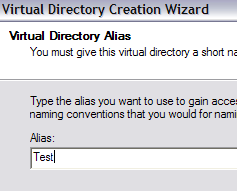
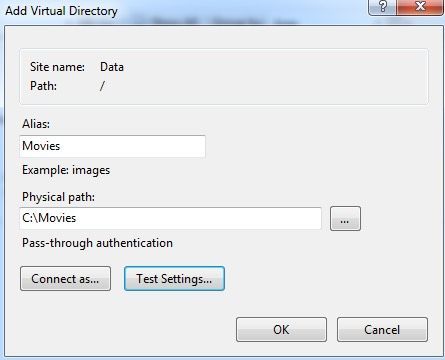
When creating a virtual directory on IIS, you will basically create a directory alias on the internal hard drive. First you will be asked the directory name. You can set simple and understandable aliases, such as FreeMovies or WordDocs, for example .
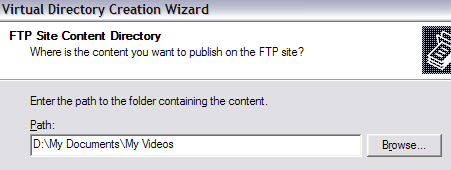
Click Next and browse the path where you want to share the folder. If you want to share a lot of good movies, browse to the My video folder or folder containing the video file you want to share.
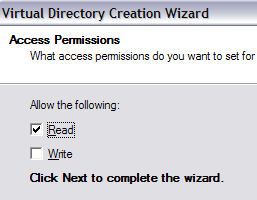
Click Next and select access options like Read or Read and Write . If you simply want to share files, check the box. If you want other users to upload files on your computer, choose Read and Write .
Click on Nex t then click Finish . You should now see a new virtual directory under the default FTP site.
On Windows 7 and higher versions, the process is simpler, users only need to perform the steps in a single dialog box as shown below:
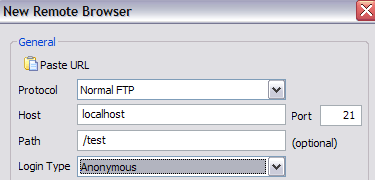
You can connect to the FTP client you are using by typing in the Path "/ Test" or "/ NameOfFolder" field.
On Explorer, you can enter ftp: // IP address / alias name .
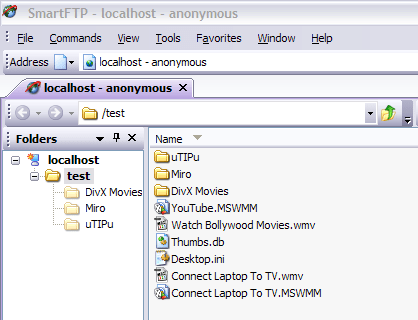
Now you can see the files in the alias folder you created.
You can create as many folders as you want. It is important to provide a public IP address to any user connected from outside or inside your network.
Finally, you need to set up Port Forwarding on the Router so that the local computer will be the FTP Server.
Refer to some of the following articles:
- Instructions for setting up and managing FTP Server on Windows 10
- Instructions for setting up individual FTP Server with FileZilla
- Instructions on how to add FTP, Network Location drives on Windows 7, 8
Good luck!
- 4 basic difference between Windows Server and Windows Desktop
- Instructions for setting up and managing FTP Server on Windows 10
- Create VPN Server on Windows 8
- How to create a VPN server on Windows without using software?
- How to install DNS Server on Windows Server 2019
- How to connect to an FTP Server from Windows Explorer?
- History of Windows Server through versions
- Install Windows Server 2003 and create a backup server
- New update of Windows Server causes many serious errors
- Instructions for installing Windows Server 2016 on Windows 10
- How to install FTP Server on Ubuntu
- Instructions for setting up and managing FTP Server on Windows 10
- Computer network models
- Instructions for setting up individual FTP Server with FileZilla
- Instructions for installing Ubuntu Web Server on remote host
- Automatically backup web server data with WinSCP via FTP
- Instructions for configuring FTP server on iPad
- How to connect to an FTP Server from Windows Explorer?
- Use Web browser to connect FTP Server
-
 Top 5 best FTP software 2020
-
How to install FTP Server on Ubuntu
-
3 most important changes in the newly released version of Google Chrome 81
-
Mozilla is about to stop supporting FTP protocol in Firefox
-
What is FTP? Things you didn't know about FTP
-
IIS 7.0 - FTP Publishing Service - Part 1: Installation
 Top 5 best FTP software 2020
 How to install FTP Server on Ubuntu
 3 most important changes in the newly released version of Google Chrome 81
 Mozilla is about to stop supporting FTP protocol in Firefox
 What is FTP? Things you didn't know about FTP
 IIS 7.0 - FTP Publishing Service - Part 1: Installation