How to set up your own Git server on Linux
While you can count on globally renowned Git hosting services like GitHub, in some cases it is better to host a personal Git server for enhanced privacy, customizability, and security.
Table of Contents
Git server hosts a project's repository, which contains source code and other core files. While you can count on globally renowned Git hosting services like GitHub, in some cases it is better to host a personal Git server for enhanced privacy, customizability, and security.
Learn how you can set up your own Git server on Linux.
Prerequisites for setting up Git server
Before you start setting up your own Git server, you must have access to a spare machine or must register with cloud service providers. This is important because you will be setting up the standby machine to act as a Git server that you will connect to from your local machine and perform Git operations.
Although there are no clearly defined system requirements, 1GB of RAM should be enough for the Git server to work. Furthermore, make sure you have a Linux distribution running on your machine.
Step 1: Download and Install Git on Linux Server

You need to have Git installed on your Linux server. Fire up a terminal and use the Linux distribution's package manager to install Git:
On Debian/Ubuntu derivatives:
sudo apt install git
On Arch-based distributions:
sudo pacman -S git
On CentOS/RHEL/Fedora:
sudo dnf install git
Once Git is installed on your system, proceed to the next steps to configure your Linux system and host your Git repositories as a Git server.
Step 2: Set up a Git user account
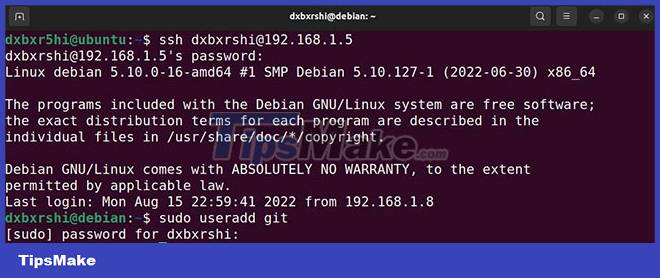
Connect to your Linux server via SSH, RDP or any other remote access protocol. Or, if you're using a spare computer as a server, turn it on and create a new user account to handle your inventory.
ssh [email protected] sudo useradd git
After the new user is added, switch to that user with the su command:
su git
Creating a dedicated git user account is a secure protocol that ensures clients connecting to your Git server have limited visibility and access to on-premises resources. This allows you to securely collaborate on team projects where multiple members will access your server.
Step 3: Create .ssh folder and add authorized keys
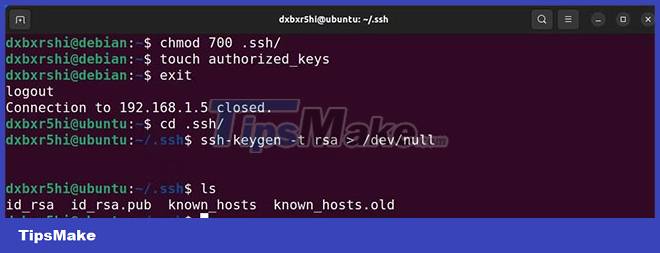
Creating a .ssh directory is necessary to store public keys and other essential data that will specify who has access to this Git server. To get started, log into the git user account you created earlier, create the .ssh directory, and restrict access to the git user only:
ssh [email protected] mkdir .ssh chmod 700 .ssh/ touch .ssh/authorized_keys
Secure directory access with the chmod command to ensure that no one but you can make changes to it. Move into the .ssh directory and create a new file "allow_keys" using the touch command.
cd .ssh ssh-keygen -t rsa #only run this command if you DO NOT have an id_rsa.pub file cat id_rsa.pub
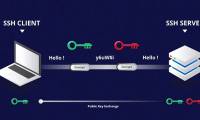
You will have to update this file with the SSH public key of the clients you want to give access to the Git server. Pause the SSH session and open the .ssh/id_rsa.pub file in your local machine with a text editor or the cat command. This file contains your publicly encrypted key, which, when written to the allow_keys file, will grant you access to the Git server without a password.
cd .ssh vi authorized_keys
Copy the public key and create a new SSH connection to the Git server. Move into the .ssh directory, open the authorized_keys file with a text editor and paste the public key. Save changes and exit.
From then on, you should be able to connect to the server without a password. Repeat this step for each machine that will connect to the server.
Step 4: Create a folder to store all the repositories
Go to a Linux server and create a directory or use an existing directory as the root directory. Remember that this is the directory where all your repositories will be stored. This is a good thing to organize projects more neatly.
mkdir directory_name
After creating the directory, move on to the last step in this tutorial to complete the Git server setup.
Step 5: Start development by adding new project
Now, you are really done with the Git server setup. You just need to start development by initializing the repository and adding the remote source to the local machine. Move into the parent directory with the cd command and create a .git project directory:
cd parent_directory mkdir new_project.git
Now, initialize the bare git repository:
git init --bare
With the repository initialized, it's time to add the remote origin on your local machine:
git remote add origin name [email protected]:new_project.git
That's all you need to do on the server side. Any authenticated client can now perform common Git operations like push, pull, merge, clone, etc. To start new projects, you'll have to repeat this step. every time you create a new project.
Test its functionality by executing git push:
touch testfile git add testfile git commit -m "test file" git push name master git clone [email protected]:new_project.git
Your file will be successfully pushed to the remote source. To cross check if push is working, you can clone the repository and should find the test file in the repository.
Security tips for Git server
With a Git server up and running, you must be mindful of its security stature as it is your personal server and it is your responsibility to maintain and protect it from external threats. Some of the best security practices to adopt are:
- Turn off password login
- Change default shell to git-shell. This restricts logged in users from executing any non-git commands
- Use a custom port for SSH
- Disable root user login
- Back up data regularly
There are many security configurations and safety measures that you can implement on your Linux server to protect it from attackers and prevent unauthorized access.
Was this article helpful?
Your feedback helps us improve.
Related Articles
 The 5 best Linux server distributions5 minutes read
 7 Enterprise Linux Server Distributions7 minutes read
 12 best Linux server operating systems16 minutes read
 How to manage remote Linux server using SSH11 minutes read
 New points in SQL Server 201714 minutes read
 How to access Linux server from Android6 minutes read
Reader Comments 0
Sign in with email or Google to join the discussion.