10 advanced techniques using MS Word
Simple word options to the most advanced options of Microsoft Word 2010 help you compose and present documents faster.
Word 2007 and Word 2010 software have many useful features for text editing. This tutorial supports you to use them in a methodical way to speed up compilation and presentation of documents.
1. Create and use Building Blocks

Building Block is a powerful tool that allows you to create standard covers, headers and footers, and tables, to be reusable. Once Building Block has been created, you can insert it into new documents.
To create a header for the document, click on the Insert tab, click Header , and select Blank in the gallery library.
Enter the " QuanTrimang " text in the header and format presented as normal (for example, press Ctrl + E to center the middle, press Ctrl + A to select the entire title).
Go back to the Insert tab, click Header , and then click Save Selection from the library's footer to save the text to the Header Gallery.
In the Create New Building Block dialog box, your title has just been assigned to a name (for example, " QuanTrimang "), and click OK to save the Building Block.
To insert this title into a new document, go to the Insert tab, click on Header , scroll down to the list of General and click on the name you created for the title, in this example " QuanTrimang ".
When you exit Word, the program will prompt you to save the text changes in the BuildingBlocks.dotx file, so that you can reuse it in other Word documents.
2. Save backup and edit Word's default text template
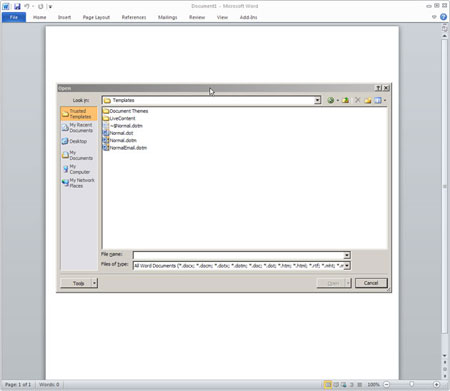
The Word program uses the default template in the Normal.dotm file to determine the format of the new text. To edit this format, you must first turn off the option to hide Windows file name extensions. To do this in Vista or Windows 7, go to the Start Menu search box, open Folder Options , and in the View tab, remove the check mark next to " Hide extensions for known file types ", and click OK .
Then, from the File menu of Word, select Open . In the slider, click Microsoft Word, and select Templates , or click Trusted Templates .
Doing so will open a list of files that include Normal.dotm . Before any other changes, you must create a backup copy of Normal.dotm.
You select the file, press Ctrl + C to copy it, then Ctrl + V to paste a copy into the same folder. The newly created copy will be automatically named " Copy of Normal.dotm " but you can rename the copy to whatever name you like, such as " My customized Normal.dotm " as long as you keep it safe full of this .dotm file.
When you have finished making a backup copy, double-click Normal.dotm to open it freely for editing. If you do not like your revision, open the backup file and overwrite the Normal.dotm file, then the text page will return to the original format.
3. Create Header and default page numbering
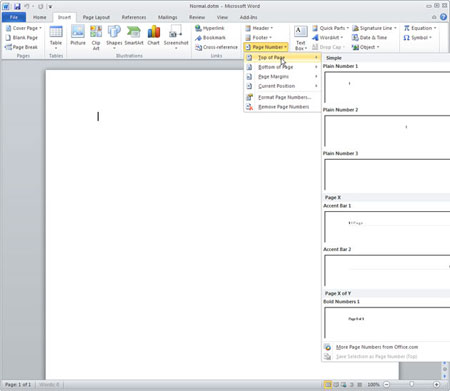
If you want all of your Word documents to be paginated by default, this way applies. Note that step 2 above only works on individual pages, not all.
Open Normal.dotm's default text template, as instructed above, go to the Insert tab, select Page Number , and choose a location and format for the number of pages displayed.
Close the document and save Normal.dotm , after this step all your new documents will use the page number you specified.
4. Create the default page number starting on the second page

Use this trick after setting the default page numbering in Word, but do not want the page number to appear on the first page of the document and all the remaining pages have a page number.
Open the Normal.dotm file, go to the Page Layout tab. In the Page Setup group, click More Arrow (the bottom right arrow of the group) to open the Page Setup dialog box.
After opening, click the Layout tab, and under Headers and Footers , check next to Different First Page , and click OK .
Finally, close Normal.dotm file. From there, any newly created document will not have the page number on the first page, but will start page numbering on the second page.
5. Restore the default sample text
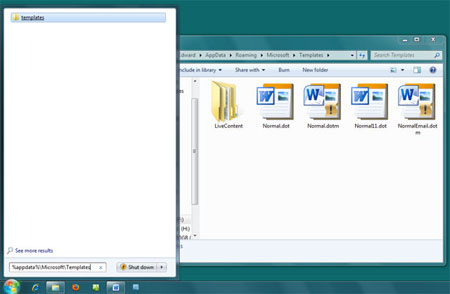
If you need to delete or rename the Normal.dotm file , you will need to close Word again and navigate to the folder that stores it, because Normal.dotm cannot be modified while Word is running.
The address of this directory changes in different Windows versions, so the fastest way to find it is to enter the text string below into the search dialog or Run in Start Menu:
% appdata% MicrosoftTemplates
After pressing the Enter key, the Templates folder will be opened in Windows Explorer. Normal.dotm 's operation mode is very special, if you delete it, the original version of the file will be recreated the next time you start Word.
Based on these protocols you can back up a previously customized sample text and rename this copy to Normal.dotm , and then Word will use it as your default template.
You can import formats and customize the default Word 2003 template into Word 2007 or 2010 by deleting the Normal.dotm file and copying the Normal.dot file present in the Word 2003 Templates folder to the Templates folder of Word 2010 The program will automatically import custom and macros from the old Normal.dot file when it creates its new Normal.dotm .
6. Select Default font for easier reading

The default font in Word 2010 is Calibri, which looks pretty on the screen, but for better readability you have to use a font with underlines like " sans-serif ".
To change Word's default font, press Ctrl + Shift + F keys to open the Font dialog box. The recommended font should be Times font, size 14. After selecting click Save as Default , select " All documents based on the Normal.dotm template " and click OK .
7. Change the default page layout
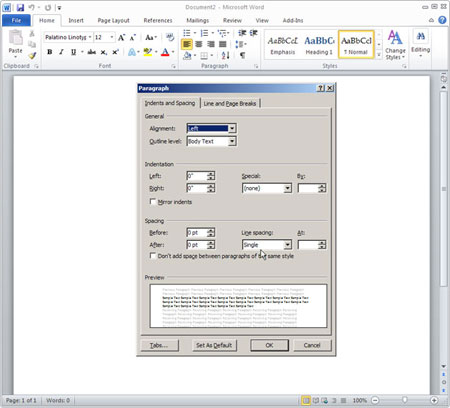
You can change other default settings the same way you change the default font. Press the Alt + O keys, then press the P key to open the Paragraph dialog box (or click More Arrow in the Paragraph group on the Home tab). You set the line spacing and other options for the text, and click Save as Default .
Go to the Page Layout tab, click More Arrow in the Page Setup group to open the Page Setup dialog box. Set the margins and display the print page, and click Save as Default .
8. Put the AutoFormat tool on the Quick Access Toolbar
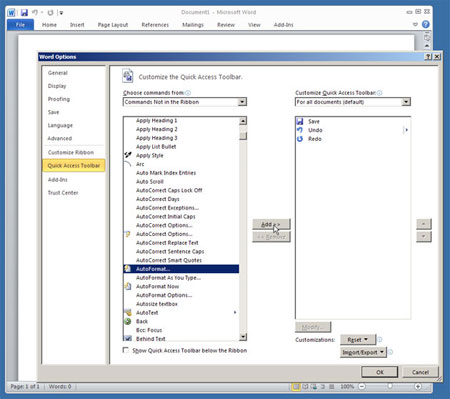
AutoFormat is an automated way of presenting text pages that are very useful for editing an existing document.
The Office 2007 Ribbon interface does not preinstall the AutoFormat tool in the program, but you can activate it again by including it in the Quick Access Toolbar . Click on the down arrow at the bottom right of Quick Access Toolbar on the tab of the Ribbon, and then click More Commands . In the drop-down menu below " Choose commands from ", select Commands Not In the Ribbon .
From the list that appears, click on Autoformat , select the Add button, and then click OK .
Performing the above steps also helps you put any other tool on the Quick Access Toolbar for quick access.
9. Turn on notification mode for modifications before saving and printing text
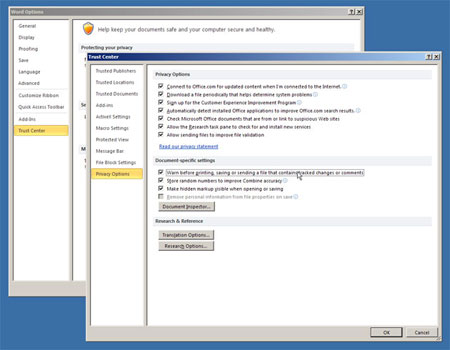
Re-checking the document before printing or sending it will help you avoid releasing faulty documents. To make these steps easier, Word 2010 has added options to display modifications and changes. Word 2010 warns whenever you record or print a document with modified information, or when you send an e-mail from Word's menu.
To enable this warning, go to the File menu, then select Options , choose Trust Center . Click Trust Center Settings . , then go to Privacy Settings , and check next to " Warn before printing, saving or sending a file that contains tracked changes or comments ".
10. Save and restore macros

If you want to share macros (merge commands) of Word document pages with other users, or include them in other documents, first save your macros in a separate file.
Start by pressing Alt + F11 to open the Visual Basic Editor in the Project pane in the upper left, then click the plus, Modules , and select " NewMacros ". From the File menu, select Export File to export your macros to a file. That file will have the extension .BAS.
If you want to remove some macros or write additional explanations, you can edit the files in Notepad or any other text editor.
To import your macros into a copy of Word, press Alt + F11 , select Normal in the Project pane, and select Import File from the File menu.