Create and manage Quick Steps in Outlook 2010
One of the most new and handy functions of Microsoft Outlook 2010 is Quick Steps - which can help users create, manage and apply many functions in a single operation to manage email.
QuanTriMang.com - One of the most new and handy functions of Microsoft Outlook 2010 is Quick Steps - which can help users create, manage and apply many functions in a single operation to manage email .
Set Quick Steps
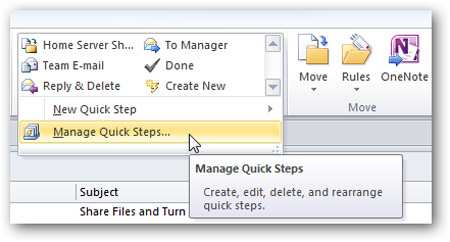
At the Home tab, press Quick Steps ' display arrow and select Manage Quick Steps :
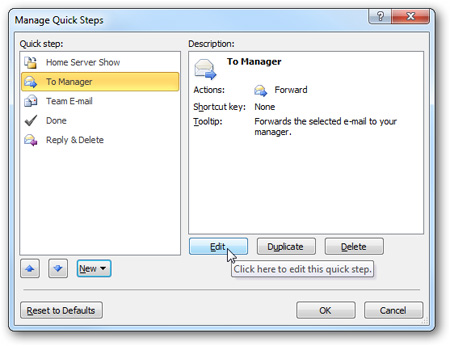
The Manage Quick Steps window opens, where the user can choose between the main functions. In this tutorial, we will modify the To Manager step. Select To Manager > Edit :
And we begin to modify the steps applied. For example, we need to forward any email to our superiors. Therefore, enter the email addresses of the managers, select the importance level, and add the comment text next to it. Besides, we can also move these emails to any folder:

Select the appropriate shortcut:

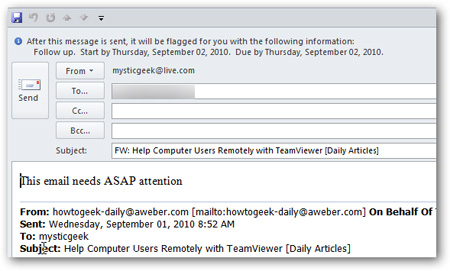
After saving, open any email you want to send to your superiors and select To Manager from the Quick Steps function box:

Here, you can forward, add or remove recipients if you want:
Create your own Quick Step
On the other hand, you can also create your own Quick Step if you want. At the Home tab, select Create New from the Quick Steps box:

And choose the appropriate actions, name, add caption text - will show when you hover over the Quick Steps box:

For example, we will copy the email to any folder and mark these emails. Alternatively, you can add other actions if you want:
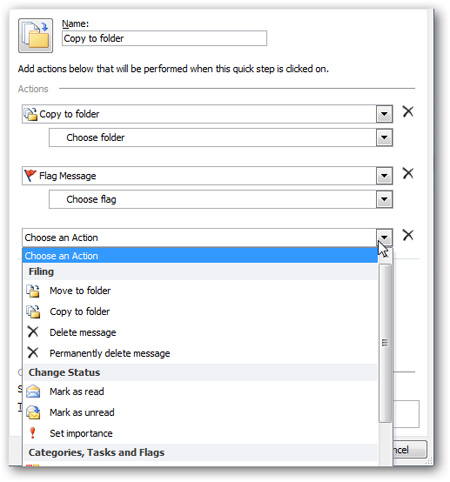
The steps taken during this test include: naming the action Copy to: misc , applying the action is to copy the email to the misc folder . then click Finish :

Now, in Quick Steps, you will see Step has just created:
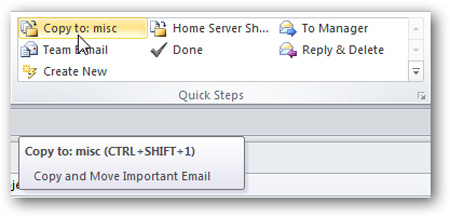
And we will test it by opening any email and applying Quick Step:

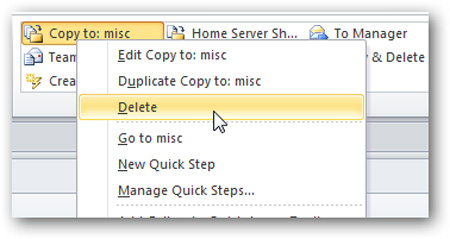
But note that, if you have multiple accounts in Outlook, you'll have to set Quick Steps separately for each corresponding account. If you don't want to use Quick Steps, right-click on it and select Delete .
Here are some basic steps to set up and use Quick Steps in Outlook, which is very convenient for email management. Good luck!
- Steps to create a new folder in Microsoft Outlook
- 6 ways to speed up email management in Outlook
- 10 ways to manage Inbox in Outlook 2010
- How to create rules (Rules) in Outlook
- 10 good tips to help you work more efficiently on Outlook
- Instructions for basic steps to backup Outlook data
- Move daily email to a folder in Outlook
- How to create AI theme for Outlook
- Open multiple Exchange Servers mailboxes with Outlook 2010
- How to set up a virtual server
- Microsoft Forefront TMG - TMG Storage 101
- Network setup for PC and Mac
- Combine iTunes Playlist with SugarSync in Mac OS X
- 'Turn' your Mac into a Wi-Fi Access Point
- Access applications directly to XAMPP MySQL Server
- Guide to creating Virtual Hosting with PureFTPd and MySQL
- Set up control and use KTorrent remotely
- Add Gmail account to Outlook 2010 with IMAP


 How does your phone track your every step?
 How to 10 cool ways to trick your phone's step counter (without walking)
 Just exercise and 'make money' with Sweatcoin
-
 Application
-
Web Email
-
Website - Blog
-
Web browser
-
Support Download - Upload
-
Software conversion
-
Social Network
-
Simulator software
-
Online payment
-
Office information
-
Music Software
-
Map and Positioning
-
Installation - Uninstall
-
Graphic design
-
Free - Discount
-
Email reader
-
Edit video
-
Edit photo
-
Compress and Decompress
-
Chat, Text, Call
-
Archive - Share
-
-
System
-
Mac OS X
-
Hardware
-
Game
-
Tech info
-
Technology
-
Science
-
Life
-
Electric
-
Program
-
Mobile