How to create a folder in Outlook 2013 by creating a rule
By default, Outlook receives all incoming email and transfers it to the Inbox folder. Some people find it difficult to find messages in Inbox and want to set up to automatically transfer certain emails to another folder to make it easier to find. This article will show you how to create a rule in Outlook 2013 to automatically send email to a specific folder..
By default, Outlook receives all incoming email and transfers it to the Inbox folder. Some people find it difficult to find messages in Inbox and want to set up to automatically transfer certain emails to another folder to make it easier to find. This article will show you how to create a rule in Outlook 2013 to automatically send email to a specific folder.
How to create a folder in Outlook 2013 by creating a rule
Step 1: Select an email you want to move to a specific folder, then right-click the email and select Rules > Create Rule .

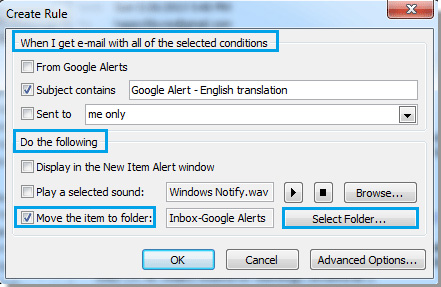
Step 2 : In the Create Rule dialog box, under the When I get e-mail header with all of the selected conditions , select the condition for this email. Under the Do the following heading, select the Move the item to folder box and then click the Select Folder button.
Step 3 : In the Rules and Alerts dialog box, select the folder you want to forward the email to, then click OK to close the dialog box.

Step 4: If you want to create new folders for these emails, click the New . button .

In the Create New Folder dialog box, name the folder, select the location for the folder under the select where to place the folder heading, and then click the OK button.

Step 5: When returning to the Create Rule dialog box, click OK to complete the setup process.
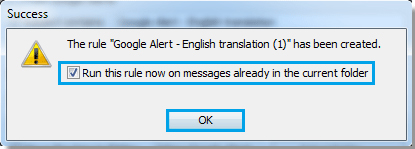
Step 6 : Now, a Success dialog box pops up, select Run this rule now on messages already in the current folder , then click OK to start transferring email to the new folder.
Step 7: From now on, when Outlook receives the emails that meet the conditions you have set it will be automatically transferred to the specific folder.
See more:
- Create a Rule to move and store email to another folder in Outlook
- Instructions 4 simple ways to backup Outlook data
- Instructions to add Gmail to Outlook 2013 via POP protocol