Figure 1
Network Administration - In Part 1 of this series, I will give you an overview of the VPN configuration in TMG 2010.
Over the years ISA and then the TMG VPN server have been close friends of administrators whenever they leave their office. With ISA 2004, Microsoft has a real success when it comes to their VPN server. ISA VPN server is a powerful and easily configurable remote access VPN solution. What you can enjoy most about the ISA VPN server is that it is one of the safest solutions on the market. When it comes to remote access, its security issue is absolutely guaranteed.
However, it should be admitted that when your DirectAccess configuration is set up and running, you will not use VPN much. However, there will be times when someone needs to use a computer without DirectAccess, so we still depend on VPN access to access our network. That's why we still need a TMG VPN server in the office.
In this series of TMG VPN servers, we will begin with an overview of VPN configuration, then go into some specific issues to enable L2TP / IPsec and SSTP access. If you feel completely new to ISA / TMG, this section will give you the basics of what's going on.
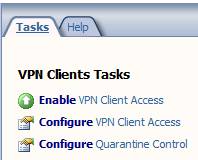
Let's start by opening the TMG firewall interface and clicking the Remote Access Policy (VPN) button in the left pane. In the right pane, in the list of VPN Clients Tasks , click the Enable VPN Client Access link , as shown in the figure below.

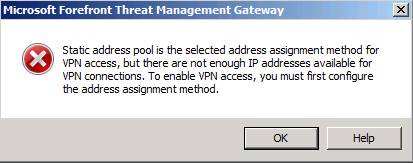
If you are an experienced ISA VPN administrator, you will probably recognize this dialog. Click OK in this dialog box and fix the problem.

In the right pane of the console, click the Define Address Assignments link , see the figure below.
In the Remote Access Policy (VPN) Properties dialog box, click the Address Assignment tab. Select the option Dynamic Host Configuration Protocol (DHCP) . This will configure the TMG firewall to obtain IP addresses for VPN clients (and its own RAS adapter) from the DHCP server. Note that only IP addresses are obtained from the VPN server. You will not have DHCP options. To provide DHCP options to VPN clients, you need to configure the TMG VPN server as a DHCP relay. We will show you how to do this in another part.
Note the Use the following network drop-down list to obtain DHCP, DNS and WINS services. This list includes the name of the NIC installed on the TMG firewall. The TMG firewall will use DNS and WINS settings on the NIC you choose to provide these services to the VPN client. However, if you want to customize the configuration, you can click the Advanced button.
Now you will see the Name Resolution dialog box. The default setting is Obtain DNS server addresses using DHCP configuration . However, you can select the options Use the following DNS server addresses and Use the following WINS server addresses to use the addresses not included in the configuration on the NICs on the TMG firewall.
Click OK , then click Apply at the top in the middle pane to apply the changes to the Firewall Policy.
Note that the addressing issue needs to be handled, so click the Enable VPN Client Access link in the right pane of the console.
Click Apply at the top of the middle pane to save changes to the Firewall Policy .
See page 2
As mentioned earlier, the TMG firewall obtains an IP address from the DHCP server. Here's how it works: The TMG firewall does not obtain these addresses at a time, but instead requires IP addresses in groups 10. Obviously you need to have a DHCP server on the network to authenticate. does this job. We have installed a DHCP server on the domain controller in our test network. When you check the DHCP console, you will see that the TMG firewall has 'snapped' 10 IP addresses from the DHCP server, as shown in the figure below.
Click the Configure VPN Client Access link in the right pane of the interface.
In the VPN Clients Properties dialog box, on the General tab, you will see the Enable VPN client access checkbox and Maximum number of VPN clients allowed to be set to 100 . With Standard Edition, you will be limited to 1000 connections, with Enterprise Edition you will not be restricted (may be limited only to hardware and network support).
Click the Groups tab. Here you can configure through Active Directory which groups of users can connect to the VPN server. You select groups by using the Add button. User accounts belonging to these domain groups need to be configured for VPN access in 'dial-in' account options that are set up to control access through the policy. This is set by default for Windows Server 2008 domains, so we don't need to do anything in Active Directory to make sure it works. However, if you use Windows Server 2003, you should check those settings.
When you click the Add button, the Select Groups dialog box will appear. In the From this location section , make sure you have selected the domain. The default will be the internal computer, and you do not need to choose for that. In this example, we selected the msfirewall.org domain and allowed all users in the domain to connect to the VPN, so we had to enter the Domain Users in the text box Enter the object names to select. Click OK to save the changes.
Now you can see the group appear in the list on the Groups tab, as shown in the figure below.
Click the Protocols tab. Here you can choose which VPN protocol can be used to connect to the TMG VPN server. Options include:
The Enable PPTP option is enabled by default and will work without any additional configuration on VPN clients, requiring minimal additional configuration on the TMG VPN server. However, if you choose the L2TP / IPsec or SSTP option, you will need to handle some of the issues related to the certificates (you can use the shared key to share with L2TP / IPsec, but that's an unsafe way. We will go into the configuration requirements and procedures for these two VPN protocols later.
In the User Mapping tab, you have an option to allow you to map VPN clients from non-Windows namespaces (such as those that have been authenticated with RADIUS or EAP) to the Windows namespace. This means that if you do not integrate authentication for VPN clients, use RADIUS or EAP, then you cannot take advantage of Windows Active Directory groups automatically. So, if user mapping is not enabled, you will have to create a user set on the TMG firewall and use the usual user set up when configuring the firewall rule to control access. VPN client. Obviously, to work, the TMG firewall must be a domain member. We will not use User Mapping in this example because we do not use RADIUS or EAP authentication.
See page 3
There are two main options here after you enable quarantine control : Quarantine according to the RADIUS server policies and Quarantine VPN clients according to TMG policies . The first is the NAP option and then the option of controlling remote access isolation. Note that you also have options for controlling how long the waiting time is before disconnecting disconnected VPN clients and also configuring the list of users exempt from quarantine monitoring. We will not go into the details of quarantine control details in this section but will introduce later.
Now switch to the General VPN Configuration section in the right pane of the console. Click the Select Access Networks link , as shown in the figure below.
On the Access Networks tab, select the Networks in which you want the VPN server to listen for connections. By default, the default External Network option will be selected. However you can use other options or combine the options you like. Note that you cannot assign specific IP addresses; All NIC IP addresses for the network you choose will listen to incoming connections. If you allow inbound connections for VPN users, that does not mean that the IP address will be used. There is no real security advantage for restricting VPN access to an IP address on a specific interface.
Click the Address Assignment tab. You will then get a familiar window because we saw it before. If you decide to use a static address, you can make that change here. An example of static address change is when you want to configure the array of TMG VPN servers. In that case, each member of the array needs to have a separate collection of IP addresses. We will show you how to configure the TMG VPN server array in the following sections. In this example, we only have one server.
On the Authentication tab, you can configure the type of user authentication . The default setting is MS-CHAPv2 . By default you can use EAP, CHAP and PAP, but in general there are only a few options that you will probably want to use are MS-CHAPv2 or EAP. Note that there is an option to verify the computer at the bottom. When checking the Allow customer IPsec policy check box for L2TP , you will be able to enter the pre-shared key. This is a 'poor' method for IPsec protection with L2TP / IPsec connections, which allows you to establish a connection without deploying a certificate. I will show you how to deploy certificates in the next part of this series so you can use the recommended (more secure) method for L2TP / IPsec.
In the RADIUS tab, you can configure the RADIUS servers used for VPN authentication or logging. Note that you can use RADIUS for authentication or logging, or both. We will not introduce the RADIUS server authentication or logging in this series.
Conclude
Like ISA, the TMG firewall can act as a remote access VPN server. If you are an experienced ISA VPN server administrator, you probably won't see many new points in the TMG VPN server configuration - except for SSTP integration. In the next part of this article series, I will show you what you need to do to make L2TP / IPsec connections work, using computer certificates and pre-shared keys. In the following, we will also introduce some firewall issues that you know if you want to standardize the configuration of the L2TP / IPsec remote access VPN client.
