Instructions for installing Exchange Server 2010 - Part 1: Installation
It has been a long time since we last introduced you to a Microsoft product. We note that the 2010 exchange has not been mentioned. So why not try and check on its new features?
Table of Contents
TipsMake.com - A step-by-step guide on how to install Exchange Server 2010
Introduce
It has been a long time since we last introduced you to a Microsoft product. We note that Exchange 2010 has not been mentioned yet. So why not try and check on its new features?
We have used a copy of Exchange 2010 from MSDN Library for this tutorial. Get a copy or download a copy from Microsoft at:
http://www.microsoft.com/exchange/2010/en/us/default.aspx
Experiment
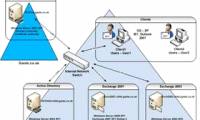
Below is installing Exchange Server 2010 Lab; All servers are virtualized using VMWARE.
1. A Windows 2008 R2 Domain controller with all FSMO Roles installed, including certificate server (DC01), this will be our domain controller and will not contain any Exchange services. Users are not recommended to install exchange on a domain controller but Microsoft still supports it.
2. Windows Domain: Faleh.net
3. A Windows 2008 R2 server with Exchange requirements (Ex .01)
4. This Server will hold all roles.
System requirements for Exchange and Windows 2008 installation
To run Microsoft Exchange Server 2010 you need:
Computer — Computer with Intel processor that supports Intel Extended Memory 64 Technology (Intel EM64T) or AMD supporting AMD64 platform; Intel Itanium family IA64 processor is not supported.
Operating system — Microsoft Windows Server 2008 x64 Standard and Enterprise Edition with Service Pack 2 or Microsoft Windows Server 2008 R2 Standard and Enterprise Edition.
Operating system —to install management tools? 64-bit version of Microsoft Windows Vista or Microsoft Windows 7 or Windows Server 2008. Note: This requirement is only for installing management tools.
Additional requests when running Exchange Server 2010
Memory - RAM is at least 4 GB for each server plus 5GB for each mailbox.
Hard drive capacity
- Use at least 1.2 GB of hard drive space for installation.
- Add about 500 MB of storage for each Unified Messaging (UM) language pack you can install later.
- 200 MB of unused space for system drive.
Drive —DVD-ROM drive, accessible locally or online.
File format — Partitioning the disk in NTFS file system format.
Screen —The screen has a resolution of 800x600 pixels or more.
Prerequisites Exchange Server 2010
If the following conditions are not installed, the Exchange Server 2010 installation process will display and provide installation links; Internet access is required if the necessary software is not installed or not on the local network.
- Microsoft .NET Framework 3.5 SP1
- Windows PowerShell v2.0
This is a simple virtualization, in a real environment, you will have many different roles installed and will need a standalone server for each infrastructure-based role that has been designed.
Prerequisites
Before installing an Exchange Server 2010, there are a few prerequisites that need to be installed on the server before installing Exchange.
These prerequisites can be installed via a script code or by using Graphical User Interface. Details can be found here: http://technet.microsoft.com/en-us/library/bb691354.aspx
Notice the different sections for Windows 2008 Server and Windows 2008 R2
There are different scripts for each different installation context.
In addition, before starting to install Exchange 2010, consider the following:
- In order for the email messages to be delivered correctly, you need to install both the Mailbox server role and the Hub Transport server role in the same Active Directory site.
- Users can install the Mailbox server role, the Hub Transport role, the Client Access server role, the Unified Messaging server role on the same computer or on different machines.
Step by step
First, pay attention to the previous requirements:
1. Prepare the forest and organization in Active Directory
First, we need to prepare the Schema. Since this is a new installation, not an update or an integration, so we will perform the preparation process on the domain controller in My Case: DC01
When preparing for active directory schema, we need the Schema admin permissions. The account running the preparation process needs to be a member of the Schema admin group on active directory.
Open a command on the domain controller with the delegated permissions (Run as command).
Run Setup from the address book where the Exchange 2010 installation files are located. Here are cmdlets
Setup / PrepareSchema or Setup / ps
And below is a screen capture showing the preparation process that was completed on our domain controller.

If you have reached this section, which means you have completed all of the prerequisites, start the installation process.
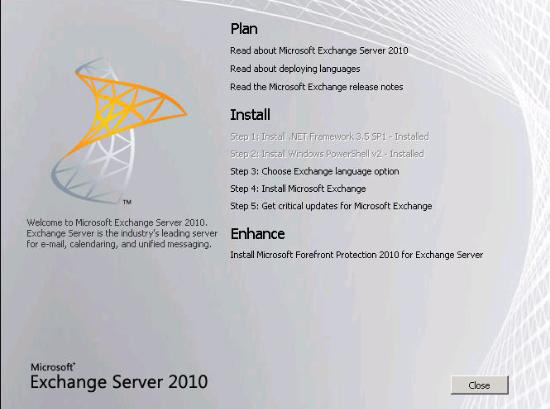
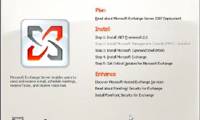
Run setup.exe from the installation folder or CD, an installation menu will appear
As you can see, .Net framework 3.5 and windows power shell are already installed, so these choices are grayed out. If they are not already installed, you can still install them in this step.
Select language packs for Exchange 2010; In this case, we choose all languages from DVD.
Select Next Step 4: Install Microsoft Exchange
Click Next and accept the terms in the License agreement (make sure you know what will happen if you do not accept these terms).
Click Next and opt in to the error message - Error reporting - or not.

Click Next and select Select Exchange Server Installation .
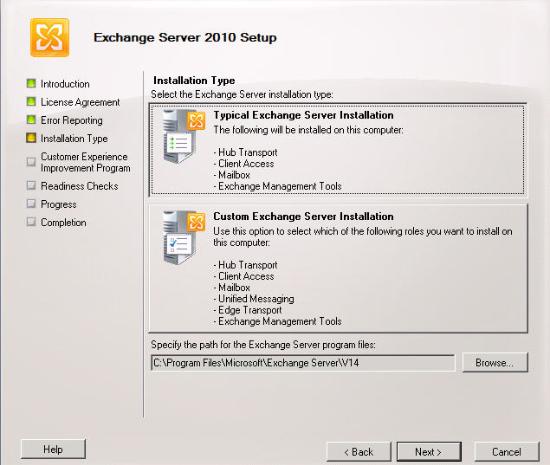
Explanation: Some exchange roles cannot co-exist on the same server, such as Edge Transport and unified Messaging Role. If you need these roles you will have to select ' Custom Exchange Server Installation '. Please note that if you select ' Edge Transport ' or ' Unified Messaging Role ' you will not be able to install another role on the same server and vice versa.
In the case of testing, we did not install Unified Messaging or Edge Transport. These roles require a lot of customization and can be added at any time after the first installation. So we will ignore them.
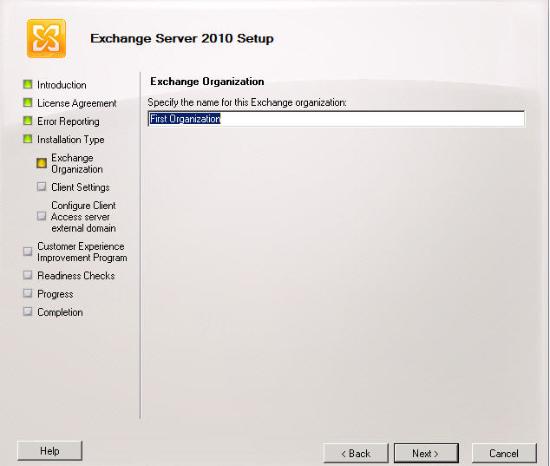
Click Next and change the name ' First Organization ' to the name of your company / organization. We will change the name to 'New York'.
Next, click Next and select if you want to enable Public Folders. In previous versions of Exchange, we often used these folders. On exchange 2007 and 2010 we can install exchange without the public folder database.
In our test, we will not use Public Folders, so choose No , confirm that we do not have any accounts in Outlook 2003. Please note that you can still add Public Folders after installation.

Next, click Next and enter your Public Client Access server address. This will be the address that all users use to access Outlook web access, enable synchronization, .
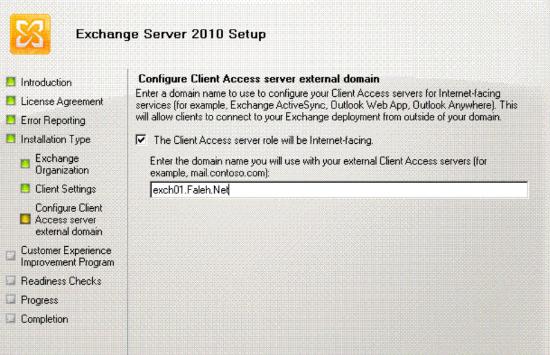
Confirm the FQDN and select next
Choose whether you want to join the Customer Improvement Program or not. We choose No
Now click on Next to start the test
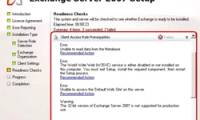
Exchange installation will run a test and confirm that it is ready to install.

If all goes well, you'll see a confirmation. If any steps are missing, exchange settings will inform you.
The yellow message in our case indicates that the installation will run installation / preparation.
You can run it before running exchange setup; We want to run it with the GUI interface.
If exchange is available, the Install button will display. If you are missing some steps, installing exchange will not continue and lead you to install the missing requirements with a Retry button enabled.
If you receive the screen as above, it means you can install it again. Click the Install button and wait a few minutes.
This is a step-by-step installation guide for a single server running all roles except unified messaging and Edge Transport roles. Exchange installation is still really a complicated task. If you are installing in a real environment, it also involves designing and planning the exchange infrastructure before executing any role. In some cases, you may have to integrate from previous versions of exchange; You will have to perform an integration from other mail servers. All these cases need design, planning and time. These issues are not in the scope of this article and we will try to include the configuration part exchange in the following tutorial.
We hope that you will find this article useful and wish you a successful implementation.
Was this article helpful?
Your feedback helps us improve.
Related Articles
 Installing Exchange 2007 (Part II)9 minutes read
 Installing and configuring Exchange 2007 from the command line utility - Part 111 minutes read
 Installing and configuring Exchange 2007 from the command line utility - Part 312 minutes read
 Transfer Exchange 2003 to Exchange 2007 (Part 2)9 minutes read
 Installing Exchange 2007 (Part I)9 minutes read
 Installing, configuring, and testing Exchange 2007 CCR on Mailbox Server (Part 2)8 minutes read
Reader Comments 0
Sign in with email or Google to join the discussion.