Check the TMG 2010 virtual private network server - Part 2: Configure TMG Firewall as the PPTP Remote Access VPN Server
Network Administration - In Part 2 of this series, I will show you how to configure the firewall to accept PPTP and L2TP / IPsec connections.
>> Check the TMG 2010 virtual private network server - Part 1
In the previous part of this series, an overview of the VPN configuration, we gave you an overview of the TMG firewall's remote access VPN configuration interface. We also introduced the control available and the location you can find them. Now in this next section, we will go into how to configure the firewall to accept PPTP and L2TP / IPsec connections.
PPTP Remote Access VPN Server
PPTP is the first remote access VPN protocol. It had a bit of a bad reputation before when it was discovered that there was a security issue with PPTP, which was a vulnerability to password-based attacks. This problem has been solved with the release of PPTPv2, but PPTP is still considered less secure than the VPN protocol (according to security experts). This is because the authentication mechanism takes place outside the secure encrypted tunnel context.
Now, if using complex passwords or using EAP / TLS user-based authentication mechanisms for your PPTP connections, security issues will be easier to resolve. So unless you're in a high security industry or a place with huge resources with PPTP supercomputers is still a good choice for remote access VPN protocols.
PPTP is preferred by ISA and TMG firewall administrators for its operability. However, it must be said that there are many PPTP situations that do not work, such as the PPTP client or PPTP server that is located behind a NAT device without a PPTP NAT editor or has a standalone NAT editor.
Therefore it is worth considering again because PPTP, unlike most other VPN protocols, is not what is still called a 'friendly firewall'. This raises the question as to why we do not use future remote access methods, such as DirectAccess, instead of relying solely on traditional VPN methods. The reason for this is that DirectAccess is only available on Windows 7 clients and it needs some other requirements that all of your clients may not be able to meet, then the remote access VPN solution still exists and is an essential choice.
You need to know that third-party firewalls only have a standalone PPTP NAT editor so only one outgoing PPTP connection is done from within the firewall. In other cases, the NAT editor has so many errors that no client can establish a connection from behind the firewall with the defective PPTP NAT editor. You can always expect to be behind the RRAS NAT server or an ISA or TMG firewall, but sometimes that luck is not for you. In such cases, you can try using another remote access VPN protocol or some other method for remote access to get the information you need.
In the previous article of this series, we configured the VPN server to use DHCP to obtain IP addresses for remote access VPN clients. We also enabled the default VPN protocol configuration, which is PPTP. The TMG firewall is listening on the default external interface for remote access VPN client connections and using the default authentication method, MS-CHAPv2.
Now let's look at the next steps. In our test we have a Windows 7 client to connect to a network outside of the TMG firewall, then try a VPN connection. In our test, we have admitted that you already know how to create a VPN connection on a Windows 7 client, so it is not recommended to show that process here.
Note: If you do not know how to do that, open the Network and Sharing Center and click on the Set up a new connection or network link and follow the instructions in the wizard.
Before connecting, I want to introduce you to something in the VPN client configuration that can help you troubleshoot some different VPN protocols. In Figure 1 below, you can see the Properties dialog box for the VPN client connection. When you click on the Security tab, the Type of VPN drop-down list will appear. When you open this list, you will see a list of VPN protocols that support remote access VPN clients. In this example, we want to make the VPN client use PPTP. Select that option and create a connection.
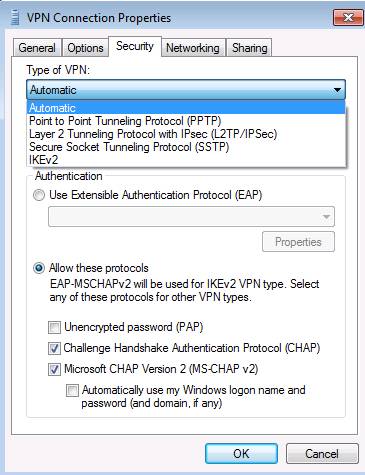
Figure 1
After creating the connection, you can right-click the VPN connection in the Network Connections window and click Status . In the Status dialog box, click the Details tab, where you will see the details of the PPTP connection. You can see the WAN Miniport (PPTP) protocol used, the authentication method and the IP address information, as shown in Figure 2.
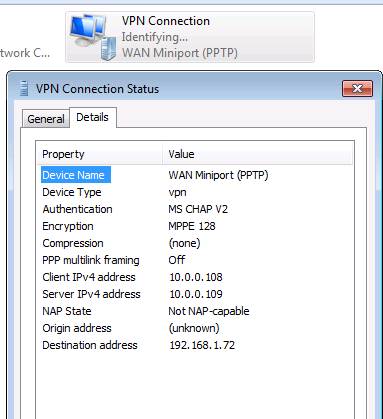
Figure 2
In the TMG firewall console, the Dashboard directive, you can see the connection in Sessions as shown in Figure 3 below.

Figure 3
When switching to the Monitoring button in the left pane of the TMG firewall console and clicking the Sessions tab, you will see the VPN client connection. If the VPN server is remotely busy, you can use the filtering feature included in the Sessions tab and configure the filter to show only remote access VPN client connections. Note that this button also provides information related to the VPN protocol used to connect the TMG firewall's remote access VPN server as well as the username of the connected user. See the figure shown in Figure 4 below.
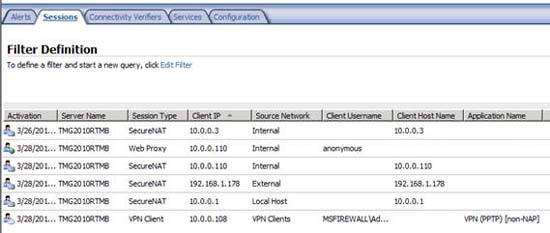
Figure 4
Easy? Now you know why administrators like to configure ISA and TMG as PPTP remote access VPN servers. You can be attracted and enable EAP / TLS authentication, use RADIUS server and do some things to extend PPTP VPN server security and configure access control - but if you Just want an easy and fast solution, PPTP is what you need to choose (at least from the configuration server).
However, all you have done so far is configure the TMG firewall to become a remote access VPN server and verify that the PPTP connection can be established. What we haven't done is connect to the resources on the intranet to make sure that the connection really works.
An easy way to test this is to see if we can ping a domain controller on the internal network. The IP address of the domain controller is 10.0.0.2 . Figure 5 below shows the result of the ping action.
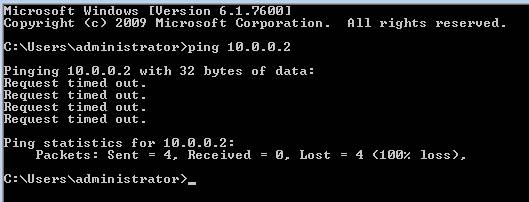
Figure 5
What's up with that? TMG firewall requires many VPN connections. Remember, when setting up the TMG firewall, by default, no traffic can move through the firewall. You need to create rules that allow traffic to pass through the firewall.
OK, let's create those rules.
On the left pane of the TMG firewall console, click the Firewall Policy button. In the right pane of the console, click the Tasks tab. In the Tasks tab, click the Create Access Rule link , as shown in Figure 6.
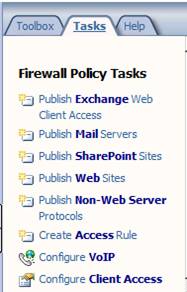
Figure 6
In the Welcome to the New Access Rule Wizard dialog box, shown in Figure 7, enter the name of the rule in the Access Rule name text box. In this example, we have named the rule VPN Clients to Internal and then click Next .
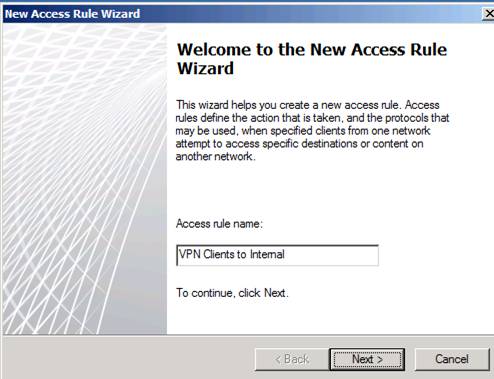
Figure 7
In the Rule Action page, shown in Figure 8, select the Allow option, since we want to use this rule to allow traffic from the VPN client network to the internal network by default. Click Next .
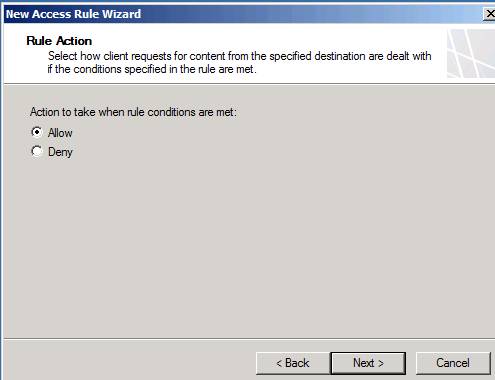
Figure 8
On the Protocols page, shown in Figure 9, you can choose which protocols are allowed from the source network to the destination network (or computer or other network object). In this example, we allow all traffic from the VPN client network to the internal network, so select the All outbound traffic option from the This rule applies to drop down list . Click Next .
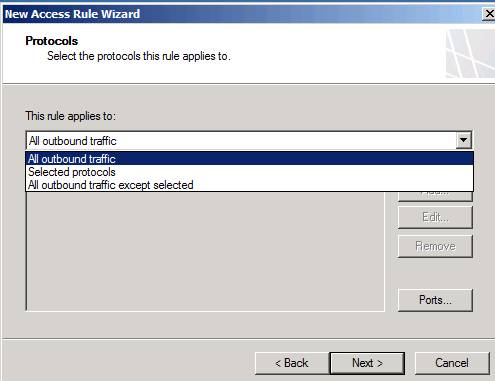
Figure 9
On the Malware Inspection page, shown in Figure 10, we will select the option Do not enable malware inspection for this rule . The reason we choose this option is for convenience in this example. Note that in a production environment, you need to protect clients from malware, because of split tunneling (the process of allowing remote VPN users to access the Internet when allowed to access resources on the VPN, this method gives allowing users to access remote devices such as printers in the network, while still able to access the Internet) is disabled by default. Because split tunneling is disabled, VPN clients will have to access the Internet through the resources you create on the corporate network. That resource could be another TMG firewall or web proxy, or it could be the TMG firewall that the VPN client is connecting to to set up a remote access VPN client session.
See page 2
In this example, we will not go into creating rules that allow Internet access when connecting to VPN - your policies will determine if you want to allow Internet access while the VPN client is connected. no and want to allow split tunneling when the VPN client is connected to the TMG remote access VPN server.
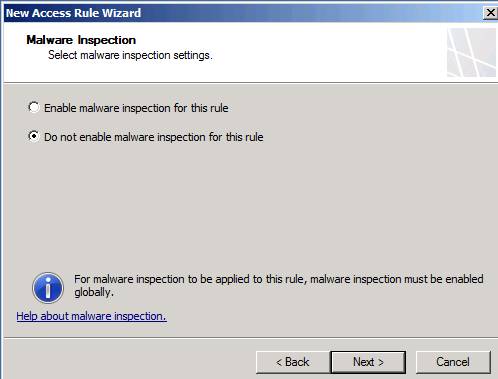
Figure 10
On the Access Rule Source page, click the Add button and click the Networks button. Then double-click the VPN Clients Network and click Close in the Add Network Entities dialog box, as shown in Figure 11. Click Next .
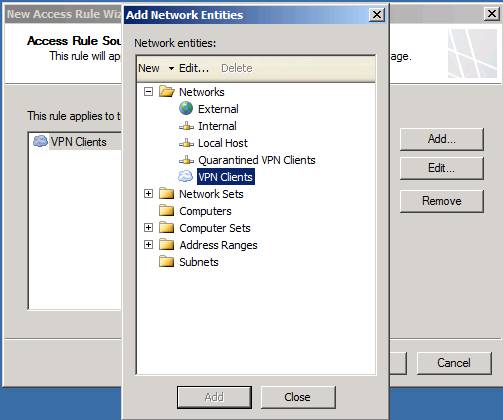
Figure 11
On the Access Rule Destination page, click the Add button. In the Add Network Entities dialog box shown in Figure 12, click the Networks button, and then double-click Internal Network. Click Close in the Add Network Entities dialog box. Click Next .
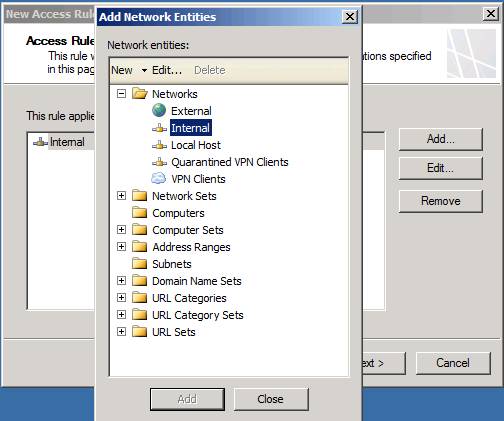
Figure 12
On the User Sets page, shown in Figure 13, use the default entry, All Users . Note that in a production environment, you can restrict which users connect through this rule, or create other rules to apply to remote access VPN clients. Be aware that, when a computer connects via a remote access VPN connection, the TMG firewall will have the user context of the session. That's a good thing - because VPN clients are the same as Firewall Clients (TMG Clients) where the user context is available for connections created through the TMG firewall and allows you to create user-based rules. or a group of users to allow VPN clients to connect to resources behind the TMG firewall.
Click Next .
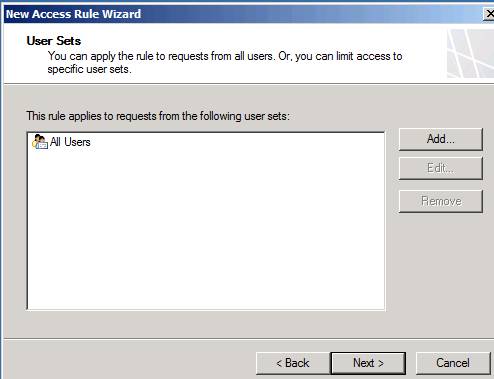
Figure 13
On the Completing page of the New Access Rule Wizard , shown in Figure 14, click Finish .
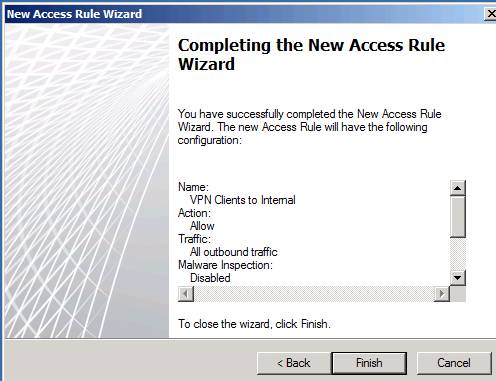
Figure 14
In the middle pane of the TMG firewall console, you will see a new rule appear. Click the Apply button, see Figure 15, to save the changes to the firewall policy.

Figure 15
Now let's test the configuration, using the ping command to the domain controller on the corporate network. And the result is what you see in Figure 16 below, it worked because the rule allowed the connection.
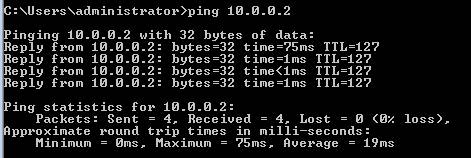
Figure 16
What else do we have to do? Since we have enabled all traffic, we can connect to SMB shares or at least see a list of them on the domain controller. All you see is as shown in Figure 17.

Figure 17
So far everything we have done is good. Next, let's look at the TMG filewall log files, shown in Figure 18, and find out what happens here. You can see details about the ping process that the VPN Clients to Internal rule is allowed to ping the destination 10.0.0.2 . What is most interesting is that there is a user context, which is not what you expect from non-firewall clients. However, as we mentioned earlier, when users connect as a remote access VPN client, you will have user information through the firewall and this information can be used in firewall rules. Note that when user information is received when done with the Firewall (TMG) client, we will not have support for complex protocols as we do with the Firewall (TMG) client.
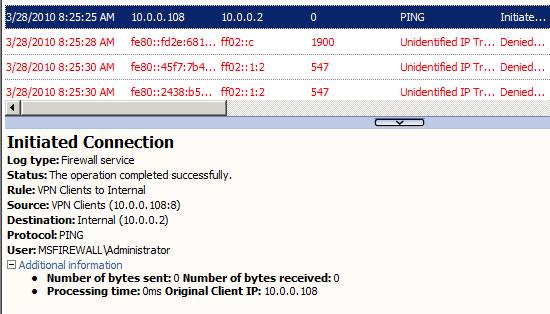
Figure 18
Conclude
In the second part of this article series, I have shown you a simple PPTP remote access VPN connection. We have configured the PPTP VPN server and then created an Access Rule to allow the connection between the VPN client and the resources on the default internal network. However, PPTP is just the beginning, we think we will start with a few simple things and move on to more complex configurations, so in the next part of this series we will figure out how to develop. declare L2TP / IPsec VPN server.
This deployment is a little more complicated because we need to deploy certificates for both VPN clients (CA certificates) and TMG firewall (server certificates). This process requires dexterity because the admissions site utility has changed for Windows Server 2008 R2, which means we won't be able to use that tool to get website certificates easily. easy. In addition, there is a problem with RPC filter and this problem makes using MMC certificates more difficult. Even so we will introduce you to the right solutions to solve those problems in the next section.
You should read it
- ★ Office 2010 requires 'terrible' configuration
- ★ 'Read taste' computer configuration in 2010
- ★ Use the Security Configuration Wizard with TMG 2010
- ★ Check the TMG 2010 virtual private network server - Part 3: Configure TMG Firewall as L2TP / IPsec Remote Access VPN Server
- ★ Virus collection of 2010 from Panda Labs