Step by step install Exchange Server 2010
Facing the increasing demands of organizations and businesses in exchanging information, so that they both save costs, operate faster, are more manageable, more reliable and better security. ..
Table of Contents
TipsMake.com - Prior to the increasing requirements of organizations and businesses in information exchange, so that both saving costs, operating faster, more manageable, more reliable and guarantee For better confidentiality , Microsoft has officially upgraded and expanded and launched Exchange Server 2010 version with outstanding advantages:
- Flexible and reliable. Besides deploying on servers of organizations and businesses like previous versions, now, you have another deployment solution, which is hosting at Microsoft data center (Exchange Online). These two solutions can be coordinated simultaneously.
- Improvements in storage capabilities also help Exchange Server 2010 be deployed more flexibly. Besides storage solutions with Storage Area Networks (SAN), you can also choose the Direct Attached Storage (DAS) solution with SATA disk technology. One of the goals of designing Exchange Server 2010 is to meet the ability to deploy email databases and log files only on one SATA disk. Moreover, thanks to the support of consistent deployment on a 64-bit operating system platform, Exchange Server 2010 significantly reduced reading time compared to previous versions.
- The availability and reliability of the database system is also a factor to be improved on Exchange Server 2010. In addition, there are quite a number of administrative tools that are integrated and upgraded and simplified, helping to save Save time and reduce administrative costs by up to 20%.
- Access anywhere. Improvements on Exchange Server 2010 help users improve work efficiency. With this new version, users are free to use all forms of information exchange such as email, voice mail, chat . with the highest security mechanisms on most operating system versions, browsers web and device. Users can use their inbox to perform almost every exchange on the information channel. Exchange Server 2010 helps users increase productivity, easily collaborate with each other thanks to advanced features.
- Mailbox management tools make it easy for users to organize the contact information they receive each day. Exchange 2010 attaches the ability to automatically organize contact information by subject; Integrated messaging support provided by Microsoft Office Communications Server 2007 R2 and SMS in Outlook Web Access. From there, users are allowed to choose to use a variety of communication tools wherever they can log in to Web mail.
- Unified Messaging (Unified Messaging) with an important emphasis is to integrate improvements on voice mail. With this new version, users can handle voice mail as a way to handle regular mailboxes with tools like Microsoft Outlook or Outlook Web App.
- Protection and compliance. With the development of the Internet and the popularity and importance of email systems today, the protection of email data is a core requirement when you choose a suitable email solution deployed in the unit. mine. Exchange 2010 provides integrated control and protection tools, helping you to simplify and automate email security activities.
- The new IRM integrated email protection rules (Information Rights Management) help you protect sensitive business information. You can automatically apply IRM policies for both regular email and voice mail.
- New integrated policy platform on Exchange 2010 allows administrators to identify, deploy and automate email data storage operations. Besides the general policies of the system, users can also choose and apply the appropriate policies themselves. With a highly flexible mechanism, administrators can automatically or decentralize their employees to secure their own data. In addition, with centralized management, blocking, limit, encryption . Exchange 2010 maximizes the ability to protect user information.
2. System requirements
To install Exchange Server 2010 Standard or Enterprise, you need to ensure the server meets the minimum software and hardware system configuration as follows:
IngredientRequest
Operating system
Windows Server 2008 SP2 64-bit, Windows Server 2008 R2 64-bit
Processor
Intel EM64T, AMD 64
RAM memory
8 GB with Exchange Server running roles simultaneously: Mailbox, Client Access, Hub Transport, plus 5 MB corresponding to each user mailbox
Hard disk
1.2 GB used to install Exchange Server,
200 MB for system drive,
500 MB uses to store transport queues for the Edge Transport server or Hub Transport server,
NTFS filesystem
Installation drive
DVD-ROM
3. Update the required components before installing Exchange
3.1. Install hotfixes for Windows Server 2008 SP2
After completing the installation of Windows Server 2008 64-bit Standard or Enterprise on an Exchange Server 2010 server, download Service Pack 2 of this operating system at www.microsoft.com. Next, run the downloaded file and follow the instructions for installing SP2 to the server (Figure 1-1).
Next, you install Exchange 2010 SP1 hotfixes for Windows Server 2008 SP2, including update packages such as: KB977624, KB979744, KB979917, KB973136 and KB977592.

Install Windows Server 2008 Service Pack 2
3.2. Install .NET Framework 3.5 SP1 and necessary components
Before installing Exchange Server 2010 on the server, you need to install the necessary components on Windows Server 2008 SP2. The first is the .NET Framework 3.5 SP1. Once successfully downloaded from the www.microsoft.com website, run the installation file and follow the instructions to install the .NET Framework 3.5 SP1 on the server.
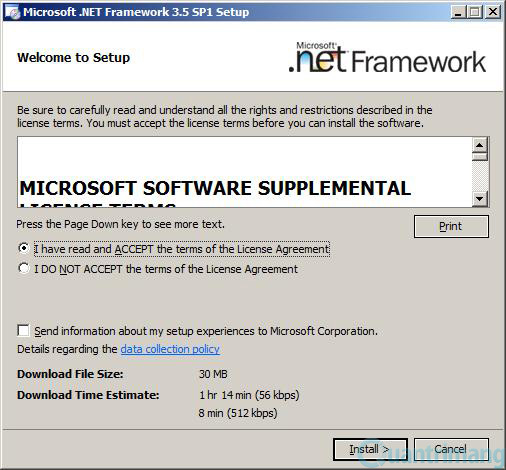
Install the .NET Framework 3.5 SP1
Next, install the Remote Management (WinRM) 2.0 and Windows PowerShell V2 components on the server. To do so, download the KB968930 update package and install it on the server.
With the Exchange server taking on the Hub Transport or Mailbox roles, you need to install the Microsoft Filter Pack. With Exchange Server 2010 SP1, download Microsoft Office 2010 Filter Pack and install it on the server.
Besides, .NET Framework 3.5 Family Update 64-bit and KB979099 update package also need to be downloaded and installed on the server.

Install KB979099 update package on the server
Finally, move to the Scripts folder in the Exchange Server 2010 installation source to perform the installation of the necessary components for the operating system:
sc config NetTcpPortSharing start = auto
ServerManagerCmd -i Desktop-Experience
These commands are executed on the server that accepts Client Access, Hub Transport, Mailbox, and Unified Messaging roles:

Install the necessary components for the operating system
3.3. Install Active Directory Domain Services and related services
To prepare the service infrastructure for Exchange Server 2010, you need to install the necessary services on Windows Server 2008. The first is Active Directory Domain Services. To install, open the Server Manager window. In the left pane, click on the Roles item. In the corresponding right pane, click the Add Roles link.
In the Select Server Roles window, click Active Directory Domain Services and follow the instructions screen to install this service on the server.
Hint: Refer to the Windows Server 2008 Administration book for details on how to install and administer Active Directory Domain Services.
Next, with Active Directory Lightweight Directory Services , you also use the Server Manager window and perform the same steps to install this service on the server.
Web services also need to be installed on Windows Server 2008. To do so, you also select the Web Server (IIS) entry in the Server Manager window. After successfully installing Web Server (IIS), you need to add components for this service. To do so, in the Server Manager window, click the installed Web Server (IIS) service, and click the Add Features link. Next, in the Select Role Services window, click Static Content Compression and Dynamic Content Compression items , and follow the instructions screen to add components to the Web Server (IIS).
With Windows Process Activation Service and Windows PowerShell , you install on the server by selecting Features in the left pane of the Server Manager window. Also, in the right pane, click the Add Features link. In the Select Features window, check the two items and follow the instructions screen to add to the server.

Install Windows Process Activation Service and Windows PowerShell
With Net. Tcp Port Sharing Service, you need to make sure this service automatically starts the system. To configure, expand the Configuration section in the left pane of the Server Manager window, select Services . Also, in the right pane, double-click the Net item . Tcp Port Sharing Service .
In the Net dialog box . Click Port Sharing Service Properties , in the Startup type section, click the arrow and select Automatic service startup type. After done, press the OK button.
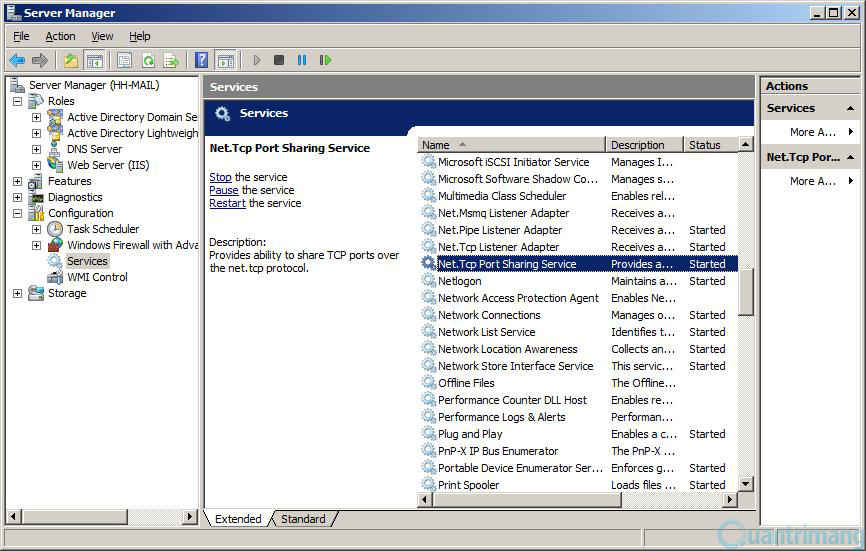
Open the Net services properties window.Tcp Port Sharing

Switch to service startup mode with the system
4. Install Exchange Server 2010
After completing the preparation, proceed to install Exchange Server 2010 according to the following steps:
1. Launch the Exchange Server 2010 installation program. Soon, the Exchange Server 2010 installation wizard screen will automatically appear.
2. Here, click on the Step 3: Choose Exchange Language Option link .

Run the Exchange Server 2010 installation program
Next, click the appropriate option to install languages that support Exchange deployment, such as Install only languages from the DVD .
3. After completing the language-related installation, click the link Step 4: Install Microsoft Exchange .

Install language options

Install Exchange Server 2010
4. In the Introduction of the Exchange Server 2010 Setup screen , look at the introductory information about Exchange Server 2010 and click the Next button.

Introduction to Exchange Server 2010
5. In the License Agreement screen, select I accept the terms in the license agreement and click the Next button.

Agree to the license to use Exchange Server 2010
6. In the Error Reporting screen, select Yes so that the system automatically sends error messages to the manufacturer. Then, click the Next button.

Automatically send error messages to the manufacturer
7. On the Installation Type screen, select Typical Exchange Server Installation to install all Exchange Server roles on a server.

Select Typical installation type
Custom Exchange Server Installation option allows you to deploy roles on different servers. Details on how to implement this are detailed in Chapter 2. Distributed deployment of Exchange Server 2010 roles .
8. In the Exchange Organization screen, enter the name corresponding to the organization or business and click the Next button.
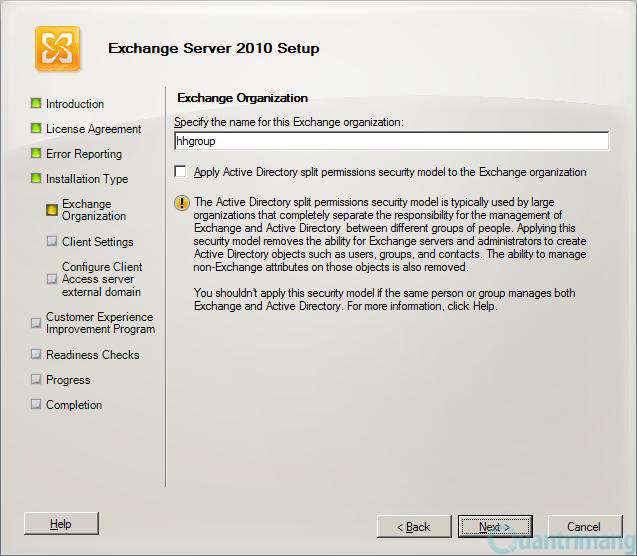
Enter the name of the organization or business
9. In the Client Settings screen, select Yes to allow network clients to use Outlook 2003 to communicate with Exchange Server 2010. After selecting, click the Next button.
10. In the Configure Client Access server external domain screen , you enter the name of the access to the Exchange server for workstations that do not belong to your domain, such as mail.hhgroup.com. Once completed, click the Next button.

Allow network workstations to use Outlook 2003

Enter domain name so that external workstations access Exchange Server 2010
11. In the Customer Experience Improvement Program screen , you can join the Microsoft improvement program by selecting Join the Exchange Customer Experience Improvement Program . On the other hand, if you don't intend to join at this time, you choose I don't wish to join the program at this time . Once done, click the Next button.

Join the Microsoft improvement program
12. In the Readiness Checks screen, the installation program will perform the necessary test operations to ensure the components are fully installed and configured correctly.
If it detects that there are certain components that have not been properly installed or configured, the installation program will display an error message and provide suggestions for troubleshooting.
13. If the components are configured and installed correctly, you will get Completed status in all roles. At this point, click the Install button to install Exchange Server 2010 on the server. Soon, the installation process will take place.

Some components have not been installed correctly

Install Exchange Server 2010 on the server
14. When the Completion screen appears, click the Finish button to complete the Exchange Server 2010 installation.

Complete the Exchange Server 2010 installation
15. When the Microsoft Exchange Server 2010 SP1 warning box appears, request to restart the server for changes to the system to take effect, click the OK button and restart the server.

Restart the server
5. Perform the operations after installing Exchange
After installing Exchange Server 2007 on the server, you need to do some operations to make sure the system works properly. These operations are suggested in the Exchange Management Console window, on the Post-Installation Tasks tab.

Actions to perform after installing Exchange 2010
Enter the Product Key
The first operation to do after installing Exchange Server 2010 is to enter the corresponding product key. To do this, open the Exchange Management Console window from the Start menu. In the left pane of this window, select Server Configuration . In the middle pane, click on the server name. In the right pane, click the Enter Product Key link .
In the Enter Product Key window, enter the key sequence that you purchased the license to and press Enter .

Select the server to fill out the Product Key

Enter the Product Key
Check the successful installation status of Exchange
To ensure that Exchange Server 2010 services and components are fully and correctly installed, open the Exchange Management Shell window from the Start menu. Next, you execute the command:
Get-ExchangeServer | Format-List

Execute the command to display Exchange status information
Soon, detailed information about the Exchange Server 2010 system will appear. At this screen, you will have all the information about the Exchange system installed.

Exchange Server 2010 status information
Download and install the latest Exchange update packages
You should also update your Exchange 2010 system by clicking the Step 5: Get critical updates link for Microsoft Exchange in the Exchange Server 2010 installation screen.

Update Exchange Server 2010 system
Summary : In the three presentations, you learned an overview of Exchange Server 2010. Superior improvements make it simple, easy to use and especially reduce costs, making this new version a options are very interested in businesses. Also, with detailed step-by-step instructions, you can easily deploy Exchange Server 2010 systems in your unit.
Was this article helpful?
Your feedback helps us improve.
Related Articles
 Introducing Exchange Server 2019, how to install Exchange Server 201916 minutes read
 Backup for Exchange Server with DPM 2007 (Part 1)12 minutes read
 Transfer from Linux Mail Server to Exchange Server 2007 (Part 1)10 minutes read
 Discover EMC in Exchange Server 2010 (Part 2)4 minutes read
 Forward from Exchange 2000/2003 to Exchange Server 2007 (part 2)8 minutes read
 Backup for Exchange Server with DPM 2007 - Part 2: Configure DPM 200710 minutes read
Reader Comments 0
Sign in with email or Google to join the discussion.