Install and configure email handling solutions on TMG 2010 Firewall - Part 3
In this section, I will show you what you can do when configuring the anti-spam features on the TMG 2010 firewall.
Network Administration - In this section, I will show you what you can do when configuring the anti-spam features on the TMG 2010 firewall.
 Install and configure the solution to handle email on TMG 2010 Firewall - Part 1: Installation
 Install and configure email handling solutions on TMG 2010 Firewall - Part 2: E-Mail Policy
In the second part of this article series, we went over some of the necessary procedures for the Email Protection components to work. We have configured the incoming SMTP listener listener , which is used to accept incoming mail, and configure the outgoing SMTP listener , used to send mail. In addition, we have enabled Forefront Protection for Exchange components and Exchange Edge to enable anti-spam and anti-virus protection. In this third part, we will show you what you can do when configuring the anti-spam features on the TMG 2010 firewall.
Spam filtering configuration ( Spam Filtering )
Spam Filtering tab in the middle pane of the console. Here you can see the collection of options for configuring Spam Filters . Those are the options:
- IP Allow List: Allows you to configure the IP address set so that messages are always accepted from there.
- IP Allow List Providers: Allows configuration of the address of one or more IP Allow List providers.
- IP Block List: Allows you to configure a list of addresses you never receive mail from.
- Content Filtering: Allows blocking email based on the content of the message.
- Recipient Filtering: Allows control of email distribution based on recipients.
- Sender Filtering: Allows controlling the delivery of email based on sender.
- Sender ID: Controls whether to allow or deny email based on the presence of a Sender ID record.
- Sender Reputation: Allows you to allow or deny mail based on the sender's name.
Let's start by clicking the IP Allow List option .
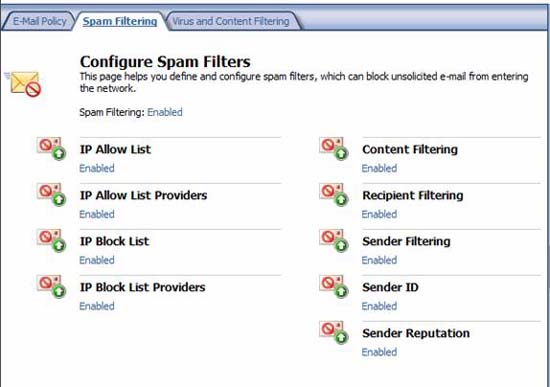
Figure 1
IP Allow List
In the IP Allow List dialog box, click the Allowed Addresses tab. Here you can add an address, a range of addresses you want to receive mail from.
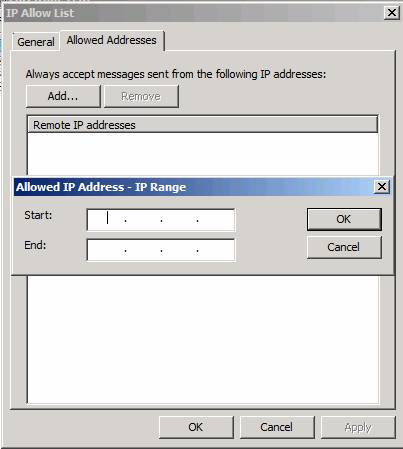
Figure 2
Allow List Providers IP
Click the Allow List Providers IP option in the middle pane of the console. In the Allow List Providers IP dialog box, click the Providers tab. Here you can configure a list of allowed IP Allow List Providers providers. Click the Add button to add a new entry. If you want to enter an address, you only need to enter the same address in the Start and End fields.
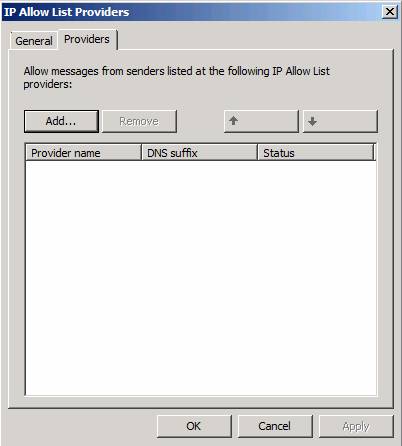
Figure 3
In the IP List Provider dialog box, you can enter the following information:
- Provider name . Enter the name of the provider in this text box. This is only identifiable, it is not a value used by the system.
- Lookup domain . This is the domain name of the IP Allow List provider.
- Match nào nào không thể thay thế . This option allows the system to match any IP address status code.
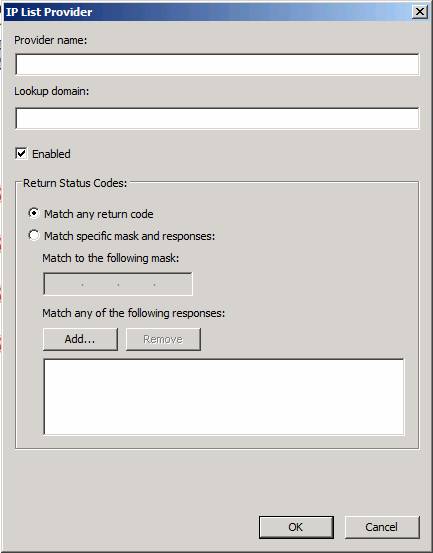
Figure 4
IP Block List
Click the IP Block List option in the middle pane of the TMG firewall console. You will now see the IP Block List dialog box. Click the Blocked Addresses tab. On this tab you can click the Add button to add one or more addresses that you never want to receive mail from. Messages from these addresses will be blocked.
Note that in the Blocked IP Address dialog box - IP Range you can choose:
- Never let this address expire (never expires) or
- Block until date and time (locked to a certain time)
These are very useful options if you want to temporarily lock mail from a range of addresses, possibly due to a spam operation, but then you want to allow redistribution when that problem is fixed. .
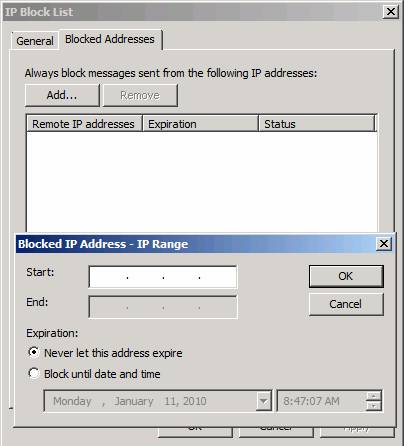
Figure 5
Click on the Providers tab. This Providers tab has the same options as what we saw in the IP Allow List dialog box, the items here are similarly done.
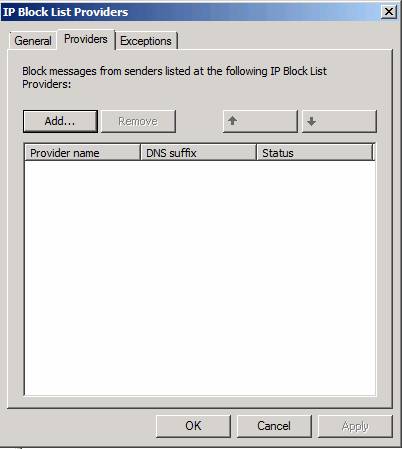
Figure 6
The IP List Provider dialog box is the same as what is provided in the IP Allow List option , showing the provider name, DNS suffix, and status columns. To add a provider, click the Add button.
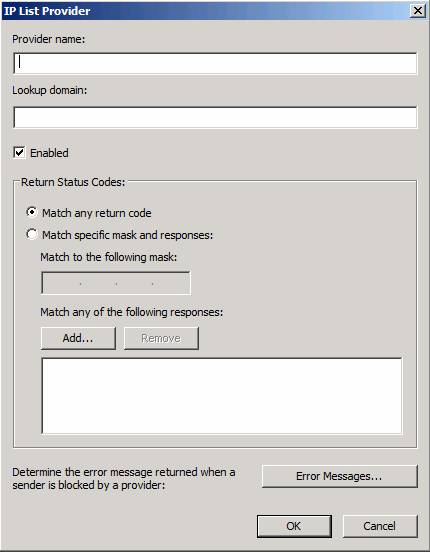
Figure 7
If you click the Error Messages button, you will see the IP dialog Blocking List Provider Error Message . This feature is not documented at this time, but it is a feature that allows error messages to be sent back to providers that you block their messages.
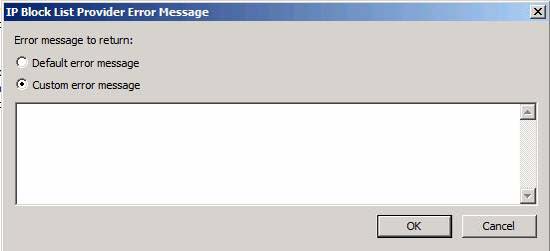
Figure 8
You can use the default error message or you can create a custom message. If you select the following option, you need to type the content of the message into the text box, then click OK .
Content Filtering
Click the Content Filtering option in the middle pane in the console, and you will see the Content Filtering dialog box appear. Click the Custom Words tab. On the Custom Words tab, click the Add button. In the Add Word or Phrase dialog box, you can enter keywords to allow or block when it is in the content of the message. Note that there are two Add buttons in this dialog box: one always allows and one always locks when the keyword appears.
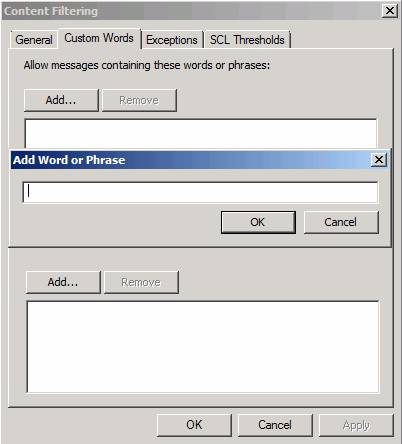
Figure 9
What if you want to receive mail from certain senders even though their messages contain keywords that you block? No problem - you just need to make an exception.
Click the Exceptions tab. When you click the Add button, you can enter the Add E-mail address dialog box for the sender that you do not want the mail sent from that address to be filtered.
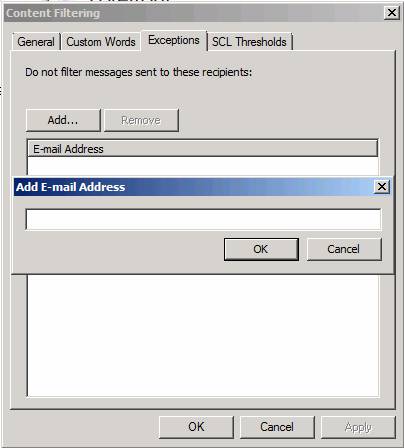
Figure 10
Click the SCL Thresholds tab, SCL stands for 'Spam Confidence Level'. Content Filter agent uses Microsoft SmartScreen technology to check messages and assign it to a SCL rating. Scores are rated from 0 to 9. The higher the number, the higher the risk of spam. The Content Filter handles messages after Exchange 2010's other anti-spam agents have been applied, which reduces the number of messages that need to be checked by the Content Filter. For more information about the order in anti-spam agents, you can refer to the information from Microsoft here.
You can adjust the SCL action threshold to match your organization's needs. The thresholds here are SCL values that, when crossed over that threshold, an action (delete, remove or isolate) will be executed.
Here you have three important options:
- Xoá các thư mà có một giá trị SCL lớn hơn hay bằng (Delete messages with SCL value greater than or equal to)
- Thông báo Re thể mà có một giá trị SCL lớn hơn hoặc bằng (exclude messages with SCL value greater than or equal to)
- Quarantine messages that have an SCL giá trị lớn hơn hoặc bằng (Quarantine mail with SCL value greater than or equal to)
When enabling these options, the default value will be 9. That means that most messages to the Content Filtering filter station will go through and reach the user's inbox. If, for example, you set the Delete value to 7, then all messages with SCL values equal to 7 or higher will be deleted.
When the message is deleted, the sending system will not be alerted. In the case of removal, the Content Filter sends a discard message to the sending system.
You also have an option to send discarded messages to a quarantined mailbox address ( Quarantine mailbox address ). You need to check this quarantined mailbox periodically and decide what you need to do with the messages here.
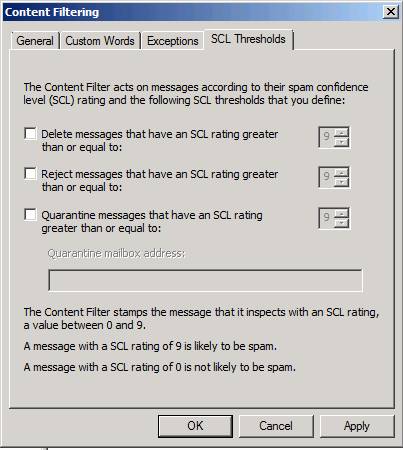
Figure 11
If a SCL of certain messages is below the set values for Delete, Reject and Quarantine thresholds, the message will still have to go through the Junk mail filter, which will take all the messages in the Junk Mail folder of Users enter where users can review them and decide whether to mark them as 'not junk'. If the SCL value is lower than the Junk mail threshold, those messages will go directly to the user's Inbox.
You do not set the Junk Mail threshold here; however, you can do that with the Set-Mailbox cmdlet in the Exchange Management Shell. For more information on Set-Mailbox cmdlet, please refer here.
Recipient Filtering
Can also filter mail by the recipient. Click the Recipient Filtering option in the middle pane of the firewall console. You will then see the Recipient Filtering dialog box appear. Click the Blocked Recipients tab. Here you have the option of Block messages sent to recipients not listed in the Global Address List . This option allows you to prevent delivery to addresses such as administrator@yourdomain.com.
You can also enable the block the following recipients option . This option allows you to prevent external mail being delivered to certain addresses that they are only allowed to use within the organization. After activating that option, you can click the Add button to add the email address of the recipient you want to lock.
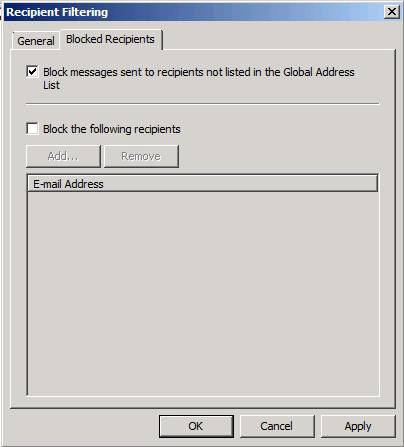
Figure 12
Sender Filtering
You can lock mail based on the sender. Sender Filter agent uses MAIL FROM: SMTP header to determine which messages need locking. You can lock a sender, an entire domain or domains with all subdomains. Note that the MAIL FROM: SMTP header may be spoofed, so it may affect the sender filtering plan here. You can use Sender ID (discussed in the next section) to prevent spoofed mail of this type.
Click the Sender Filtering option in the middle pane of the TMG firewall console. In the Sender Filtering dialog box, click the Blocked Senders tab. Here you can click the Add button to open the Blocked sender dialog box. You can choose to enter the address of a certain sender, or you can block the entire email domain.
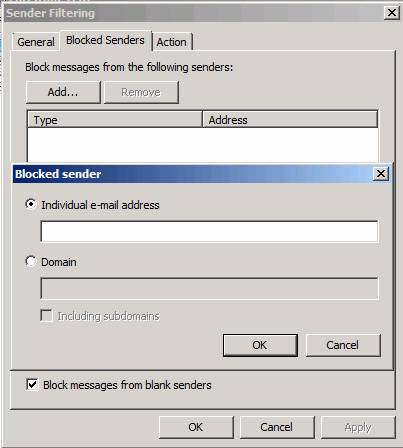
Figure 13
The Action tab tab, you'll see there are two options for matching sender:
- Reject the message
- Stamp thông báo với mật khẩu đã đóng và tiếp tục xử lý (Stamp for the sender's mail locked and continue processing)
The second option allows other components in the email solution to make decisions based on the information of this title. The action of marking messages from locked senders will be used in calculating SCL values.
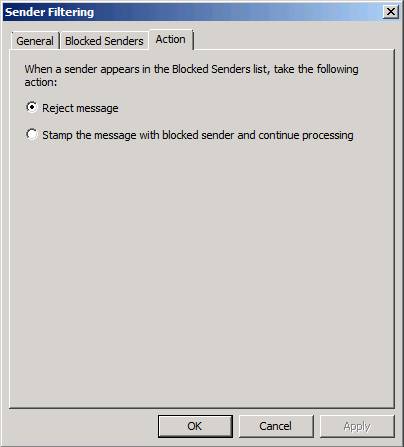
Figure 14
Sender ID
The Sender ID agent uses the RECEIVED SMTP header to send a query to the sending system's DNS in order to verify that the IP address the message sent from is authenticated for sending mail from a domain listed in the title. The only problem is that domain administrators must set up sender policy framework (SPF) records on their DNS servers. To learn more about how to use Sender ID, you can refer to this link.
To configure Sender ID, click the Sender ID option in the middle pane of the TMG firewall console. Click the Action tab. Here you will have three options that occur when the Sender ID test action fails:
- Reject message
- Stamp message with Sender ID and continue processing (Stamp and continue processing)
- Delete message (Delete message)
When the message is removed, it sends an SMTP error to the sending server. When you select the Delete option, the message will be deleted without any notification to the sending server. In the other case, the message is stamped when it fails to check the Sender ID, which is used by the Junk Mail filter in Outlook to calculate the SCL value.
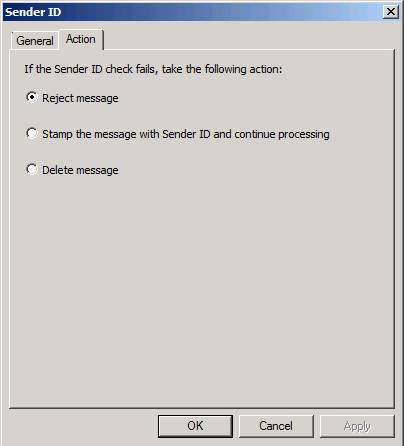
Figure 15
Sender Reputation
Sender Reputation (Sender Reputation) uses the published information about the sender to calculate the value of Sender Reputation Level (SRL). To configure Sender Reputation, click the Sender Reputation option in the middle pane of the console.
The Sender Reputation Level works just like the Spam Confidence Level, where the sender's value is set to 0 to 9 and you can configure the threshold to block mail from entering the organization. The sender is added to the Blocked Senders list and you can configure a certain amount of time for maintaining this sender to be in the list.
In the Sender Reputation dialog box on the Sender Confidence tab. Here you have the option Perform a test open proxy when deciding sender confidence level .
This is an interesting option. It connects to the sender's IP address by sending an SMTP message. If the TMG firewall detects that the SMTP server will allow it to send mail to itself, then the sending SMTP server is an SMTP relay to open. Open SMTP relay can be used by spammers to send email spam to email domains around the world, and will instantly red flag what happened to the messages when they passed a server like so.
You will see the SMTP relay open when someone configures a server error, or when someone is infected with malware and acts as an SMTP relay. In that case, do not want to receive mail from an SMTP relay to open, so you should enable this option.
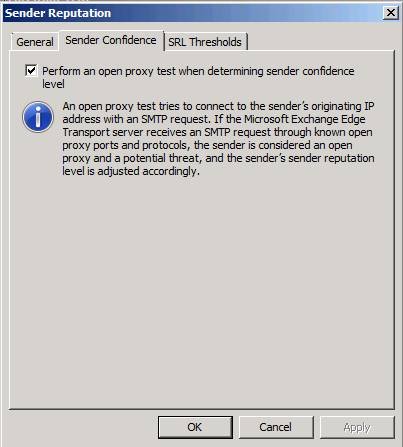
Figure 16
In threshold configuration, the best thing to do is to use the default values first, then gradually increase the threshold over time until you reach the point where there are many mistakes, then gradually reduce the value to the most reasonable.
Note that you can also customize the Threshold Action threshold. This value allows you to configure how long it takes to lock an SMTP server before allowing it to receive mail back. This method allows you to be more flexible because often problems are temporary, you definitely won't want to permanently lock a sender.
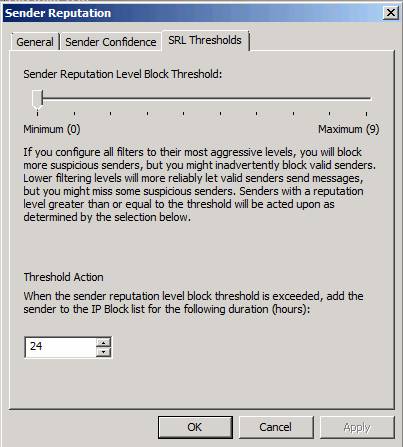
Figure 17
Conclude
In the third part of this series, we learned about some of the configuration options available in tweaking the spam lock feature. However, there are many options, but not all of them need configuration. The most interesting and useful options are those related to Sender Reputation, Recipient Filtering and Content Filtering. Most spam is sent through a well-known server, so locking mail based on sender reputation (sender reputation) is a very useful method to help you reduce up to 95% spam. . Recipient filtering is also an effective method, because spammers often send a large amount of mail to addresses that do not exist in your organization. Finally, content filtering allows sophisticated analysis of messages with SCL values used to determine whether the message is spam, which is an extremely method useful when the sending server is a desktop computer that has been hijacked and becomes part of the botnet. In the next part of this series, I will show you the options for filtering content and viruses.
Was this article helpful?
Your feedback helps us improve.
Related Articles
 Install and configure email handling solutions on TMG 2010 Firewall - Part 2: E-Mail Policy13 minutes read
 Install and configure email handling solutions on TMG 2010 Firewall - Part 510 minutes read
 Install and configure email handling solutions on TMG 2010 Firewall - Part 413 minutes read
 Install and configure the solution to handle email on TMG 2010 Firewall - Part 1: Installation17 minutes read
 How to Configure Firewall on Debian Using UFW4 minutes read
 Check the TMG 2010 virtual private network server - Part 2: Configure TMG Firewall as the PPTP Remote Access VPN Server16 minutes read
Reader Comments 0
Sign in with email or Google to join the discussion.