TMG 2010 ISP Redundancy feature (Part 2)
Network Administration - In the first part of this series, we have a look at the virtual network system and some of the tasks that need to be done with the communication to support Multi-ISP.
>> TMG 2010 ISP Redundancy Feature (Part 1)
In this second part, we will perform the configuration for ISP Redundancy, then learn how ISP Redundancy works.
Configure ISP Redundancy
First, open TMG Firewall Console and click on Networking node in the left panel of this Console. In the Task Pane , select the Tasks tab, then click the Configure ISP Redundancy link as shown in Figure 1.

Then ISP Redundancy Configuration Wizard will appear. On the Welcome to the ISP Redundancy Configuration Wizard page , click Next .

On the ISP Redundancy Mode page, we can choose one of the following two options:
Load balancing with failover capability . This option allows us to use both ISPs simultaneously. We can set a priority ISP with most of the traffic going through, or we can install traffic for these two ISPs alike. Select this option if we want to maximize bandwidth usage without paying attention to bandwidth costs for both ISPs. If an ISP stops working, all traffic will go through the remaining ISP connection.
Failover only . Select this option if we only want to use an ISP, but want the remaining ISP to be used in case the first ISP doesn't work. Select this option if we don't want to pay the bandwidth for both ISPs, but still want to make sure we can connect even if the primary ISP fails. This is a suitable option if we have to pay bandwidth costs for the second ISP.
In this example we will select the Load balancing option with failover capability and click Next .

On the ISP Connection 2 page, we will configure the first ISP link. We will name this connection RRAS1 because this will be the connection via the RRAS1 NAT server to perform the first ISP simulation. Since we are using separate NICs (Network Interface Controllers) for each ISP connection, we can select the NIC that connects us to RRAS1 in the Network adapter (optional) drop-down list. Note that after selecting this NIC, the secondary network address helps determine the default port for that NIC in the internal address of the RRAS1 NAT server, listed in the Subnet box. Remember that each ISP must be on a different Network ID, meaning that each ISP connection is on a separate secondary network. Now click Next .

On the ISP Connection 1 page - Configuration , check the Gateway address and Mask . Also confirm whether the Subnet box has Subnet Mask correctly. We can enter a Primary DNS Server and an Alternate DNS Server if you want, but we should not configure the firewall to use external DNS servers, and it is best not to enter any addresses into two boxes. this. There are also cases where we need to enter the external IP address for DNS servers on the TMG firewall system, but in this case it is not necessary. Then click Next .

On the ISP Connection 1 - Dedicated Servers page , enter the IP addresses of servers that regularly use this ISP connection. Usually these are servers on the ISP's network that are not accessible from external networks, such as Time and DNS servers. In addition, SMTP servers are usually located on the ISP network for external mail that does not appear from the external network. Since we do not use the transducers in this example, and are using Internet Time servers, we will not import any Ip addresses for dedicated servers.
Note that if we enter IP addresses for dedicated servers, and if that ISP crashes, the connection will not be forwarded to another ISP. However, this is not a serious problem because these IP addresses will not be accessible from external networks. Then click Next .

>> TMG 2010 ISP Redundancy Feature (Part 1)
In this second part, we will perform the configuration for ISP Redundancy, then learn how ISP Redundancy works.
Configure ISP Redundancy
First, open TMG Firewall Console and click on Networking node in the left panel of this Console. In the Task Pane , select the Tasks tab, then click the Configure ISP Redundancy link as shown in Figure 1.
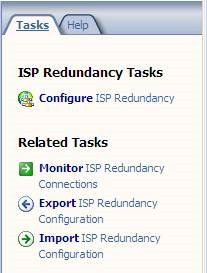
Figure 1
Then ISP Redundancy Configuration Wizard will appear. On the Welcome to the ISP Redundancy Configuration Wizard page , click Next .
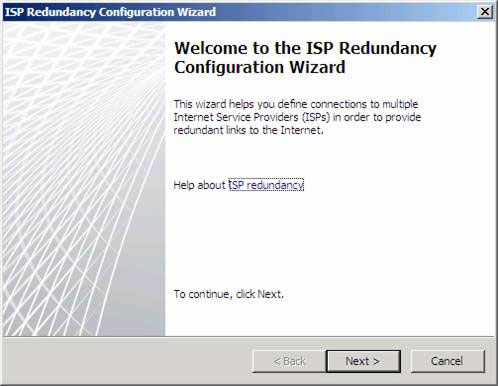
Figure 2
On the ISP Redundancy Mode page, we can choose one of the following two options:
Load balancing with failover capability . This option allows us to use both ISPs simultaneously. We can set a priority ISP with most of the traffic going through, or we can install traffic for these two ISPs alike. Select this option if we want to maximize bandwidth usage without paying attention to bandwidth costs for both ISPs. If an ISP stops working, all traffic will go through the remaining ISP connection.
Failover only . Select this option if we only want to use an ISP, but want the remaining ISP to be used in case the first ISP doesn't work. Select this option if we don't want to pay the bandwidth for both ISPs, but still want to make sure we can connect even if the primary ISP fails. This is a suitable option if we have to pay bandwidth costs for the second ISP.
In this example we will select the Load balancing option with failover capability and click Next .
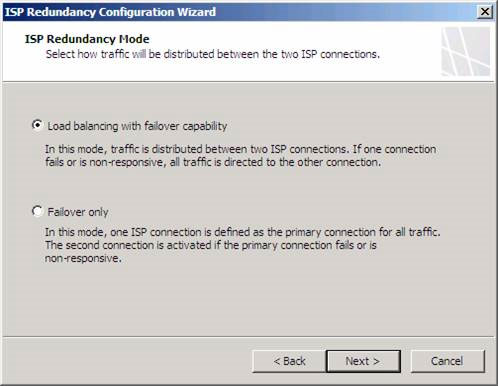
Figure 3
On the ISP Connection 2 page, we will configure the first ISP link. We will name this connection RRAS1 because this will be the connection via the RRAS1 NAT server to perform the first ISP simulation. Since we are using separate NICs (Network Interface Controllers) for each ISP connection, we can select the NIC that connects us to RRAS1 in the Network adapter (optional) drop-down list. Note that after selecting this NIC, the secondary network address helps determine the default port for that NIC in the internal address of the RRAS1 NAT server, listed in the Subnet box. Remember that each ISP must be on a different Network ID, meaning that each ISP connection is on a separate secondary network. Now click Next .
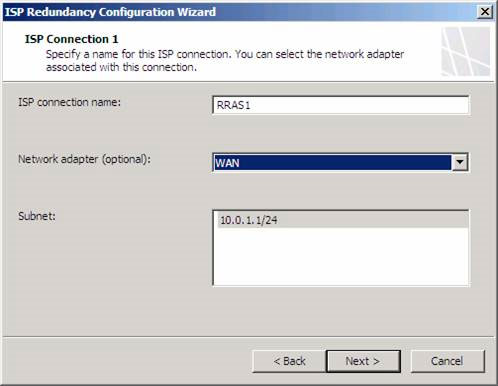
Figure 4
On the ISP Connection 1 page - Configuration , check the Gateway address and Mask . Also confirm whether the Subnet box has Subnet Mask correctly. We can enter a Primary DNS Server and an Alternate DNS Server if you want, but we should not configure the firewall to use external DNS servers, and it is best not to enter any addresses into two boxes. this. There are also cases where we need to enter the external IP address for DNS servers on the TMG firewall system, but in this case it is not necessary. Then click Next .
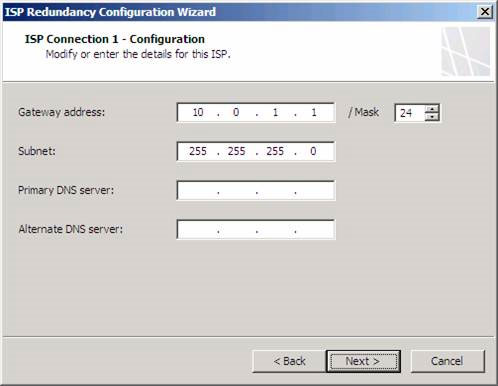
Figure 5
On the ISP Connection 1 - Dedicated Servers page , enter the IP addresses of servers that regularly use this ISP connection. Usually these are servers on the ISP's network that are not accessible from external networks, such as Time and DNS servers. In addition, SMTP servers are usually located on the ISP network for external mail that does not appear from the external network. Since we do not use the transducers in this example, and are using Internet Time servers, we will not import any Ip addresses for dedicated servers.
Note that if we enter IP addresses for dedicated servers, and if that ISP crashes, the connection will not be forwarded to another ISP. However, this is not a serious problem because these IP addresses will not be accessible from external networks. Then click Next .
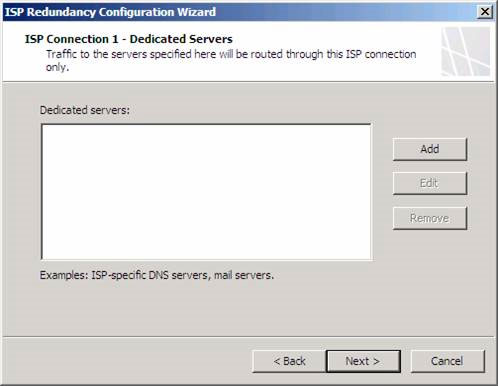
Figure 6
On the ISP Connection 2 page, we'll redo the operations performed on similar ISP 1 pages. In this example, ISP2 will make the connection through the RRAS2 NAT server. Note that the Subnet is on a Network ID other than the first ISP connection. Now click Next .

Check the settings on the ISP Connection 2 - Configuration page and click Next .

On the ISP Connection 2 - Dedicated Servers page , enter the IP addresses of the servers that can be accessed from the second ISP connection. The limitations and principles of the first ISP connection will apply to this ISP connection. Now click Next .

On the Load Balancing Configuration page, we will configure traffic for connections. If the connections are the same, normally we will set the traffic for them equally. However, if ISPs have a speed difference, we will install larger traffic for a high-speed ISP connection. In this example, RRAS2 is faster than RRAS1, so we will install them to receive 75% of the traffic, and RRAS1 is 25%. Connections are based on the method we mentioned in Part 1. Click Next .

Check the settings on the Completing the ISP Redundancy Configuration Wizard page and click Finish .

After clicking Finish , a dialog box will appear asking to add a static route for each DNS IP address configured on the external network adapters on all Forefront TMG servers. We need to do this to ensure that DNS requests are routed through the appropriate network adapter.
The reason we need to manually create static routes for ISPs is that automatic routing works with ISP Redundancy only works when there is a NAT relationship between source and destination. Because DNS connections come from TMG Firewall, this connection will have a route relationship, because all connections from Local Host Network to any other network use a route relationship. Then click OK .

Click Apply to save the firewall configuration. Enter the change description in the Configuration Change Description dialog box if you want, then click Apply on this dialog box. Click OK in the Saving Configuration Changes dialog box.
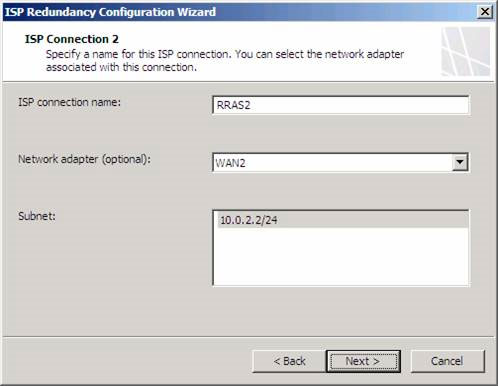
Figure 7
Check the settings on the ISP Connection 2 - Configuration page and click Next .
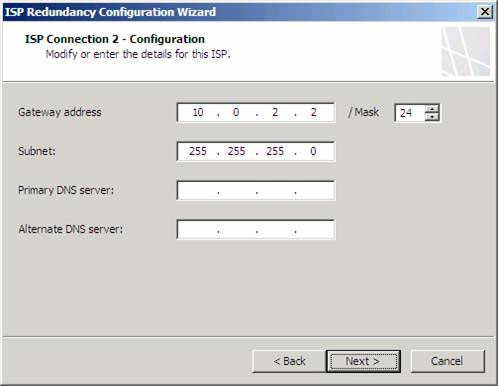
Figure 8
On the ISP Connection 2 - Dedicated Servers page , enter the IP addresses of the servers that can be accessed from the second ISP connection. The limitations and principles of the first ISP connection will apply to this ISP connection. Now click Next .
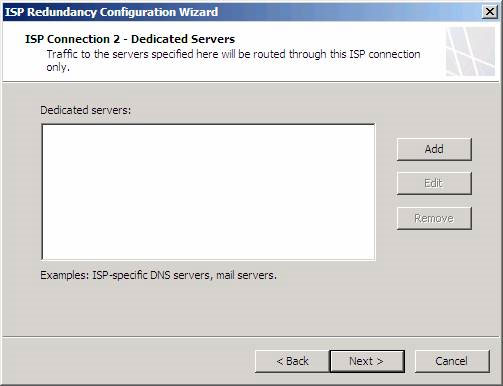
Figure 9
On the Load Balancing Configuration page, we will configure traffic for connections. If the connections are the same, normally we will set the traffic for them equally. However, if ISPs have a speed difference, we will install larger traffic for a high-speed ISP connection. In this example, RRAS2 is faster than RRAS1, so we will install them to receive 75% of the traffic, and RRAS1 is 25%. Connections are based on the method we mentioned in Part 1. Click Next .
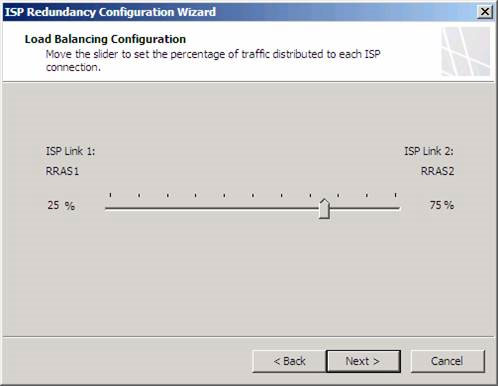
Figure 10
Check the settings on the Completing the ISP Redundancy Configuration Wizard page and click Finish .
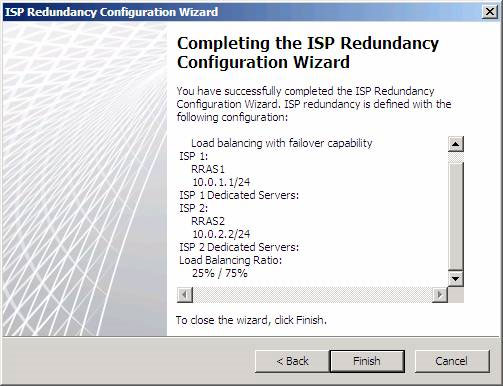
Figure 11
After clicking Finish , a dialog box will appear asking to add a static route for each DNS IP address configured on the external network adapters on all Forefront TMG servers. We need to do this to ensure that DNS requests are routed through the appropriate network adapter.
The reason we need to manually create static routes for ISPs is that automatic routing works with ISP Redundancy only works when there is a NAT relationship between source and destination. Because DNS connections come from TMG Firewall, this connection will have a route relationship, because all connections from Local Host Network to any other network use a route relationship. Then click OK .
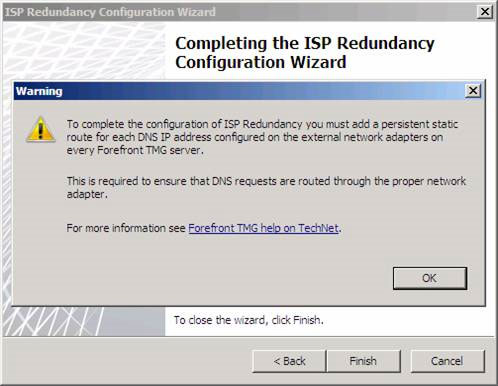
Figure 12
Click Apply to save the firewall configuration. Enter the change description in the Configuration Change Description dialog box if you want, then click Apply on this dialog box. Click OK in the Saving Configuration Changes dialog box.
ISP Redundancy method of operation
Next we will learn how the ISP Reducdancy feature works. The first object will be the Dashboard . Here we can see information about Network Status for ISP connections. In Figure 13, we can see Status , Uptime and Bytes / Sec (Byte speed per second) being used by every ISP.

What do we have to do to change ISP Redundancy settings? Just click on the Networking node in the left panel of TMG Firewall Console and then double-click the ISP connection you want to change. In Figure 14, we can see the General tab of the dialog box RRAS1 Properties . Here we can change the Name , Gateway IP Address , Mask , Subnet , Connectivity Detection and Load Balancing Ratio .
Note that Connectivity Detection is not displayed in this Wizard. It has three options, including:

We can confirm this by examining part of Netmon as shown in Figure 15. IP addresses 10.0.2.3 and 10.0.1.3 are the external addresses on the TMG Firewall connecting to each ISP connection. The destination address 192.33.4.12 is the IP address of one of the original DNS servers on the Internet. However, they are not DNS queries, but are connections via TCP port 53 to the original DNS servers. If we check the decryption section, we will see that there is no information about the DNS protocol. We only see a three-way connection.

The method that TMG Firewall determines a connection to be disconnected and how does it determine a connection to work again?
Many servers are probed to confirm whether there is a connection problem through a particular ISP. If many of the original DNS servers cannot respond to a specific ISP, TMG will retry this connection (up to three times) every 60 seconds before switching to a backup ISP connection, and indicate the connection. This connector is disconnected.
Therefore, if RRAS1 is interrupted at 12:58 PM, TMG will check the connection to the original DNS servers at 12:59 PM to 1:00 PM. If both attempts to reconnect fail, this connection will be marked as 'down'. Between 12:58 PM and 1:00 PM, connections are still made through this disconnected ISP.
After the connection of the marked ISP is disconnected, TMG Firewall will check this disconnected ISP every 5 minutes, and when the connection returns, at least two requests must be made within 60 seconds to be performed. successful, this primary connection is considered active again. TMG then creates new connections using the primary ISP connection.
So if RRAS1 is marked as interrupted at 1:00 PM, it will not be checked again until 1:05 PM. At 1:05 PM TMG will conduct a test. If successful, it will check again at 1:06 PM and 1:07 PM. If both tests are successful, the connection will be marked as active again and the connections will be redirected back to that connection.
To check what happened when an ISP was interrupted, we just need to turn off RRAS2, then wait 2 to 3 minutes, we will see in the Dashboard node in the left panel of TMG Firewall , Status will switch to Local (local ).

However there is a problem. When accessing the client and downloading a file, it will automatically switch to RRAS1. Keep in mind that if the client is using a disconnected ISP to access a site, then we need to wait about 2 minutes before the Web page is transferred to the online ISP.
If you check the Alerts tab, we will see a message that says this ISP connection is not working (Figure 17).

In all notifications, only a few are related to ISP Redundancy as shown in Figure 18.

Conclude
In this second part, we looked at how ISP Redundancy works, how to install the NIC to prepare for ISP Redundancy, and how to configure this feature. Note that this series of articles covers a specific case in which dedicated NICs are used for each ISP. However, this is not a mandatory condition. We can include both ISP's Gateway and IP addresses in a single NIC.
Next we will learn how the ISP Reducdancy feature works. The first object will be the Dashboard . Here we can see information about Network Status for ISP connections. In Figure 13, we can see Status , Uptime and Bytes / Sec (Byte speed per second) being used by every ISP.
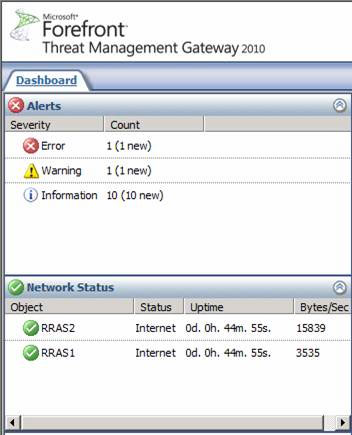
Figure 13
What do we have to do to change ISP Redundancy settings? Just click on the Networking node in the left panel of TMG Firewall Console and then double-click the ISP connection you want to change. In Figure 14, we can see the General tab of the dialog box RRAS1 Properties . Here we can change the Name , Gateway IP Address , Mask , Subnet , Connectivity Detection and Load Balancing Ratio .
Note that Connectivity Detection is not displayed in this Wizard. It has three options, including:
- Disable, connection is down . This option cancels the process of checking whether the ISP is working and disabling the ISP connection. We can use this option if we want to disable this ISP for a certain period of time.
- Disbale, connection is up . This option aborts the process of checking whether the ISP is active or not, but will let this connection work. We can use this option in case we want to use ISP connection all the time without paying attention to the state of this connection.
- Enabled . This is the default option.
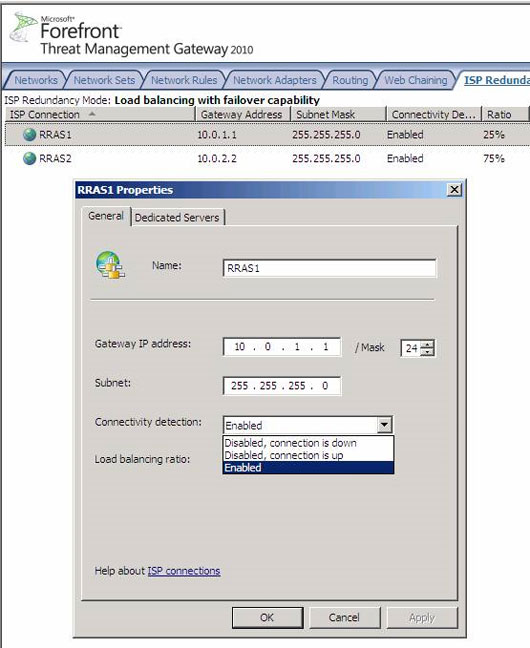
Figure 14
We can confirm this by examining part of Netmon as shown in Figure 15. IP addresses 10.0.2.3 and 10.0.1.3 are the external addresses on the TMG Firewall connecting to each ISP connection. The destination address 192.33.4.12 is the IP address of one of the original DNS servers on the Internet. However, they are not DNS queries, but are connections via TCP port 53 to the original DNS servers. If we check the decryption section, we will see that there is no information about the DNS protocol. We only see a three-way connection.

Figure 15
The method that TMG Firewall determines a connection to be disconnected and how does it determine a connection to work again?
Many servers are probed to confirm whether there is a connection problem through a particular ISP. If many of the original DNS servers cannot respond to a specific ISP, TMG will retry this connection (up to three times) every 60 seconds before switching to a backup ISP connection, and indicate the connection. This connector is disconnected.
Therefore, if RRAS1 is interrupted at 12:58 PM, TMG will check the connection to the original DNS servers at 12:59 PM to 1:00 PM. If both attempts to reconnect fail, this connection will be marked as 'down'. Between 12:58 PM and 1:00 PM, connections are still made through this disconnected ISP.
After the connection of the marked ISP is disconnected, TMG Firewall will check this disconnected ISP every 5 minutes, and when the connection returns, at least two requests must be made within 60 seconds to be performed. successful, this primary connection is considered active again. TMG then creates new connections using the primary ISP connection.
So if RRAS1 is marked as interrupted at 1:00 PM, it will not be checked again until 1:05 PM. At 1:05 PM TMG will conduct a test. If successful, it will check again at 1:06 PM and 1:07 PM. If both tests are successful, the connection will be marked as active again and the connections will be redirected back to that connection.
To check what happened when an ISP was interrupted, we just need to turn off RRAS2, then wait 2 to 3 minutes, we will see in the Dashboard node in the left panel of TMG Firewall , Status will switch to Local (local ).
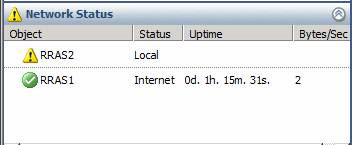
Figure 16
However there is a problem. When accessing the client and downloading a file, it will automatically switch to RRAS1. Keep in mind that if the client is using a disconnected ISP to access a site, then we need to wait about 2 minutes before the Web page is transferred to the online ISP.
If you check the Alerts tab, we will see a message that says this ISP connection is not working (Figure 17).
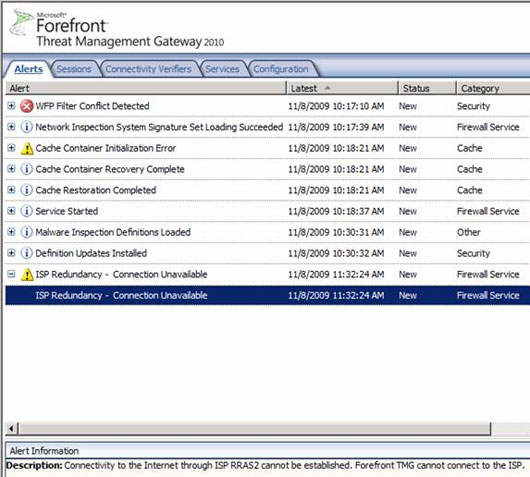
Figure 17
In all notifications, only a few are related to ISP Redundancy as shown in Figure 18.
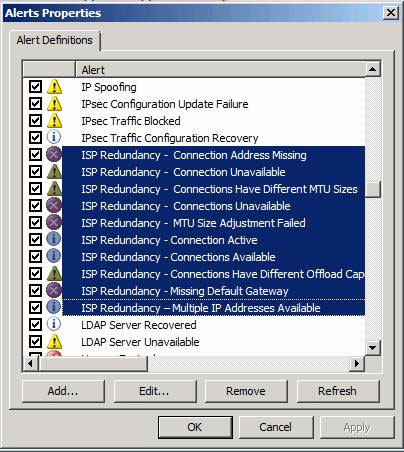
Figure 18
Conclude
In this second part, we looked at how ISP Redundancy works, how to install the NIC to prepare for ISP Redundancy, and how to configure this feature. Note that this series of articles covers a specific case in which dedicated NICs are used for each ISP. However, this is not a mandatory condition. We can include both ISP's Gateway and IP addresses in a single NIC.
Share by
Micah Soto
Update 26 May 2019